
顺序编程——即程序中的所有事物在任意时刻都只能执行一个步骤。编程问题中相当大的一部分都可以通过使用顺序编程来解决。然而,对于某些问题,如果能够并行地执行程序中的多个部分,则会变得非常方便甚至非常必要,因为这些部分要么看起来在并发地执行,要么在多处理器环境下可以同时执行。
并行编程可以使程序执行速度得到极大提高,或者为设计某些类型的程序提供更易用的模型,或者两者皆有。但是,熟练掌握并发编程理论和技术,对于程序员来说,是一种飞跃,并且是通向高级主题的桥梁。本文只能作为一个介绍,即便融会贯通了本文的内容,也绝不意味着你就是一个优秀的并发程序员了。
正如你应该看到的,当并行执行的任务彼此开始产生互相干涉时,实际的并发问题就会接踵而至。这可能会以一种微妙而偶然的方式发生,我们可以很公正的说,并发“具有可论证的确定性,但是实际上具有不可确定性”。这就是说,你可以得出结论,通过仔细设计和代码审查,编写能够正确工作的并发程序是可能的。但是,在实际情况中,更容易发生的情况是所编写的并发程序在给定适当条件的时候,将会工作失败。这些条件可能从来都不会实际发生,或者发生得不是很频繁,以至于在测试过程中不会碰上它们。实际上,你可能无法编写出能够针对你的并发程序生成故障条件的测试代码。所产生的故障经常是偶尔发生的,并且经常是以客户抱怨的形式出现的。这是研究并发问题的最强理由:如果视而不见,你就会遭其反噬。
因此,并发看起来充满了危险,如果你对它有些畏惧,这可能是件好事。尽管Java SE5在并发方面做出了显著的改进,但是仍旧没有像编译期验证或检查型异常这样的安全网,在你犯错误的时候告诉你。使用并发时,你得自食其力,并且只有变得多疑而自信,才能用Java编写出可靠的多线程代码。
遗憾的是,你无法选择何时在你的Java程序中出现线程。仅仅是你自己没有启动线程并不代表你就可以回避编写使用线程的代码。例如,Web系统是最常见的Java应用系统之一,而基本的Web库类、Servlet具有天生的多线程性——这很重要,因为Web服务器经常包含多个处理器,而并发是充分利用这些处理器的理想方式。即便是像Servlet这样看起来很简单的情况,你也必须理解并发问题,从而能正确地使用它们。
Java是一种多线程语言,并且提出了并发问题,不管你是否意识到了。因此,有很多使用中的Java程序,要么只是偶尔工作,要么在大多数时间里工作,并且会由于未发现的并发缺陷而是不是地神秘崩溃。有时这种崩溃是温和的,但有时却意味着重要数据的丢失,并且如果没有意识到并发问题,你可能最终会认为问题出在其他什么地方,而不是你的软件中。如果程序被迁移到多处理器系统中,这些种类的问题还会被暴露或放大。基本上,了解并发可以使你意识到明显正确的程序可能会展示出不正确的行为。
学习并发编程就像进入了一个全新的领域,有点类似于学习一门新的编程语言,或者至少是学习一整套新的语言概念。要理解并发编程,其难度与理解面向对象编程差不多。如果你花点儿功夫,就能明白其基本机制,但要想真正地掌握它的实质,就需要深入的学习和理解。本文的目标就是要让读者对并发的基本知识打下坚实的基础,从而能够理解其概念并编写出合理的多线程程序。注意,你可能很容易就会变得过分自信,在编写任何复杂程序之前,应该学习一下专门讨论这个主题的书籍。
1.并发的多面性
并发编程令人困惑的一个主要原因是:使用并发时需要解决的问题有多个,而实现并发的方式也有多种,并且在这两者之间没有明显的映射关系(而且通常只具有模糊的界线)。因此,你必须理解所有这些问题和特例,以便有效地使用并发。
用并发解决的问题大体上可以分为“速度”和“设计可管理性”两种。
1.1 更快的执行
速度问题初听起来很简单:如果你想要一个程序运行得更快,那么可以将其断开为多个片段,在单独的处理器上运行每个片段。并发是用于多处理器编程的基本工具。当前,摩尔定律已经有些过时了(至少对于传统芯片是这样),速度提高是以多核处理器的形式而不是更快的芯片的形式出现的。为了使程序运行得更快,你必须学习如何利用这些额外的处理器,而这正是并发赋予你的能力。
如果你有一台多处理器的机器,那么就可以在这些处理器之间分布多个任务,从而可以极大地提高吞吐量。这是使用强有力的多处理器Web服务器的常见情况,在为每个请求分配一个线程的程序中,它可以将大量的用户请求分布到多个CPU上。
但是,并发通常是提高运行在单处理器上的程序的性能。
这听起来有些违背直觉。如果你自己考虑一下就会发现,在单处理器上运行的并发程序开销确实应该比该程序的所有部分都顺序执行的开销大,因为其中增加了所谓上下文切换的代码(从一个任务切换到另一个任务)。表面上看,将程序的所有部分当做单个的任务运行好像是开销更小一点,并且可以节省上下文切换的代价。
使这个问题变得有些不同的是阻塞。如果程序中的某个任务因为该程序控制范围之外的某些条件(通常是I/O)而导致不能继续执行,那么我们就说这个任务或线程阻塞了。如果没有并发,则整个程序都将停止下来,直至外部条件发生变化。但是,如果使用并发来编写程序,那么当一个任务阻塞时,程序中的其他任务还可以继续执行,因此这个程序可以保持继续向前执行,事实上,从性能角度看,如果没有任务会阻塞,那么在单处理器机器上使用并发就没有任何意义。
在单处理器系统中的性能提高的常见示例是事件驱动的编程。实际上,使用并发最吸引人的一个原因就是要产生具有可响应的用户界面。考虑这样一个程序,它因为将执行某些长期运行的操作,所以最终用户输入会被忽略,从而成为不可响应的程序。如果有一个“退出”按钮,那么你肯定不想在你写的每一段代码中都检查它的状态。因为这会产生非常尴尬的代码,而我们也无法保证程序员不会忘记这种检查。如果不使用并发,则产生可响应用户界面的唯一方式就是所有的任务都周期性地检查用户输入。通过创建单独的执行线程来响应用户的输入,即使这个线程在大多数时间里都是阻塞的,但是程序可以保证具有一定程度的可相应性。
程序需要连续执行它的操作,并且同时需要返回队用户界面的控制,以便使程序可以响应用户。但是传统的方法在连续执行其操作的同时,返回对程序其余部分的控制。事实上,这听起来就像是不可能之事,好像CPU必须同时位于两处一样,但是这完全是并发造成的一种错觉(在多处理器系统中,这就不只是一种幻觉了)。
实现并发最直接的方式是在操作系统级别使用进程。进程是运行在它自己的地址空间内的自包容的程序。多任务操作系统可以通过周期性地将CPU从一个进程切换到另一个进程,来实现同时运行多个进程(程序),尽管这使得每个进程看起来在其执行过程中都是歇歇停停。进程总是很吸引人,因为操作系统通常会将进程互相隔离开,因此它们不会彼此干涉,这使得用进程编程相对容易一些。与此相反的是,像Java所使用的这种并发系统会共享诸如内存和I/O这样的资源,因此编写多线程程序最基本的困难在于协调不同线程驱动的任务之间对这些资源的使用,以使得这些资源不会同时被多个任务访问。
这里有一个利用操作系统进程的简单示例。在编写本文时,我会有规律地创建本文当前状态的多个冗余备份副本。我会在本地目录中保存一个副本,在记忆棒上保存一个副本,在Zip盘上保存一个副本,还会在远程FTP站点上保存一个副本。为了自动化这个过程,我还编写了一个小程序(用Python写的,但是其概念是相同的),它会把本文压缩成一个文件,其文件名中带有版本号,然后执行赋值操作。最初,我会顺序执行所有的复制操作,在启动下一个复制操作之前先等待前一个操作的完成。但随后我意识到,每个复制操作会依存储介质I/O速度的不同而花费不同的时间。既然我在使用多任务操作系统,那就可以将每个赋值操作当做单独的进程来启动,并让它们并行地运行,这样可以加速整个程序的执行速度。当一个进程受阻时,另一个进程可以继续向前执行。
这是并发的理想示例。每个任务都作为进程在其自己的地址空间中执行,因此任务之间根本不可能互相干涉。更重要的是,对进程来说,它们之间没有任何彼此通信的需要,因为它们都是完全独立的。操作系统会处理确保文件正确复制的所有细节,因此,不会有任何风险,你可以获得更快的程序,并且完全免费。
有些人走的更远,提倡将进程作为唯一合理的并发方式,但遗憾的是,对进程通常会有数量和开销的限制,以避免它们在不同的并发系统之间的可应用性。
某些编程语言被设计为可以将并发任务彼此隔离,这些语言通常被称为函数型语言,其中每个函数调用都不会产生任何副作用(并因此而不能干涉其他函数),并因此可以当做独立的任务来驱动。Erlang就是这样的语言,它包含针对任务之间彼此通信的安全机制。如果你发现程序中某个部分必须大量使用并发,并且你在试图构建这个部分时碰到了过多的问题,那么你可以考虑使用像Erlang这类专门的并发语言来创建这部分。
Java采取了更加传统的方式,在顺序型语言的基础上提供对线程的支持。与在多任务操作系统中分叉外部进程不同,线程机制是在由执行程序表示的单一进程中创建任务。这种方式产生的一个好处是操作系统的透明性,这对Java而言,是一个重要的设计目标。例如,在OSX之前的Macintosh操作系统版本(Java第一个版本的一个非常重要的目标系统)不支持多任务,因此,除非在Java中添加多线程机制,否则任何并发的Java程序都无法移植到Macintosh和类似的平台之上,这样就会打破“编写一次,到处运行”的要求。
1.2 改进代码设计
在单CPU机器上使用多任务的程序在任意时刻仍旧只在执行一项工作,因此从理论上讲,肯定可以不用任何任务而编写出相同的程序。但是并发提供了一个重要的组织结构上的好处:你的程序设计可以极大地简化某些类型的问题,例如仿真,没有并发的支持是很难解决的。
大多数人都看到过至少一种形式的仿真,例如计算机游戏或电影中计算机生成的动画。仿真通常涉及许多交互式元素,每一个都有“其自己的想法”。尽管你可能注意到了这一点,但是在单处理器机器上,每个仿真元素都是由这个处理器驱动执行的,从编程的角度看,模拟每个仿真元素都尤其自己的处理器并且都是独立的任务,这种方式要容易得多。
完整的仿真可能涉及非常大量的任务,这与仿真中的每个元素都可以独立动作这一事实相对应——这其中包含门和岩石,而不仅仅只是精灵和巫师。多线程系统对可用的线程数量的限制通常都会是一个相对较小的数字,有时就是数十或数百这样的数量级。这个数字在程序控制范围之外可能会发生变化——它可能依赖于平台,或者在Java中,依赖于Java的版本。在Java中,通常要假定你不会获得足够的线程,从而使得可以为大型仿真系统中的每个元素都提供一个线程。
解决这个问题的典型方式是使用协作多线程。Java的线程机制是抢占式的,这表示调度机制会周期性地中断线程,将上下文切换到另一个线程,从而为每个线程都提供时间片段,使得每个线程都会分配到数量合理的时间去驱动它的任务。在协作式系统中,每个任务都会自动地放弃控制,这要求程序员要有意识地在每个任务中插入某种类型的让步语句。协作式系统的优势是双重的:上下文切换的开销通常比抢占式系统要低廉许多,并且对可以同时执行的线程数量在理论上没有任何限制。当你处理大量的仿真元素时,这是一种理想的解决方案。但是注意,某些协作式系统并未设计为可以在多个处理器之间分布任务,这可能会非常受限。
在另一个极端,当你用流行的消息系统工作时,由于消息系统涉及分布在整个网络中的多台独立的计算机,因此并发就会成为一种非常有用的模型,因为它是实际发生的模型。在这种情形中,所有的进程都彼此完全独立地运行,甚至没有任何可能去共享资源。但是,你仍旧必须在进程间同步信息,使得整个消息系统不会丢失信息活在错误的时刻混进信息。即使你没有打算在眼前大量使用并发,理解并发也会很有用,因为你可以掌握基于消息机制的架构,这些架构在创建分布式系统时是更主要的方式。
并发需要付出代价,包含复杂性代价,但是这些代价与在程序设计、资源负载均衡以及用户方便使用方面的改进相比,就显得微不足道了。通常,线程使你能够创建更加松散耦合的设计,否则,你的代码中各个部分都必须显式地关注那些通常可以由线程来处理的任务。
2.基本的线程机制
并发编程使我们可以将程序划分为多个分离的、独立运行的任务。通过使用多线程机制,这些独立任务(也被称为子任务)中的每一个都将由执行线程来驱动。一个线程就是在进程中的一个单一的顺序控制流,因此,单个进程可以拥有多个并发执行的任务,但是你的程序使得每个任务都好像有其自己的CPU一样。其底层机制是切分CPU时间,但通常你不需要考虑它。
线程模型为编程带来的便利,它简化了在单一程序中同时交织在一起的多个操作的处理。在使用线程时,CPU将轮流给每个任务分配其占用时间。每个任务都觉得自己在一直占用CPU,但事实上CPU时间是划分成片段分配给了所有的任务(例外情况是程序确实运行在多个CPU之上)。线程的一大好处是可以使你从这个层次抽身出来,即代码不必知道它是运行在具有一个还是多个CPU的机器上。所以,使用线程机制是一种建立透明的、可扩展的程序的方法,如果程序运行得太慢,为机器增添一个CPU就能很容易加快程序的运行速度。多任务和多线程往往是使用多处理器的最合理方式。
2.1 定义任务
线程可以驱动任务,因此你需要一种描述任务的方式,这可以由Runnable接口来提供。要想定义任务,只需实现Runnable接口并编写run()方法,使得该任务可以执行你的命令。例如,下面的LiftOff任务将显示发射之前的倒计时:
package com.zjwave.thinkinjava.concurrency;

public class LiftOff implements Runnable{

    protected int countDown = 10;//Default
    private static int taskCount = 0;
    private final int id = taskCount++;

    public LiftOff() {
    }

    public LiftOff(int countDown) {
        this.countDown = countDown;
    }

    public String status(){
        return "#" + id + "(" + (countDown > 0 ? countDown : "Liftoff!)") + "), ";
    }


    @Override
    public void run() {
        while (countDown-- > 0){
            System.out.print(status());
            Thread.yield();
        }
    }
}
标识符id可以用来区分任务的多个实例,它是final的,因为它一旦被初始化之后就不希望被修改。
任务的run()方法通常总会有某种形式的循环,使得任务一直运行下去直到不再需要,所以要设定跳出循环的条件(有一种选择是直接从run()返回)。通常,run()被写成无限循环的形式,这就意味着,除非有某个条件使得run()终止,否则它将永远运行下去(在本文后面将会看到如何安全地终止线程)。
在run()中对静态方法Thread.yield()的调用是对线程调度器(Java线程机制的一部分,可以将CPU从一个线程转移给另一个线程)的一种建议,它在圣经:“我已经执行完生命周期中最重要的部分了,此刻正是切换给其他任务执行一段时间的大好时机。”这完全是选择性的,但是这里使用它是因为它会在这些事例中产生更加有趣的输出:你更可能会看到任务换进换出的证据。
在下面的实例中,这个任务的run()不是由单独的线程驱动的,它是在main()中直接调用的(实际上,这里仍旧使用了线程,即总是分配给main()的那个线程):
package com.zjwave.thinkinjava.concurrency;

public class MainThread {
    public static void main(String[] args) {
        LiftOff launch = new LiftOff();
        launch.run();
    }
}

当从Runnable导出一个类时,它必须具有run()方法,但是这个方法并无特殊之处——它不会产生任何内在的线程能力。要实现线程行为,你必须显式地将一个任务附着到线程上。
2.2 Thread类
将Runnable对象转变为工作任务的传统方式是把它交给一个Thread构造器,下面的示例展示了如何使用Thread来驱动LiftOff对象:
package com.zjwave.thinkinjava.concurrency;

public class BasicThreads {
    public static void main(String[] args) {
        Thread t = new Thread(new LiftOff());
        t.start();
        System.out.println("Waiting for LiftOff");
    }
}

Thread构造器只需要一个Runnable对象。调用Thread对象的start()方法为该线程执行必须的初始化操作,然后调用Runnable的run()方法,以便在这个新线程中启动该任务。尽管start()看起来是产生了一个对长期运行方法的调用,但是从输出中可以看到,start()迅速地返回了,因为Waiting for LiftOff消息在倒计时完成之前就出现了。实际上,你产生的是对LiftOff.run()的方法调用,并且这个方法还没有完成,但是因为LiftOff.run()是由不同的线程执行的,因此你仍旧可以执行main()线程中的其他操作(这种能力并不局限于main()线程,任何线程都可以启动另一个线程)。因此,程序会同时运行两个方法,main()和LiftOff.run()是程序中与其他线程“同时”执行的代码。
你可以很容易地添加更多的线程去驱动更多的任务。下面,你可以看到所有任务彼此之间是如何互相呼应的:
package com.zjwave.thinkinjava.concurrency;

public class MoreBasicThreads {
    public static void main(String[] args) {
        for (int i = 0; i < 5; i++) {
            new Thread(new LiftOff()).start();
        }
        System.out.println("Waiting for LiftOff");
    }
}

输出说明不同任务的执行在线程被换进换出时混在了一起。这种交换是由线程调度器自动控制的。如果在你的机器上有多个处理器,线程调度器将会在这些处理器之间默默地分发线程。
这个程序一次运行的结果可能与另一次运行的结果不同,因为线程调度机制是非确定性的。事实上,你可以看到,在某个版本的JDK与下个版本之间,这个简单程序的输出会产生巨大的差异。例如,较早 的JDK不会频繁对时间切片,因此线程1可能会首先循环到尽头,然后线程2会经历其所有循环,等等。这实际上与调用一个线程去同时执行所有的循环一样,只是启动所有线程的代价要更加高昂。较晚的JDK看起来会产生更好的时间切片行为,因此每个线程看起来都会获得更加正规的服务。通常,Java并未提及这些种类的JDk的行为变化,因此你不能依赖于任何线程行为的一致性。最好的方式是在编写使用线程的代码时,尽可能地保守。
当main()创建Thread对象时,它并没有捕获任何对这些对象的引用。在使用普通对象时,这对于垃圾回收来说是一场公平的游戏,但是在使用Thread时,情况就不同了。每个Thread都“注册”了它自己,因此确实有一个对它的引用,而且在它的任务退出其run()并死亡之前,垃圾回收器无法清除它。你可以从输出中看到,这些任务确实运行到了结束,因此,一个线程会创建一个单独的执行线程,在对start()的调用完成之后,它仍旧会继续存在。
2.3 使用Executor
Java SE5的java.util.concurrent包中的执行器(Executor)将为你管理Thread对象,从而简化了并发编程。Executor在客户端和任务执行之间提供了一个间接层,与客户端直接执行任务不同,这个中介对象将执行任务。Executor允许你管理异步任务的执行,而无须显式地管理线程的生命周期。Executor在Java SE5/6中的启动任务的优选方法。
我们可以使用Executor来代替在MoreBasicThreads.java中显式地创建Thread对象。LiftOff对象知道如何运行具体的任务,与命令模式一样,它暴露了要执行的单一方法。ExecutorService(具有服务生命周期的Executor,例如关闭)知道如何构建恰当的上下文来执行Runnable对象。在下面的实例中,CachedThreadPool将为每个任务都创建一个线程。注意,ExecutorService对象是使用静态的Executor方法创建的,这个方法可以确定其Executor类型:
package com.zjwave.thinkinjava.concurrency;

import java.util.concurrent.ExecutorService;
import java.util.concurrent.Executors;

public class CachedThreadPool {
    public static void main(String[] args) {
        ExecutorService exec = Executors.newCachedThreadPool();
        for (int i = 0; i < 5; i++) {
            exec.execute(new LiftOff());
        }
        exec.shutdown();
    }
}

非常常见的情况是,单个的Executor被用来创建和管理系统中所有的任务。
对shutdown()方法调用可以防止新任务被提交给这个Executor,当前线程(在本例中,即驱动main()的线程)将继续运行在shutdown()被调用之前提交的所有任务。这个程序将在Executor中的所有任务完成之后尽快退出。
你可以很容易地将前面示例中的CachedThreadPool替换为不同类型的Executor。FixedThreadPool使用了有限的线程集来执行所提交的任务:
package com.zjwave.thinkinjava.concurrency;

import java.util.concurrent.ExecutorService;
import java.util.concurrent.Executors;

public class FixedThreadPool {
    public static void main(String[] args) {
        // Constructor argument is number of threads:
        ExecutorService exec = Executors.newFixedThreadPool(5);
        for (int i = 0; i < 5; i++) {
            exec.execute(new LiftOff());
        }
        exec.shutdown();
    }
}

有了newFixedThreadPool,你就可以一次性预先执行代价高昂的线程分配,因而也就可以限制线程的数量了。这可以节省时间,因为你不用为每个任务都固定地付出创建线程的开销。在事件驱动的系统中,需要线程的事件处理器,通过直接从池中获取线程,也可以如你所愿地尽快得到服务。你不会滥用可获得的资源,因为FixedThreadPool使用的Thread对象的数量是有界的。
注意,在任何线程池中,现有线程在可能的情况下,都会被自动复用。
尽管本文将使用CachedThreadPool,但是也应该考虑在产生线程的代码中使用FixedThreadPool。CachedThreadPool在程序执行过程中通常会创建与所需数量相同的线程,然后在它回收旧线程时停止创建新线程,因此它是合理的Executor的首选。只有当这种方式会引发问题是,你才需要切换到FixedThreadPool。
SingleThreadExecutor就像是线程数量为1的FixedThreadPool。这对于你希望在另一个线程中连续运行的任何事物(长期存活的任务)来说,都是很有用的,例如监听进入的套接字连接的任务。它对于希望在线程中运行的短任务也同样很方便,例如,更新本地或远程日志的小任务,或者是事件分发线程。
如果向SingleThreadExecutor提交了多个任务,那么这些任务将排队,每个任务都会在下一个任务开始之前运行结束,所有的任务将使用相同的线程。在下面的示例中,你可以看到每个任务都是按照它们被提交的顺序,并且是在下一个任务开始之前完成的。因此,SingleThreadExecutor会序列化所有提交给它的任务,并会维护它自己(隐藏)的悬挂任务队列。
package com.zjwave.thinkinjava.concurrency;

import java.util.concurrent.ExecutorService;
import java.util.concurrent.Executors;

public class SingleThreadExecutor {
    public static void main(String[] args) {
        ExecutorService exec = Executors.newSingleThreadExecutor();
        for (int i = 0; i < 5; i++) {
            exec.execute(new LiftOff());
        }
        exec.shutdown();
    }
}

作为另一个示例,假设你有大量的线程,那它们运行的任务将使用文件系统。你可以用SingleThreadExecutor来运行这些线程,以确保任意时刻在任何线程中都只有唯一的任务在运行。在这种方式中,你不需要在共享资源上处理同步(同时不会过度使用文件系统)。有时更好的解决方案是在资源上同步(你将在本文稍后学习),但是SingleThreadExecutor可以让你省去只是为了维持某些事物的原型而进行的各种协调努力。通过序列化任务,你可以消除对序列化对象的需求。
2.4 从任务中产生返回值
Runnable是执行工作的独立任务,但是它不返回任何值。如果你希望任务在完成时能够返回一个值,那么可以实现Callable接口而不是Runnable接口。在Java SE5中引入的Callable是一种具有类型参数的泛型,它的类型参数表示的是从方法call()(而不是run())中返回的值,并且必须使用ExecutorService.submit()方法调用它,下面是一个简单示例:
package com.zjwave.thinkinjava.concurrency;

import java.util.ArrayList;
import java.util.List;
import java.util.concurrent.*;

public class CallableDemo {
    public static void main(String[] args) {
        ExecutorService exec = Executors.newCachedThreadPool();
        List<Future<String>> results = new ArrayList<>();
        for (int i = 0; i < 10; i++) {
            results.add(exec.submit(new TaskWithResult(i)));
        }
        for (Future<String> fs : results) {
            try {
                System.out.println(fs.get());
            } catch (InterruptedException e) {
                System.out.println(e);
                return;
            } catch (ExecutionException e) {
                System.out.println(e);
            }finally {
                exec.shutdown();
            }
        }
    }
}

class TaskWithResult implements Callable<String>{

    private int id;

    public TaskWithResult(int id) {
        this.id = id;
    }

    @Override
    public String call() throws Exception {
        return "result of TaskWithResult " + id;
    }
}

submit()方法产生Future对象,它用Callable返回结果的特定类型进行了参数化。你可以用isDone()方法来查询Future是否已经完成。当任务完成时,它具有一个结果,你可以调用get()方法来获取该结果。你也可以不用isDone()进行检查就直接调用get(),在这种情况下,get()将阻塞,直至结果准备就绪。你还可以在试图调用get()来获取结果之前,先调用具有超时的get(),或者调用isDone()来查看任务是否完成。
2.5 休眠
影响任务行为的一种简单方法是调用sleep(),这将使任务中止执行给定的时间。在LiftOff类中,要是把对yield()的调用换成是调用sleep(),将得到如下结果:
package com.zjwave.thinkinjava.concurrency;

import java.util.concurrent.ExecutorService;
import java.util.concurrent.Executors;
import java.util.concurrent.TimeUnit;

public class SleepingTask extends LiftOff {
    @Override
    public void run() {
        try {
            while (countDown-- > 0){
                System.out.print(status());
                // Old-style:
                Thread.sleep(100);
                // Java SE5/6 style:
                TimeUnit.MILLISECONDS.sleep(100);
            }
        }catch (InterruptedException e){
            System.err.println("Interrupted");
        }
    }

    public static void main(String[] args) {
        ExecutorService exec = Executors.newCachedThreadPool();
        for (int i = 0; i < 5; i++) {
            exec.execute(new SleepingTask());
        }
        exec.shutdown();
    }
}

对sleep()的调用可以抛出InterruptedException异常,并且你可以看到,它在run()中被捕获。因为异常不能跨线程传播回main(),所以你必须在本地处理所有任务内部产生的异常。
Java SE5引入了更加显式的sleep()版本,作为TimeUnit类的一部分,就像上面实例所示的那样。这个方法允许你指定sleep()延迟的时间单元,因此可以提供更好的可阅读性。TimeUnit还可以被用来执行转换,就像稍后你会看到的那样。
你可能会注意到,这些任务是按照“完美的分布”顺序运行的。这是有意义的,因为在每个打印语句之后,每个任务都将要睡眠(即阻塞),这使得线程调度器可以切换到另一个线程,进而驱动另一个任务。但是,顺序行为依赖于底层的线程机制,这种机制在不同的操作系统之间是有差异的,因此,你不能依赖于它。如果你必须控制任务执行的顺序,那么最好的押宝就是使用同步控制(稍后描述),或者在某些情况下,压根不使用线程,但是要编写自己的协作例程,这些例程将会按照指定的顺序在互相之间传递控制权。
2.6 优先级
线程的优先级将该线程的重要性传递给了调度器。尽管CPU处理现有线程集的顺序是不确定的,但是调度器将倾向于让优先权最高的线程先执行。然而,这并不是意味着优先权较低的线程将得不到执行(也就是说,优先权不会导致死锁)。优先级较低的线程仅仅是执行的频率较低。
在绝大多数时间里,所有线程都应该以默认的优先级运行。试图操纵线程优先级通常是一种错误。
下面是一个演示优先级等级的示例,你可以用getPriority()来读取现有线程的优先级,并且在任何时刻都可以通过setPriority()来修改它。
package com.zjwave.thinkinjava.concurrency;

import java.util.concurrent.ExecutorService;
import java.util.concurrent.Executors;

public class SimplePriorities implements Runnable{

    private int countDown = 5;
    private volatile double d;//No optimization
    private int priority;

    public SimplePriorities(int priority) {
        this.priority = priority;
    }

    @Override
    public String toString() {
        return Thread.currentThread() + ": " + countDown;
    }

    @Override
    public void run() {
        Thread.currentThread().setPriority(priority);
        while (true){
            // An expensive , interruptable operation
            for (int i = 0; i < 100000; i++) {
                d += (Math.PI + Math.E) / (double) i;
                if(i % 1000 == 0){
                    Thread.yield();
                }
            }
            System.out.println(this);
            if(--countDown == 0){
                return;
            }
        }
    }

    public static void main(String[] args) {
        ExecutorService exec = Executors.newCachedThreadPool();
        for (int i = 0; i < 5; i++) {
            exec.execute(new SimplePriorities(Thread.MIN_PRIORITY));
        }
        exec.execute(new SimplePriorities(Thread.MAX_PRIORITY));
        exec.shutdown();
    }
}

toString()方法被覆盖,以便使用Thread.toString()方法来打印线程的名称、线程的优先级以及线程所属的“线程组”。你可以通过构造器来自己设置这个名称,这里是自动生成的名称,如pool-1-thread-1,pool-1-thread-2等。覆盖后的toString()方法还打印了线程的倒计数值。注意,你可以在一个任务的内部,通过调用Thread.currentThread()来获得对驱动该任务的Thread对象的引用。
可以看到,最后一个线程的优先级最高,其余所有线程的优先级被设为最低。注意,优先级是在run()的开头部分设定的,在构造其中设置它们不会有任何好处,因为Executor在此刻还没有开始执行任务。
在run()里,执行了100000次开销相当大的浮点运算,包括double类型的加法与除法。变量d是volatile的,以努力确保不进行任何编译器优化。如果没有加入这些运算的话,就看不到设置优先级的效果(试一试:把包含double运算的for循环注释掉)。有了这些运算,就能观察到优先级为MAX_PRIORITY的线程被线程调度器优先选择。尽管向控制台打印也是开销较大的操作,但在那种情况下看不出优先级的效果,因为想控制台打印不能被中断(否则的话,在多线程情况下控制台显示就乱套了),而数学运算是可以中断的。这里运算时间足够的长,因此线程调度机制才来得及介入,交换任务并关注优先级,是的最高优先级线程被优先选择。
尽管JDK有10个优先级,但它与多数操作系统都不能映射得很好。比如,Windows有7个优先级切不是固定的,所以这种映射关系也是不确定的。唯一可移植的方法是当调整优先级的时候,只使用MAX_PRIORITY、NORM_PRIORITY和MIN_PRIORITY三种级别。
2.7 让步
如果知道已经完成了在run()方法的循环的一次迭代过程中所需的工作,就可以给线程调度机制一个暗示:你的工作已经做的差不多了,可以让别的线程使用CPU了。这个暗示将通过调用yield()方法来作出(不过这只是一个暗示,没有任何机制保证它将会被采纳)。当调用yield()时,你也是在建议具有相同优先级的其他线程可以运行。
LiftOff.java使用yield()在各种不同的LiftOff任务之间产生分布良好的处理机制。尝试着注释掉LiftOff.run()中的Thread.yield()。实际上,yield()经常被误用。
2.8 后台线程
所谓后台(daemon)线程(通常也称为守护线程),是指在程序运行的时候在后台提供一种通用服务的线程,并且这种线程并不属于程序中不可或缺的一部分。因此,当所有的非后台线程结束时,程序也就终止了,同时会杀死进程中的所有后台线程。反过来说,只要有任何非后台线程还在运行,程序就不会终止。比如,执行main()的就是一个非后台线程。
package com.zjwave.thinkinjava.concurrency;

import java.util.concurrent.TimeUnit;

public class SimpleDaemons implements Runnable {
    @Override
    public void run() {
        try {
            while (true) {
                TimeUnit.MILLISECONDS.sleep(100);
                System.out.println(Thread.currentThread() + " " + this);
            }
        } catch (InterruptedException e) {
            System.out.println("sleep() interrupted");
        }
    }

    public static void main(String[] args) throws InterruptedException {
        for (int i = 0; i < 10; i++) {
            Thread daemon = new Thread(new SimpleDaemons());
            daemon.setDaemon(true);
            daemon.start();
        }
        System.out.println("All daemons started");
        TimeUnit.MILLISECONDS.sleep(175);
    }
}

必须在线程启动之前调用setDaemon()方法,才能把它设置为后台线程。
一旦main()完成其工作,就没什么能阻止程序终止了,因为除了后台线程之外,已经没有线程在运行了。main()线程被设定为短暂休眠,所以可以观察到所有后台线程启动后的结果。不这样的话,你就只能看见一些后台线程创建时得到的结果(试试调整sleep()休眠的时间,以观察这个行为)。
SimpleDaemons.java创建了显式的线程,以便可以设置它们的后台标志。通过编写定制的ThreadFactory可以定制由Executor创建的线程的属性(后台、优先级、名称):
package com.zjwave.thinkinjava.concurrency;

import java.util.concurrent.ThreadFactory;

public class DaemonThreadFactory implements ThreadFactory {
    @Override
    public Thread newThread(Runnable r) {
        Thread t = new Thread(r);
        t.setDaemon(true);
        return t;
    }
}
每个静态的ExecutorService创建方法都被重载为接受一个ThreadFactory对象,而这个对象将被用来创建新的线程:
package com.zjwave.thinkinjava.concurrency;

import java.util.concurrent.SynchronousQueue;
import java.util.concurrent.ThreadPoolExecutor;
import java.util.concurrent.TimeUnit;

public class DaemonThreadPoolExecutor extends ThreadPoolExecutor {

    public DaemonThreadPoolExecutor() {
        super(0, Integer.MAX_VALUE, 60L, TimeUnit.SECONDS, new SynchronousQueue<>(),new DaemonThreadFactory());
    }
}
可以通过调用isDaemon()方法来确定线程是否是一个后台线程。如果是一个后台线程,那么它创建的任何线程将被自动设置成后台线程,如下例所示。
package com.zjwave.thinkinjava.concurrency;

import java.util.concurrent.TimeUnit;

public class Daemons {
    public static void main(String[] args) throws InterruptedException {
        Thread d = new Thread(new Daemon());
        d.setDaemon(true);
        d.start();
        System.out.print("d.isDaemon() = " + d.isDaemon() + ", ");
        // Allow the daemon threads to
        // finish their startup processes:
        TimeUnit.SECONDS.sleep(1);
    }
}

class Daemon implements Runnable{

    private Thread[] t = new Thread[10];

    @Override
    public void run() {
        for (int i = 0; i < t.length; i++) {
            t[i] = new Thread(new DaemonSpawn());
            t[i].start();
            System.out.print("DaemonSpawn " + i + " started. ");
        }
        for (int i = 0; i < t.length; i++) {
            System.out.print("t[" + i +"].isDaemon() = " + t[i].isDaemon() +", ");
        }
        while (true){
            Thread.yield();
        }
    }
}

class DaemonSpawn implements Runnable{

    @Override
    public void run() {
        while (true){
            Thread.yield();
        }
    }
}

Daemon线程被设置成了后台模式,然后派生出许多子线程,这些线程并没有被显式地设置为后台模式,不过它们的确是后台线程。接着,Daemon线程进入了无限循环,并在循环里调用yield()方法把控制权交给其他进程。
你应该意识到后台进程在不执行finally子句的情况下就会终止其run()方法:
package com.zjwave.thinkinjava.concurrency;

import java.util.concurrent.TimeUnit;

public class DaemonsDontRunFinally {
    public static void main(String[] args) {
        Thread t = new Thread(new ADaemon());
        t.setDaemon(true);
        t.start();
    }
}

class ADaemon implements Runnable{

    @Override
    public void run() {
        try {
            System.out.println("Starting ADaemon");
            TimeUnit.SECONDS.sleep(3);
        }catch (InterruptedException e){
            System.out.println("Exiting via InterruptedException");
        }finally {
            System.out.println("This should always run?");
        }
    }
}
当你运行这个程序时,你将看到finally子句就不会执行,但是如果你注释掉对setDaemon()的调用,就会看到finally子句将会执行。
这种行为是正确的,即便你基于前面对finally给出的承诺,并不希望出现这种行为,但情况仍将如此。当最后一个非后台线程终止时,后台线程会“突然”终止。因此一旦main()退出,JVM就会立即关闭所有的后台进程,而不会有任何你希望出现的确认形式。因为你不能以优雅的方式来关闭后台线程。所以它们几乎不是一种好的思想。非后台的Executor通常是一种更好的方式,因为Executor控制的所有任务可以同时被关闭。在这种情况下,关闭将以有序的方式执行。
2.9 编码的变体
到目前为止,在你所看到的示例中,任务类都实现了Runnable。在非常简单的情况下,你可能会希望使用直接从Thread继承这种可替换的方式,就像下面这样:
package com.zjwave.thinkinjava.concurrency;

public class SimpleThread extends Thread {
    private int countDown = 5;
    private static int threadCount = 0;

    public SimpleThread() {
        // Store the thread name:
        super(Integer.toString(++threadCount));
        start();
    }

    @Override
    public String toString() {
        return "#" + getName() + "(" + countDown + "), ";
    }

    @Override
    public void run() {
        while (true){
            System.out.print(this);
            if(--countDown == 0){
                return;
            }
        }
    }

    public static void main(String[] args) {
        for (int i = 0; i < 5; i++) {
            new SimpleThread();
        }
    }
}
你可以通过调用适当的Thread构造器为Thread对象赋予具体的名称,这个名称可以通过使用getName()从toString()中获得。
另一种可能会看到的惯用法是自管理的Runnable:
package com.zjwave.thinkinjava.concurrency;

public class SelfManaged implements Runnable {

    private int countDown = 5;
    private Thread t = new Thread(this);

    public SelfManaged() {
        t.start();
    }

    @Override
    public String toString() {
        return Thread.currentThread().getName() + "(" + countDown + "), ";
    }

    @Override
    public void run() {
        while (true){
            System.out.print(this);
            if(--countDown == 0){
                return;
            }
        }
    }

    public static void main(String[] args) {
        for (int i = 0; i < 5; i++) {
            new SelfManaged();
        }
    }
}

这与从Thread继承并没有什么特别的差异,只是语法稍微晦涩一些。但是,实现接口使得你可以继承另一个不同的类,而从Thread继承将不行。
注意,start()是在构造器中调用的。这个示例相当简单,因此可能是安全的,但是你应该意识到,在构造器中启动线程可能会变得很有问题,因为另一个任务可能会在构造器结束之前开始执行,这意味着该任务能够访问处于不稳定状态的对象。这是优选Executor而不是显式地创建Thread对象的另一个原因。
有时通过使用内部类来将线程代码隐藏在类中将会很有用,就像下面这样:
package com.zjwave.thinkinjava.concurrency;

import java.util.concurrent.TimeUnit;

public class ThreadVariations {
    public static void main(String[] args) {
        new InnerThread1("InnerThread1");
        new InnerThread2("InnerThread2");
        new InnerRunnable1("InnerRunnable1");
        new InnerRunnable2("InnerRunnable2");
        new ThreadMethod("ThreadMethod").runTask();
    }
}

// Using a named inner class:
class InnerThread1{
    private int countDown = 5;
    private Inner inner;

    public InnerThread1(String name){
        inner = new Inner(name);
    }

    private class Inner extends Thread{
        Inner(String name) {
            super(name);
            start();
        }

        public void run(){
            try {
                while (true){
                    System.out.println(this);
                    if(--countDown == 0){
                        return;
                    }
                    sleep(10);
                }
            } catch (InterruptedException e) {
                System.out.println("sleep() interrupted");
            }
        }

        @Override
        public String toString() {
            return getName() + ": " + countDown;
        }
    }

}

// Using an anonymous inner class;
class InnerThread2{
    private int countDown = 5;
    private Thread t;

    public InnerThread2(String name) {
        t = new Thread(name){
            @Override
            public void run() {
                try {
                    while (true){
                        System.out.println(this);
                        if(--countDown == 0){
                            return;
                        }
                        sleep(10);
                    }
                } catch (InterruptedException e) {
                    System.out.println("sleep() interrupted");
                }
            }

            @Override
            public String toString() {
                return getName() + ": " + countDown;
            }
        };
        t.start();
    }
}


//Using a named Runnable implementation:
class InnerRunnable1{
    private int countDown = 5;
    private Inner inner;

    public InnerRunnable1(String name) {
        inner = new Inner(name);
    }

    private class Inner implements Runnable{
        Thread t;

        Inner(String name) {
            t = new Thread(this,name);
            t.start();
        }

        @Override
        public void run() {
            try {
                while (true){
                    System.out.println(this);
                    if(--countDown == 0){
                        return;
                    }
                    TimeUnit.MILLISECONDS.sleep(10);
                }
            } catch (InterruptedException e) {
                System.out.println("sleep() interrupted");
            }
        }

        @Override
        public String toString() {
            return t.getName() + ": " + countDown;
        }
    }
}

// Using an anonymous Runnable implementation:
class InnerRunnable2{
    private int countDown = 5;
    private Thread t;
    public InnerRunnable2(String name){
        t = new Thread(new Runnable() {
            @Override
            public void run() {
                try {
                    while (true){
                        System.out.println(this);
                        if(--countDown == 0){
                            return;
                        }
                        TimeUnit.MILLISECONDS.sleep(10);
                    }
                } catch (InterruptedException e) {
                    System.out.println("sleep() interrupted");
                }
            }

            @Override
            public String toString() {
                return Thread.currentThread().getName() + ": " + countDown;
            }
        },name);
        t.start();
    }
}

// A separate method to run some code as a task:
class ThreadMethod{
    private int countDown = 5;
    private Thread t;
    private String name;

    public ThreadMethod(String name) {
        this.name = name;
    }

    public void runTask(){
        if(t == null){
            t = new Thread(name){
                @Override
                public void run() {
                    try {
                        while (true){
                            System.out.println(this);
                            if(--countDown == 0){
                                return;
                            }
                            TimeUnit.MILLISECONDS.sleep(10);
                        }
                    } catch (InterruptedException e) {
                        System.out.println("sleep() interrupted");
                    }
                }

                @Override
                public String toString() {
                    return Thread.currentThread().getName() + ": " + countDown;
                }
            };
            t.start();
        }
    }
}

InnerThread1创建了一个扩展自Thread的匿名内部类,并且在构造器中创建了这个内部类的一个实例。如果内部类具有你在其他方法中需要访问的特殊能力(新方法),那这么做将会很有意义。但是,在大多数时候,创建线程的原因只是为了使用Thread的能力,因此不必创建匿名内部类。InnerThread2展示了可替换的方式:在构造器中创建一个匿名的Thread子类,并且将其向上转型为Thread引用t。如果类中的其他方法需要访问t,那它们可以通过Thread接口来实现,并且不需要了解该对象的确切类型。
该示例的第三个和第四个类重复了前面的两个类,但是它们使用的是Runnable接口而不是Thread类。
ThreadMethod类展示了在方法内部如何创建线程。当你准备好运行线程时,就可以调用这个方法,而在线程开始之后,该方法将返回。如果该线程只执行辅助操作,而不是该类的重要操作,那么这与在该类的构造器内部启动线程相比,可能是一种更加有用而合适的方式。
2.10 术语
正如前面各节所示,在Java中,你可以选择如何实现并发编程,并且这个选择会令人困惑。这个问题通常来自于用来描述并发程序技术的术语,特使是涉及线程的那些。
到目前为止,你应该看到要执行的任务与驱动它的线程之间有一个差异,这个差异在Java类库中尤为明显,因为你对Thread类实际没有任何控制权(并且这种隔离在使用执行器时更加明显,因为执行器将替你处理线程的创建和管理)。你创建任务,并通过某种方式将一个线程附着到任务上,以使得这个线程可以驱动任务。
在Java中,Thread类自身不执行任何操作,它只是驱动赋予它的任务,但是线程研究中总是不变地使用“线程执行这项或那项动作”这样的语言。因此,你得到的印象就是“线程就是任务”,当我第一次碰到Java线程时,这种印象非常强烈,以至于我看到了一种明显的“是一个”关系,这就像是在说,很明显我应该从Thread继承出一个任务。另外,Runnable接口的名字选择很糟糕,所以我认为Task应该是好得多的名字。如果接口只是其方法的反型封装,那么“它执行能做的事情”这种命名方式将是恰当的,但是如果它是要表示更高层的抽象,例如Task,那么概念名将有用。
问题是各种抽象级别被混在了一起。从概念上讲,我们希望创建独立于其他任务运行的任务,因此我们应该能够定义任务,然后说“开始”,并且不用操心其细节。但是在物理上,创建线程可能会代价高昂,因此你必须保存并管理它们。这样,从实现的角度看,将任务从线程中分离出来是很有意义的。另外,Java的线程机制基于来自C的低级的p线程方式,这是一种必须深入研究,并且需要完全理解其所有事物的所有细节的方式。这种低级特性部分地渗入了Java的实现中,因此为了处于更高的抽象级别,在编写代码时,你必须遵循规则。
为了澄清这些讨论,我将尝试着在描述将要执行的工作时使用术语“任务”,只有在我引用到驱动任务的具体机制时,才使用“线程”。因此,如果你在概念级别上讨论系统,那就可以只使用“任务”,而压根不需要提及驱动机制。
2.11 加入一个线程
一个线程可以在其他线程之上调用join()方法,其效果是等待一段时间直到第二个线程结束才继续执行。如果某个线程在另一个线程t上调用t.join(),此线程将被挂起,直到目标线程t结束才恢复(即t.isAlive()返回为false)。
也可以在调用join()时带上一个超时参数(单位可以是毫秒,或者毫秒和纳秒),这样如果目标线程在这段时间到期时还没有结束的话,join()方法总能返回。
对join()方法的调用可以被中断,做法是在调用线程上调用interrupt()方法,这时需要用到try-catch子句。
下面的例子演示了所有这些操作:
package com.zjwave.thinkinjava.concurrency;

public class Joining {
    public static void main(String[] args) {
        Sleeper sleepy = new Sleeper("Sleepy",1500),
                grumpy = new Sleeper("Grumpy",1500);
        Joiner dopey = new Joiner("Dopey",sleepy),
                doc = new Joiner("Doc",grumpy);
        grumpy.interrupt();
    }
}

class Sleeper extends Thread{
    private int duration;
    public Sleeper(String name,int sleepTime){
        super(name);
        duration = sleepTime;
        start();
    }

    @Override
    public void run() {
        try {
            sleep(duration);
        } catch (InterruptedException e) {
            System.out.println(getName() + " was interrupted. " + "isInterrupted(): " + isInterrupted());
            return;
        }
        System.out.println(getName() + " has awakened");
    }
}

class Joiner extends Thread{
    private Sleeper sleeper;

    public Joiner(String name, Sleeper sleeper) {
        super(name);
        this.sleeper = sleeper;
        start();
    }

    @Override
    public void run() {
        try {
            sleeper.join();
        } catch (InterruptedException e) {
            System.out.println("Interrupted");
        }
        System.out.println(getName() + " join completed");
    }
}
Sleeper是一个Thread类型,它要休眠一段时间,这段时间是通过构造器传进来的参数所指定的。在run()中,sleep()方法有可能在指定的时间期满时返回,但也可能被中断。在catch子句中,将根据isInterrupted()的返回值报告这个中断。当另一个线程在该线程上调用interrupt()时,将给该线程设定一个标志,表明该线程已经被中断。然而,异常被捕获时将清理这个标志,所以在catch子句中,在异常被捕获的时候这个标志总是为false。除异常之外,这个标志还可用于其他情况,比如线程可能会检查其中断状态。
Joiner线程将通过在Sleeper对象上调用join()方法来等待Sleeper醒来。在main()里面,每个Sleeper都有一个Joiner,这可以在输出中发现,如果Sleeper被中断或者是正常结束,Joiner将和Sleeper一同结束。
注意,Java SE5的java.util.concurrent类库包含诸如CyclicBarrier(本文稍后会展示)这样的工具,它们可能比最初的线程类库中的join()更加合适。
2.12 创建有响应的用户界面
如前所述,使用线程的动机之一就是建立有响应的用户界面。下面给出了一个基于控制台用户界面的简单示例。下面的例子有两个版本:一个关注与运算,所以不能读取控制台输入,另一个把运算放在任务里单独运行,此时就可以在进行运算的同时监听控制台输入。
package com.zjwave.thinkinjava.concurrency;

public class ResponsiveUI extends Thread {
    private static volatile double d = 1;

    public ResponsiveUI() {
        setDaemon(true);
        start();
    }

    @Override
    public void run() {
        while (d > 0){
            d = d + (Math.PI + Math.E) / d;
        }
    }

    public static void main(String[] args) throws Exception {
        //! new UnresponsiveUI(); // Must kill this process
        new ResponsiveUI();
        System.in.read();
        System.out.println(d);// Shows progress
    }
}

class UnresponsiveUI{
    private volatile double d = 1;

    public UnresponsiveUI() throws Exception{
        while (d > 0){
            d = d + (Math.PI + Math.E) / d;
        }
        System.in.read(); // Never gets here
    }
}

UnresponsiveUI在一个无限的while循环里执行运算,显然程序不可能到达读取控制台输入的那一行(编译器被欺骗了,相信while的条件使得程序能到达读取控制台输入的那一行)。如果把建立UnresponsiveUI的那一行注释解除掉再运行程序,那么要终止它的话,就只能杀死这个进程。
要想让程序有响应,就得把计算程序放在run()方法中,这样它就能让出处理器给别的程序。当你按下“回车”键的时候,可以看到计算确实在作为后台程序运行,同时还在等待用户输入。
2.13 线程组
线程组持有一个线程集合。线程组的价值可以引用Joshua Bloch的话来总结:
最好把线程组看成是一次不成功的尝试,你只要忽略它就好了。
如果你花费了大量的时间和精力试图发现线程组的价值(就像我一样),那么你可能会惊异,为什么没有来自这个主题的官方声明,多年以来,相同的问题对于Java发生的其他变化也询问过无数遍。诺贝尔经济学奖得主Joseph Stiglitz的生活哲学可以用来解释这个问题,它被称为承诺升级理论(The Theory of Escalating Commitment):
继续错误的代价由别人来承担,而承认错误的代价由自己承担。
2.14 捕获异常
由于线程的本质特性,使得你不能捕获从线程中逃逸的异常。一旦异常逃出任务的run()方法,它就会向外传播到控制台,除非你采取特殊的步骤捕获这种错误的异常。在Java SE5之前,你可以使用线程组来捕获这些异常,但是有了Java SE5,就可以用Executor来解决这个问题,因此你就不再需要了解有关线程组的任何知识了。
下面的任务总是会抛出一个异常,该异常会传播到其run()方法的外部,并且main()展示了当你运行它时所发生的事情:
package com.zjwave.thinkinjava.concurrency;

import java.util.concurrent.ExecutorService;
import java.util.concurrent.Executors;

public class ExceptionThread implements Runnable {
    @Override
    public void run() {
        throw new RuntimeException();
    }

    public static void main(String[] args) {
        ExecutorService exec = Executors.newCachedThreadPool();
        exec.execute(new ExceptionThread());
    }
}

将main()的主体放到try-catch语句块中是没有作用的:
package com.zjwave.thinkinjava.concurrency;

import java.util.concurrent.ExecutorService;
import java.util.concurrent.Executors;

public class NativeExceptionHadling {
    public static void main(String[] args) {
        try {
            ExecutorService exec = Executors.newCachedThreadPool();
            exec.execute(new ExceptionThread());
        }catch (RuntimeException e){
            // This statement will NOT execute!
            System.out.println("Exception has been handled!");
        }
    }
}

这将产生与前面示例相同的结果:未捕获的异常。
为了解决这个问题,我们要修改Executor产生线程的方式。Thread.UncaughtExceptionHandler是Java SE5中的新接口,它允许你在每个Thread对象上都附着一个异常处理器。Thread.UncaughtExceptionHandler.uncaughtException()会在线程因未捕获的异常而临近死亡时被调用。为了使用它,我们创建了一个新类型的ThreadFactory,它将在每个新创建的Thread对象上附着一个Thread.UncaughtExceptionHandler。我们将这个工厂传递给Executors创建新的ExecutorService的方法:
package com.zjwave.thinkinjava.concurrency;

import java.util.concurrent.ExecutorService;
import java.util.concurrent.Executors;
import java.util.concurrent.ThreadFactory;

public class CaptureUncaughtException {
    public static void main(String[] args) {
        ExecutorService exec = Executors.newCachedThreadPool(new HandlerThreadFactory());
        exec.execute(new ExceptionThread2());
    }
}

class ExceptionThread2 implements Runnable {

    @Override
    public void run() {
        Thread t = Thread.currentThread();
        System.out.println("run() by " + t);
        System.out.println("eh = " + t.getUncaughtExceptionHandler());
        throw new RuntimeException();
    }
}

class MyUncaughtExceptionHandler implements Thread.UncaughtExceptionHandler {

    @Override
    public void uncaughtException(Thread t, Throwable e) {
        System.err.println("caught " + e);
    }
}

class HandlerThreadFactory implements ThreadFactory {

    @Override
    public Thread newThread(Runnable r) {
        System.out.println(this + " creating new Thread");
        Thread t = new Thread(r);
        System.out.println("created " + t);
        t.setUncaughtExceptionHandler(new MyUncaughtExceptionHandler());
        System.out.println("eh = " + t.getUncaughtExceptionHandler());
        return t;
    }
}
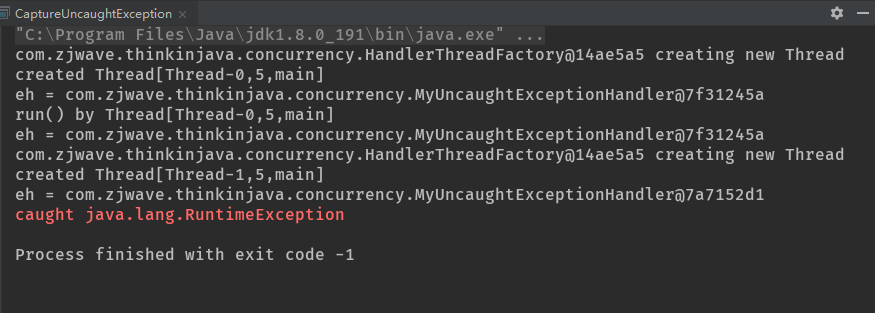
在程序中添加了额外的跟踪机制,用来验证工厂创建的线程会传递给UncaughtExceptionHandler。你现在可以看到,未捕获的异常是通过uncaughtException来捕获的。
上面的示例使得你可以按照具体情况逐个地设置处理器。如果你知道将要在代码中处处使用相同的异常处理器,那么更简单的方式是在Thread类中设置一个静态域,并将这个处理器设置为默认的未捕获异常处理器:
package com.zjwave.thinkinjava.concurrency;

import java.util.concurrent.ExecutorService;
import java.util.concurrent.Executors;

public class SettingDefaultHandler {
    public static void main(String[] args) {
        Thread.setDefaultUncaughtExceptionHandler(new MyUncaughtExceptionHandler());
        ExecutorService exec = Executors.newCachedThreadPool();
        exec.execute(new ExceptionThread());
    }
}

这个处理器只有在不存在线程专有的未捕获异常处理器的情况下才会被调用。系统会检查线程专有版本,如果没有发现,则检查线程组是否有其专有的uncaughtException()方法,如果也没有,再调用defaultUncaughtExceptionHandler。
3.共享受限资源
可以把单线程程序当做在问题域求解的单一实体,每次只能做一件事情。因为只有一个实体,所以永远不用担心诸如“两个实体试图同时使用同一个资源”这样的问题——比如,两个人在同一个地方停车,两个人同时走过一扇门,甚至是两个人同时说话。
有了并发就可以同时做多件事情了,但是,两个或多个线程彼此互相干涉的问题也就出现了。如果不防范这种冲突,就可能发生两个线程同时试图访问同一个银行账户,或向同一个打印机打印,改变同一个值等诸如此类问题。
3.1 不正确地访问资源
考虑下面的例子,其中一个任务产生偶数,而其他任务消费这些数字。这里,消费者任务的唯一工作就是检查偶数的有效性。
首先,我们定义EvenChecker,即消费者任务,因为它将在随后所有的示例中被复用。为了将EvenChecker与我们要试验的各种类型的生成器解耦,我们将创建一个名为IntGenerator的抽象类,它包含EvenChecker必须了解的必不可少的方法:即一个next()方法,和一个可以执行撤销的方法。这个类没有实现Generator接口,因为它必须产生一个int,而泛型不支持基本类型的参数:
package com.zjwave.thinkinjava.concurrency;

public abstract class IntGenerator {
    private volatile boolean canceled = false;
    public abstract int next();
    // Allow this to be canceled:
    public void cancel(){
        canceled = true;
    }

    public boolean isCanceled() {
        return canceled;
    }
}
IntGenerator有一个cancel()方法,可以修改boolean类型的canceled标志的状态,还有一个isCanceled()方法,可以查看该对象是否已经被取消。因为calceled标志是boolean类型的,所以它是原子性的,即诸如赋值和返回值这样的简单操作在发生时没有中断的可能,因此你不会看到这个域处于在执行这些简单操作的过程中的中间状态。为了保证可视性,canceled标志还是volatile的。你将在稍后学习原子性和可视性。
任何IntGenerator都可以用下面的EvenChecker类来测试:
package com.zjwave.thinkinjava.concurrency;

import java.util.concurrent.ExecutorService;
import java.util.concurrent.Executors;

public class EvenChecker implements Runnable {
    private IntGenerator generator;
    private final int id;

    public EvenChecker(IntGenerator generator, int id) {
        this.generator = generator;
        this.id = id;
    }

    @Override
    public void run() {
        while (!generator.isCanceled()){
            int val = generator.next();
            if(val % 2 != 0){
                System.out.println(val + " not event!");
                generator.cancel();//Cancels all EvenCheckers
            }
        }
    }

    // Test any type of IntGenerator:
    public static void test(IntGenerator gp,int count){
        System.out.println("Press Control-C to exit");
        ExecutorService exec = Executors.newCachedThreadPool();
        for (int i = 0; i < count; i++) {
            exec.execute(new EvenChecker(gp,i));
        }
        exec.shutdown();
    }

    // Default value for count:
    public static void test(IntGenerator gp){
        test(gp,10);
    }

}
注意,在本例中可以被撤销的类不是Runnable,而所有依赖于IntGenerator对象的EvenChecker任务将测试它,以查看它是否已经被撤销,正如你在run()中所见。通过这种方式,共享公共资源(IntGenerator)的任务可以观察该资源的终止信号。这可以消除所谓竞争条件,即两个或更多的任务竞争响应某个条件,因此产生冲突或不一致结果的情况。你必须仔细考虑并防范并发系统失败的所有可能途径,例如,一个任务不能依赖于另一个任务,因为任务关闭的顺序无法得到保证。这里,通过使任务依赖于非任务对象,我们可以消除潜在的竞争条件。
test()方法通过启动大量使用相同的IntGenerator的EvenChecker,设置并执行对任何类型的IntGenerator的测试。如果IntGenerator引发失败,那么test()将报告它并返回,否则,你必须手动终止它。
EvenChecker任务总是读取和测试从与其相关的IntGenerator返回的值。注意,如果generator.isCanceled()为true,则run()将返回,这将告知EvenChecker.test()中的Executor该任务完成了。任何EvenChecker任务都可以在与其相关联的IntGenerator上调用cancel(),这将导致所有其他使用该IntGenerator的EvenChecker得体的关闭。在后面各节中,你将看到Java包含的用于线程终止的各种更通用的机制。
我们看到的第一个IntGenerator有一个可以产生一系列偶数值的next()方法:
package com.zjwave.thinkinjava.concurrency;

public class EvenGenerator extends IntGenerator {
    private int currentEvenValue = 0;

    @Override
    public int next() {
        ++currentEvenValue; // Danger point here!
        ++currentEvenValue;
        return currentEvenValue;
    }

    public static void main(String[] args) {
        EvenChecker.test(new EvenGenerator());
    }
}

一个任务有可能在另一个任务执行第一个对currentEvenValue的递增操作之后,但是没有执行第二个操作之前,调用next()方法(即,代码中被注释为“Danger pointer here!”的地方)。这将使这个值处于“不恰当”的状态。为了证明这是可能发生的,EvenChecker.test()创建了一组EvenChecker对象,以连续地读取并输出同一个EvenGenerator,并测试检查每个数值是否都是偶数。如果不是,就会报告错误,而程序也将关闭。
这个程序最终将失败,因为各个EvenChecker任务在EvenGenerator处于“不恰当”状态时,仍能够访问其中的信息。但是,根据你使用的特定的操作系统和其他实现细节,直到EvenGenerator完成多次循环之前,这个问题都不会被探测到。如果你希望更快地发现失败,可以尝试着将对yield()的调用放置到第一个和第二个递增操作之间。这只是并发程序的部分问题——如果失败的概率非常低,那么即使存在缺陷,它们也可能看起来是正确的。
有一点很重要,那就是要注意到递增程序自身也需要多个步骤,并且在递增过程中任务可能会被线程机制挂起——也就是是,在Java中,递增不是原子性的操作。因此,如果不保护任务,即使单一的递增也不是安全的。
3.2 解决共享资源竞争
前面的示例展示了使用线程时的一个基本问题:你永远都不知道一个线程何时在运行。想象一下,你坐在桌边手拿筷子,正要去夹盘子里最后一片食物,当你的叉子就要够着它时,这片食物突然消失了,因为你的线程被挂起了,而另一个就餐者进入并吃掉了它。这正是在你编写并发程序时需要处理的问题。对于并发工作,你需要某种方式来防止两个任务访问相同的资源,至少在关键阶段不能出现这种情况。
防止这种冲突的方法就是当资源被一个任务使用时,在其上加锁。第一个访问某项资源的任务必须锁定这项资源,使其他任务在其被解锁之前,就无法访问它了,而在其被解锁之时,另一个任务就可以锁定并使用它,以此类推。如果汽车前排座位是受限资源,那么大喊着“冲呀!”的孩子就会(在这次旅途过程中)获取其上的锁。
基本上所有的并发模式在解决线程冲突问题的时候,都是采用序列化访问共享资源的方案。这意味着在给定时刻只允许一个任务访问共享资源。通常这是通过在代码前面加上一条锁语句来实现的,这就使得在一段时间内只有一个任务可以运行这段代码。因为锁语句产生了一种互相排斥的效果,所以这种机制常常称为互斥量(mutex)。
考虑一下屋子里的浴室:多个人(即多个由线程驱动的任务)都希望能单独使用浴室(即共享资源)。为了使用浴室,一个人先敲门,看看能否使用。如果没人的话,他就进入浴室并锁上门。这时其他人要使用浴室的话,就会被“阻挡”,所以他们要在浴室门口等待,直到浴室可以使用。
当浴室使用完毕,就该把浴室给其他人使用了(别的任务就可以访问资源了),这个比喻就有点不太准确了。事实上,人们并没有排队,我们也不能确定谁将是下一个使用浴室的人,因为线程调度机制并不是确定性的。实际情况是:等待使用浴室的人们簇拥在浴室门口,当锁住浴室门的那个人打开锁准备离开的时候,离门最近的那个人可能进入浴室。如前所述,可以通过yield()和setPriority()来给线程调度器提供建议,但这些建议未必会有多大效果,这取决于你的具体平台和JVM实现。
Java以提供关键字synchronized的形式,为防止资源冲突提供了内置支持。当任务要执行被synchronized关键字保护的代码片段的时候,它将检查锁是否可用,然后获取锁,执行代码,释放锁。
共享资源一般是以对象形式存在的内存片段,但也可用是文件、输入/输出端口,或者是打印机。要控制对共享资源的访问,得先把他包装进一个对象。然后把所有要访问这个资源的方法标记为synchronized。如果某个任务处于对一个标记为synchronized的方法的调用中,那么在这个线程从该方法返回之前,其他所有要调用类中任何标记为synchronized方法的线程都会被阻塞。
在生成偶数的代码中,你已经看到了,你应该将类的数据成员都声明为private的,而且只能通过方法来访问这些数据,所以可以把方法标记为synchronized来防止资源冲突。下面是声明synchronized方法的方式:
synchronized void f(){/* ... */}
synchronized void g(){/* ... */}所有对象都自动含有单一的锁(也称为监视器)。当在对象上调用其任意synchronized方法的时候,此对象都被加锁,这时该对象上的其他synchronized方法只有等到前一个方法调用完毕并释放了锁之后才能被调用。对于前面的方法,如果某个任务对对象调用了f(),对于同一个对象而言,就只能等到f()调用结束并释放了锁之后,其他任务才能调用f()和g()。所以,对于某个特定对象来说,其所有synchronized方法共享同一个锁,这可以被用来防止多个任务同时访问被编码为对象内存。
注意,在使用并发时,将域设置为private是非常重要的,否则,synchronized关键字就不能防止其他任务直接访问域,这样就会产生冲突。
一个任务可以多次获得对象的锁。如果一个方法在同一个对象上调用了第二个方法,后者又调用了同一对象上的另一个方法,就会发生这种情况。JVM负责跟踪对象被加锁的次数。如果一个对象被解锁(即锁被完全释放),其计数变为0。在任务第一次给对象加锁的时候,计数变为1。每当这个相同的任务在这个对象上获得锁时,计数都会递增。显然,只有首先获得了锁的任务才能允许继续获取多个锁。每当任务离开一个synchronized方法,计数递减,当计数为零的时候,锁被完全释放,此时别的任务就可以使用此资源。
针对每个类,也有一个锁(作为类的Class对象的一部分),所以synchronized static方法可以在类的范围内防止对static数据的并发访问。
如果你正在写一个变量,它可能接下来将被另一个线程读取,或者正在读取一个上一次已经被另一个线程写过的变量,那么你必须使用同步,并且,读写线程都必须用相同的监视器锁同步。
如果在你的类中有超过一个方法在处理临界数据,那么你必须同步所有相关的方法。如果只同步一个方法,那么其他方法将会随意地忽略这个对象锁,并可以在无任何惩罚的情况下被调用。这是很重要的一点:每个访问临界共享资源的方法都必须被同步,否则它们就不会正确地工作。
同步控制EvenGenerator
通过在EvenGenerator.java中加入synchronized关键字,可以防止不希望的线程访问:
package com.zjwave.thinkinjava.concurrency;

public class SynchronizedEvenGenerator extends IntGenerator {

    private int currentEvenValue = 0;

    @Override
    public synchronized int next() {
        ++currentEvenValue;
        Thread.yield();// Cause failure faster
        ++currentEvenValue;
        return currentEvenValue;
    }

    public static void main(String[] args) {
        EvenChecker.test(new SynchronizedEvenGenerator());
    }
}
对Thread.yield()的调用被插入到了两个递增操作之间,以提高在currentEvenValue是奇数状态时上下文切换的可能性。因为互斥可以防止多个任务同时进入临界区,所以这不会产生任何失败。但是如果失败将会发生,调用yield()是一种促使其发生的有效方式。
第一个进入next()的任务将获得锁,任何其他试图获取锁的任务都将从其开始尝试之时被阻塞,直至第一个任务释放锁。通过这种方式,任何时刻只有一个任务可以通过由互斥量看护的代码。
使用显式的Lock对象
Java SE5的java.util.concurrent类库还包含有定义在java.util.concurrent.locks中的显式的互斥机制。Lock对象必须被显式的创建、锁定和释放。因此,它与内建的锁形式相比,代码缺乏优雅性。但是,对于解决某些类型的问题来说,它更加灵活。下面用显式的Lock重写的SynchronizedEvenGenerator.java:
package com.zjwave.thinkinjava.concurrency;

import java.util.concurrent.locks.Lock;
import java.util.concurrent.locks.ReentrantLock;

public class MutexEvenGenerator extends IntGenerator{

    private int currentEvenValue = 0;
    private Lock lock = new ReentrantLock();

    @Override
    public int next() {
        lock.lock();
        try{
            ++currentEvenValue;
            Thread.yield();//Cause failure faster
            ++currentEvenValue;
            return currentEvenValue;
        }finally {
            lock.unlock();
        }
    }

    public static void main(String[] args) {
        EvenChecker.test(new MutexEvenGenerator());
    }
}
MutexEvenGenerator添加了一个被互斥调用的锁,并使用lock()和unlock()方法在next()内部创建了临界资源。当你在使用Lock对象时,将这里所示的惯用法内部化是很重要的:紧接着的对lock()的调用,你必须放置的finally子句中带有unlock()的try-finally语句中。注意,return语句必须在try子句中出现,以确保unlock()不会过早发生,从而将数据暴露给了第二个任务。
尽管try-finally所需的代码比synchronized关键字要多,但是这也代表了显式的Lock对象的优点之一。如果在使用synchronized关键字时,某些事物失败了,那么就会抛出一个异常。但是你没有机会去做任何清理工作,以维护系统使其处于良好状态。有了显式的Lock对象。你就可以使用finally子句将系统维护在正确的状态了。
大体上,当你使用synchronized关键字时,需要些的代码量更少,并且用户错误出现的可能性会降低,因此通常只有在解决特殊问题时,才使用显式的Lock对象。例如,用synchronized关键字不能尝试着获取锁且最终获取锁会失败,或者尝试着获取锁一段时间,然后放弃它,要实现这些,你必须使用concurrent类库:
package com.zjwave.thinkinjava.concurrency;

import java.util.concurrent.TimeUnit;
import java.util.concurrent.locks.ReentrantLock;

public class AttemptLocking {
    private ReentrantLock lock = new ReentrantLock();

    public void untimed(){
        boolean captured = lock.tryLock();
        try {
            System.out.println("tryLock(): " + captured);
        }finally {
            if (captured){
                lock.unlock();
            }
        }
    }

    public void timed(){
        boolean captured = false;
        try {
            captured = lock.tryLock(2, TimeUnit.SECONDS);
        } catch (InterruptedException e) {
            throw new RuntimeException(e);
        }
        try {
            System.out.println("tryLock(2,TimeUnit.SECONDS): " + captured);
        }finally {
            if (captured){
                lock.unlock();
            }
        }
    }


    public static void main(String[] args) throws InterruptedException {
        final AttemptLocking al = new AttemptLocking();
        al.untimed();// True -- lock is available
        al.timed();// True -- lock is available
        // Now create a separate task to grab the lock:
        new Thread(){
            { setDaemon(true); }

            @Override
            public void run() {
                al.lock.lock();
                System.out.println("acquired");
            }
        }.start();
        Thread.sleep(100);// Give the 2nd task a chance
        al.untimed(); // False -- lock grabbed by task
        al.timed();// False -- lock grabbed by task
    }
}

ReentrantLock允许你尝试着获取但最终未获取锁,这样如果其他人已经获取了这个锁,那你就可以决定离开去执行其他一些事情,而不是等待直至这个锁被释放,就像在untimed()方法中所看到的。在timed()中,做出了尝试去获取锁,该尝试可以在2秒之后失败(注意,使用了Java SE5的TimeUnit类来指定时间单位)。在main()中,作为匿名类而创建了一个单独的Thread,它将获取锁,这使得untimed()和timed()方法对某些事物将产生竞争。
显式的Lock对象在加锁和释放锁方面,相对于内建的synchronized锁来说,还赋予了你更细粒度的控制力。这对于实现专有同步结构是很有用的,例如用于遍历链接列表中的节点的节节传递的加锁机制(也成为锁耦合),这种遍历代码必须在释放当前节点的锁之前捕获下一个节点的锁。
3.3 原子性与易变性
在有关Java线程的讨论中,一个常不正确的知识是“原子操作不需要进行同步控制”。原子操作是不能被线程调度机制中断的操作,一旦操作开始,那么它一定可以在可能发生的“上下文切换”之前(切换到其他线程执行)执行完毕。依赖于原子性是很棘手且很危险的,如果你是一个并发专家,或者你得到了来自这样的专家的帮助,你才应该使用原子性来代替同步。如果你认为自己足够聪明可以应付这种玩火似的情况,那么请接受下面的测试:
如果你可以编写用于现代微处理器的高性能JVM,那么就有资格去考虑是否可以避免同步。
了解原子性是很有用的,并且知道原子性与其他高级技术一道,在java.util.concurrent类库中已经实现了某些更加巧妙的构件。但是要坚决抵挡住完全依赖自己的能力去进行处理的这种欲望。
原子性可以应用于除long和double之外的所有基本类型之上的“简单操作”。对于读取和写入除long和double之外的基本类型变量这样的操作,可以保证它们会被当做不可分(原子)的操作来操作内存。但是JVM可以将64位(long和double变量)的读取和写入当做两个分离的32位操作来执行,这就产生了在一个读取和写入操作中间发生上下文切换,从而导致不同的任务可以看到不正确的结果的可能性(这有时被称为字撕裂,因为你可能会看到部分被修改过的数值)。但是,当你定义long或double变量时,如果使用volatile关键字,就会获得(简单的赋值与返回操作的)原子性(注意,在Java SE5之前,volatile一直未能正确的工作)。不同的JVM可以任意地提供更强的保证,但是你不应该依赖于平台相关的特性。
因此,原子操作可由线程机制来保证其不可中断,专家级的程序员可以利用这一点来编写无锁的代码,这些代码不需要被同步。但是即便是这样,它也是一种过于简化的机制。有时,甚至看起来应该安全的原子操作,实际上也可能不安全。我们应该尽可能不用原子操作来替换同步能力。尝试着移除同步通常是一种表示不成熟优化的信号,并且将会给你招致大量的麻烦,而你却可能没有收获多少好处,甚至压根没有任何好处。
在多处理器系统(现在以多核处理器的形式出现,即在单个芯片上有多个CPU)上,相对于单处理器系统而言,可视性问题远比原子性问题多得多。一个任务做出的修改,即使在不中断的意义上讲是原子性的,对其他任务也可能是不可视的(例如,修改只是暂时性地存储在本地处理器的缓存中),因此不同的任务对应用的状态有不同的视图。另一方面,同步机制强制在处理器系统中,一个任务做出的修改必须在应用中是可视的。如果没有同步机制,那么修改时可视将无法确定。
volatile关键字还确保了应用中的可视性。如果你将一个域声明为volatile的,那么只要对这个域产生了写操作,那么所有的读操作都可以看到这个修改。即便使用了本地缓存,情况也是如此,volatile域会立即被写入到主存中,而读取操作就发生在主存中。
理解原子性和易变性是不同的概念这一点很重要。在非volatile域上的原子操作不必刷新到主存中去,因此其他读取该域的任务也不必看到这个新值。如果多个任务在同时访问某个域,那么这个域就应该是volatile的,否则,这个域就应该只能经由同步来访问。同步也会导致向主存中刷新,因此如果一个域完全由synchronized方法或语句块来防护,那就不必将其设置为是volatile的。
一个任务所作的任何写入操作对这个任务来说都是可视的,因此如果它只需要在这个任务内部可视,那么你就不需要将其设置为volatile的。
当一个域的值依赖于它之前的值时(例如递增一个计数器),volatile就无法工作了。如果某个域的值受到其他域的值的限制,那么volatile也无法工作,例如Range类的lower和upper边界就必须遵循lower<=upper的限制。
使用volatile而不是synchronized的唯一安全的情况是类中只有一个可变的域。再次提醒,你的第一选择应该是使用synchronized关键字,这是最安全的方式,而尝试其他任何方式都是有风险的。
什么才属于原子操作呢?对域中的值做赋值和返回操作通常都是原子性的,但是,在C++中,甚至下面的操作都可能是原子性的:
i++; // Might be atomic in C++
i += 2; // Might be atomic in C++
但是在C++中,这要取决于编译器和处理器。你无法编写出依赖于原子性的C++跨平台代码,因为C++没有像Java(在Java SE5中)那样一致的内存模型。
在Java中,上面的操作肯定不是原子性的,正如从下面的方法所产生的JVM指令中可以看到的那样:
package com.zjwave.thinkinjava.concurrency;

public class Atomicity {
    int i;
    void f1(){
        i++;
    }
    void f2(){
        i += 3;
    }
}
 void f1();
    Code:
       0: aload_0
       1: dup
       2: getfield      #2                  // Field i:I
       5: iconst_1
       6: iadd
       7: putfield      #2                  // Field i:I
      10: return

  void f2();
    Code:
       0: aload_0
       1: dup
       2: getfield      #2                  // Field i:I
       5: iconst_3
       6: iadd
       7: putfield      #2                  // Field i:I
      10: return
每条指令都会产生一个get和put,它们之间还有一些其他的指令。因此在获取和放置之间,另一个任务可能会修改这个域,所以,这些操作不是原子性的。
如果你盲目地应用原子性概念,那么就会看到在下面程序中的getValue()符合上面的描述:
package com.zjwave.thinkinjava.concurrency;

import java.util.concurrent.ExecutorService;
import java.util.concurrent.Executors;

public class AtomicityTest implements Runnable {

    private int i = 0;

    public int getValue(){
        return i;
    }

    private synchronized void evenIncrement(){
        i++;
        i++;
    }

    @Override
    public void run() {
        while (true){
            evenIncrement();
        }
    }

    public static void main(String[] args) throws InterruptedException {
        ExecutorService exec = Executors.newCachedThreadPool();
        AtomicityTest at = new AtomicityTest();
        exec.execute(at);
        while (true){
            int val = at.getValue();
            if(val % 2 != 0){
                System.out.println(val);
                System.exit(0);
            }
            Thread.yield();
        }
    }
}
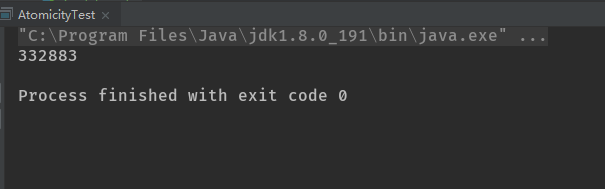
但是,该程序将找到奇数值并终止。尽管renturn i确实是原子性操作,但是缺少同步使得其数值可以在处于不稳定的中间状态时被读取。除此之外,由于i也不是volatile的,因此还存在可视性问题。getValue()和evenIncrement()必须是synchronized的。在诸如此类的情况下,只有并发专家才有能力进行优化,而你还是应该运用同步规则。
正如第二个实例,考虑一些更简单的事情:一个产生序列数字的类。每当nextSerialNumber()被调用时,它必须向调用者返回唯一的值:
package com.zjwave.thinkinjava.concurrency;

public class SerialNumberGenerator {
    private static volatile int serialNumber = 0;
    public static int nextSerialNumber(){
        return serialNumber++; // Not thread-safe
    }
}
SerialNumberGenerator与你想象的一样简单,如果你有C++或其他低层语言的北京,那么可能会期望递增是原子性操作,因为C++递增通常可以作为一条微处理器指令来实现(尽管不是以任何可靠的、跨平台的形式实现。)然而,正如前面注意到的,Java递增操作不是原子性的,并且涉及一个读操作和一个写操作,所以即便是在这么简单的操作中,也为产生线程问题留下了空间。正如你所看到的,易变性在这里实际上不是什么问题,真正的问题在于nextSerialNumber()在没有同步的情况下对共享可变值进行了访问。
基本上,如果一个域可能会被多个任务同时访问,或者这些任务中至少有一个是写入任务,那么你就应该将这个域置为volatile的。如果你将一个域定义为volatile,那么它就会告诉编译器不要执行任何移除读取和写入操作的优化,这些操作的目的是用线程中的局部变量维护对这个域的精确同步。实际上,读取和写入都是直接针对内存的,而却没有被缓存。但是,volatile并不能对递增不是原子性操作这一事实产生影响。
为了测试SerialNumberGenerator,我们需要不会耗尽内存的集(Set),以防需要花费很长时间来探测问题。这里所示的CircularSet重用了存储int数值的内存,并假设在你生成序列数时,产生数值覆盖冲突的可能性极小。add()和contains()方法都是synchronized,以防止线程冲突:
package com.zjwave.thinkinjava.concurrency;

import java.util.concurrent.ExecutorService;
import java.util.concurrent.Executors;
import java.util.concurrent.TimeUnit;

public class SerialNumberChecker {
    private static final int SIZE = 10;
    private static CircularSet serials = new CircularSet(1000);
    private static ExecutorService exec = Executors.newCachedThreadPool();

    static class SerialChecker implements Runnable{

        @Override
        public void run() {
            while (true){
                int serial = SerialNumberGenerator.nextSerialNumber();
                if (serials.contains(serial)){
                    System.out.println("Duplicate: " + serial);
                    System.exit(0);
                }
                serials.add(serial);
            }
        }
    }

    public static void main(String[] args) throws InterruptedException {
        for (int i = 0; i < SIZE; i++) {
            exec.execute(new SerialChecker());
        }
        //Stop after n seconds if there's an arguments:
        if(args.length > 0){
            TimeUnit.SECONDS.sleep(new Integer(args[0]));
            System.out.println("No duplicates detected");
            System.exit(0);
        }
    }
}

// Reuses storage so we don't run out of memory:
class CircularSet{
    private int[] array;
    private int len;
    private int index = 0;

    public CircularSet(int size) {
        array = new int[size];
        len = size;
        // Initialize to a value not produced
        // by the SerialNumberGenerator:
        for (int i = 0; i < size; i++) {
            array[i] = -1;
        }
    }

    public synchronized void add(int i){
        array[index] = i;
        // Wrap index and write over old elements:
        index = ++index % len;
    }

    public synchronized boolean contains(int val){
        for (int i = 0; i < len; i++) {
            if(array[i] == val){
                return true;
            }
        }
        return false;
    }

}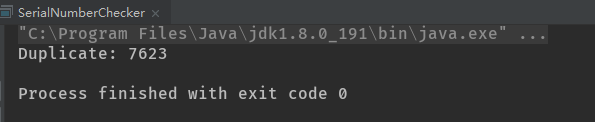
SerialNumberChecker包含一个静态的CircularSet,它持有所产生的所有序列数,另外还包含一个内嵌的SerialChecker类,它可以确保序列数是唯一的。通过创建多个任务来竞争序列数,你将发现这些任务最终会得到重复的序列数,如果你运行的时间足够长的话。为了解决这个问题,在nextSerialNumber()前面添加了synchronized关键字。
对基本类型的读取和复制操作被认为是安全的原子性操作。但是,正如你在AtomicityTest.java中看到的,当对象处于不稳定状态时,仍旧很有可能使用原子操作来访问它们。对这个问题做出假设是棘手而危险的,最明智的做法就是遵循同步规则。
3.4 原子类
Java SE5引入了诸如AtomicInteger、AtomicLong、AtomicReference等特殊的原子性变量类,它们提供下面形式的原子性条件更新操作:
boolean compareAndSet(expectedValue,updateValue);这些类被调整为可以使用在某些现代处理器上的可获得的,并且是在机器级别上的原子性,因此在使用它们时,通常不需要担心。对于常规编程来说,它们很少会派上用场,但是在涉及性能调优时,它们就大有用武之地了。例如,我们可以使用AtomicInteger来重写AtomicityTest.java:
package com.zjwave.thinkinjava.concurrency;

import java.util.Timer;
import java.util.TimerTask;
import java.util.concurrent.ExecutorService;
import java.util.concurrent.Executors;
import java.util.concurrent.atomic.AtomicInteger;

public class AtomicIntegerTest implements Runnable {
    private AtomicInteger i = new AtomicInteger(0);

    public int getValue() {
        return i.get();
    }

    private void evenIncrement() {
        i.addAndGet(2);
    }

    @Override
    public void run() {
        while (true) {
            evenIncrement();
        }
    }

    public static void main(String[] args) {
        new Timer().schedule(new TimerTask() {
            @Override
            public void run() {
                System.err.println("Aborting");
                System.exit(0);
            }
        }, 5000);
        ExecutorService exec = Executors.newCachedThreadPool();
        AtomicIntegerTest ait = new AtomicIntegerTest();
        exec.execute(ait);
        while (true) {
            int val = ait.getValue();
            if (val % 2 != 0) {
                System.out.println(val);
                System.exit(0);
            }
        }
    }
}
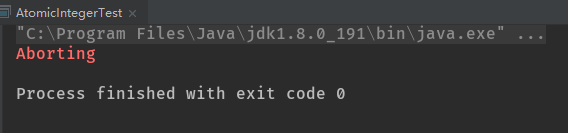
这里我们通过使用AtomicInteger而消除了synchronized关键字。因为这个程序不会失败,所以添加了一个Timer,以便在5秒钟之后自动地终止。
下面是用AtomicInteger重写的MutexEvenGenerator.java:
package com.zjwave.thinkinjava.concurrency;

import java.util.concurrent.atomic.AtomicInteger;

public class AtomicEvenGenerator extends IntGenerator {

    private AtomicInteger currentEvenValue = new AtomicInteger();

    @Override
    public int next() {
        return currentEvenValue.addAndGet(2);
    }

    public static void main(String[] args) {
        EvenChecker.test(new AtomicEvenGenerator());
    }
}
所以其他形式的同步再次通过使用AtomicInteger得到了根除。
应该强调的是,Atomic类被设计用来构件java.util.concurrent中的类,因此只有在特殊情况下才在自己的代码中使用它们,即便使用了也需要确保不存在其他可能出现的问题。通常依赖于锁要更安全一些(要么是synchronized关键字,要么是显式的Lock对象)。
3.5 临界区
有时,你只是希望防止多个线程同时访问方法内部的部分代码而不是防止访问整个方法。通过这种方式分离出来的代码段被称为临界区(critical section),它也使用synchronized关键字建立。这里,synchronized被用来指定某个对象,此对象的锁被用来对花括号内的代码进行同步控制:
synchronize(syncObject){
    // This code can be accessed
    // by only one task at a time
}这也被称为同步控制块,在进入此段代码前,必须得到syncObject对象的锁。如果其他线程已经得到这个锁,那么就得等到锁被释放以后,才能进入临界区。
通过使用同步控制块,而不是对整个方法进行同步控制,可以使多个任务访问对象的时间性能得到显著提高,下面的例子比较了这两种同步控制方法。此外,它也显示了如何把一个非保护类型的类,在其他类的保护和控制之下,应用于多线程的环境:
package com.zjwave.thinkinjava.concurrency;

import java.util.ArrayList;
import java.util.Collections;
import java.util.List;
import java.util.concurrent.ExecutorService;
import java.util.concurrent.Executors;
import java.util.concurrent.TimeUnit;
import java.util.concurrent.atomic.AtomicInteger;

public class CriticalSection {
    // Test the two different approaches:
    static void testApproaches(PairManager pman1, PairManager pman2) {
        ExecutorService exec = Executors.newCachedThreadPool();
        PairManipulator pm1 = new PairManipulator(pman1),
                pm2 = new PairManipulator(pman2);
        PairChecker
                pcheck1 = new PairChecker(pman1),
                pcheck2 = new PairChecker(pman2);
        exec.execute(pm1);
        exec.execute(pm2);
        exec.execute(pcheck1);
        exec.execute(pcheck2);
        try {
            TimeUnit.MILLISECONDS.sleep(500);
        } catch (InterruptedException e) {
            System.out.println("Sleep interrupted");
        }
        System.out.println("pm1: " + pm1 + "\npm2: " + pm2);
        System.exit(0);
    }

    public static void main(String[] args) {
        PairManager pman1 = new PairManager1(),
                pman2 = new PairManager2();
        testApproaches(pman1,pman2);
    }
}

class Pair { // Not thread-safe
    private int x, y;

    public Pair(int x, int y) {
        this.x = x;
        this.y = y;
    }

    public Pair() {
        this(0, 0);
    }

    public int getX() {
        return x;
    }

    public int getY() {
        return y;
    }

    public void incrementX() {
        x++;
    }

    public void incrementY() {
        y++;
    }

    @Override
    public String toString() {
        return "x: " + x + ", y: " + y;
    }

    public class PairValuesNotEqualException extends RuntimeException {
        public PairValuesNotEqualException() {
            super("Pair values not equal: " + Pair.this);
        }
    }

    // Arbitrary invariant -- both variables must be equal:
    public void checkState() {
        if (x != y) {
            throw new PairValuesNotEqualException();
        }
    }
}

// Protect a Pair inside a thread-safe class:
abstract class PairManager {
    AtomicInteger checkCounter = new AtomicInteger(0);
    protected Pair p = new Pair();
    private List<Pair> storage = Collections.synchronizedList(new ArrayList<>());

    public synchronized Pair getPair() {
        // Make a copy to keep the original safe:
        return new Pair(p.getX(), p.getY());
    }

    // Assume this is a time consuming operation
    protected void store(Pair p) {
        storage.add(p);
        try {
            TimeUnit.MILLISECONDS.sleep(50);
        } catch (InterruptedException ignore) {
        }
    }

    public abstract void increment();

}

// Synchronize the entire method:
class PairManager1 extends PairManager {

    @Override
    public synchronized void increment() {
        p.incrementX();
        p.incrementY();
        store(getPair());
    }
}

// Use a critical section:
class PairManager2 extends PairManager {

    @Override
    public void increment() {
        Pair temp;
        synchronized (this) {
            p.incrementX();
            p.incrementY();
            temp = getPair();
        }
        store(temp);
    }
}


class PairManipulator implements Runnable {

    private PairManager pm;

    public PairManipulator(PairManager pm) {
        this.pm = pm;
    }


    @Override
    public void run() {
        while (true) {
            pm.increment();
        }
    }

    @Override
    public String toString() {
        return "Pair: " + pm.getPair() + " checkCounter = " + pm.checkCounter.get();
    }
}

class PairChecker implements Runnable {

    private PairManager pm;

    public PairChecker(PairManager pm) {
        this.pm = pm;
    }

    @Override
    public void run() {
        while (true) {
            pm.checkCounter.incrementAndGet();
            pm.getPair().checkState();
        }
    }
}

正如注释中注明的,Pair不是线程安全的,因为它的约束条件(虽然是任意的)需要两个变量要维护成相同的值。此外,如本文前面所述,自增加操作不是线程安全的,并且因为没有任何方法被标记为synchronized,所以不能保证一个Pair对象在多线程程序中不会被破坏。
你可以想象一下这种情况:某人交给你一个非线程安全的Pair类,而你需要在一个线程安全的环境中使用它。通过创建PairManager类就可以实现这一点,PairManager类持有一个Pair对象并控制对它的一切访问。注意唯一的public方法是getPair(),它是synchronized的。对于抽象方法increment(),对increment()的同步控制将在实现的时候进行处理。
至于PaireManager类的结构,它的一些功能在基类中实现,并且其一个或多个抽象方法在派生类中定义,这种结构在设计模式中称为模板方法。设计模式使你得以把变化封装在代码里,在此,发生变化的部分是模板方法increment()。在PairManager1中,整个increment()方法是被同步控制的,但在PairManager2中,increment()方法使用同步控制块进行同步。注意,synchronized关键字不属于方法特征签名的组成部分,所以可以在覆盖方法的时候加上去。
store()方法将一个Pair对象添加到了synchronized ArrayList中,所以这个操作是线程安全的。因此,该方法不必进行防护,可以放置在PairManager2的synchronized语句块的外部。
PairManipulator被创建用来测试两种不同类型的PairManager,其方法是在某个任务重调用increment(),而PairChecker则在另一个任务中执行。为了跟踪可以运行测试的频度,PairChecker在每次成功时都递增checkCounter。在main()中创建了两个PaireManipulator对象,并允许它们运行一段时间,之后每隔PairManipulator的结果会得到展示。
尽管每次运行的结果可能会非常不同,但一般来说,对于PairChecker的检查频率,PairManager1.increment()不允许有PairManager2.increment()那样多。后者采用同步控制块进行同步,所以对象不加锁的时间更长。这也是宁愿使用同步控制块而不是对整个方法进行同步控制的典型原因:使得其他线程能更多地访问(在安全的情况下尽可能多)。
你还可以使用显式的Lock对象来创建临界区:
package com.zjwave.thinkinjava.concurrency;

import java.util.concurrent.locks.Lock;
import java.util.concurrent.locks.ReentrantLock;

public class ExplicitCriticalSection {
    public static void main(String[] args) {
        PairManager pman1 = new ExplicitPairManager1(),
                pman2 = new ExplicitPairManager2();
        CriticalSection.testApproaches(pman1, pman2);
    }
}

abstract class ExplicitPairManager extends PairManager{
    protected Lock lock = new ReentrantLock();

    @Override
    public Pair getPair() {
        lock.lock();
        try {
            return new Pair(p.getX(), p.getY());
        } finally {
            lock.unlock();
        }
    }

}

// Synchronize the entire method:
class ExplicitPairManager1 extends ExplicitPairManager {

    @Override
    public void increment() {
        lock.lock();
        try {
            p.incrementX();
            p.incrementY();
            store(getPair());
        } finally {
            lock.unlock();
        }
    }
}

// Use a critical section:
class ExplicitPairManager2 extends ExplicitPairManager {

    @Override
    public void increment() {
        Pair temp;
        lock.lock();
        try {
            p.incrementX();
            p.incrementY();
            temp = getPair();
        } finally {
            lock.unlock();
        }
        store(temp);
    }
}

这里复用了CriticalSection.java的绝大部分,并创建了新的使用显式的Lock对象的PairManager类型。ExplicitPairManager2展示了如何使用Lock对象来创建临界区,而对store()的调用则在这个临界区的外部。注意,获取getPair()方法也需要使用Lock对象加锁。
3.6 在其他对象上同步
synchronized块必须给定一个在其上进行同步的对象,并且最合理的方式是,使用其方法正在被调用的当前对象:synchronized(this),这正是PairManager2所使用的方式。在这种方式中,如果获得了synchronized块上的锁,那么该对象其他的synchronized方法和临界区就不能被调用了。因此,如果在this上同步,临界区的效果就会直接缩小在同步的范围内。
有时必须在另一个对象上同步,但是如果你要这么做,就必须确保所有相关的任务都是在同一个对象上同步的。下面的示例演示了两个任务可以同时进入同一个对象,只要这个对象上的方法是在不同的锁上同步的即可:
package com.zjwave.thinkinjava.concurrency;

public class SyncObject {
    public static void main(String[] args) {
        final DualSync ds = new DualSync();
        new Thread(){
            @Override
            public void run() {
                ds.f();
            }
        }.start();
        ds.g();
    }
}

class DualSync {
    private Object syncObject = new Object();
    public synchronized void f(){
        for (int i = 0; i < 5; i++) {
            System.out.println("f()");
            Thread.yield();
        }
    }

    public void g(){
        synchronized (syncObject){
            for (int i = 0; i < 5; i++) {
                System.out.println("g()");
                Thread.yield();
            }
        }
    }
}

DualSync.f()(通过同步整个方法)在this同步,而g()有一个在syncObject上同步的synchronized块。因此,这两个同步是互相独立的。通过在main()中创建调用f()的Thread对这一点进行了演示,因为main()线程是被用来调用g()的。从输出中可以看到,这两个方式在同时运行,因此任何一个方法都没有因为对另一个方法的同步而被阻塞。
3.7 线程本地存储
防止任务在共享资源上产生冲突的第二种方式是根除对变量的共享。线程本地存储是一种自动化机制,可以为使用相同变量的每个不同的线程都创建不同的存储。因此,如果你有5个线程都要使用变量x所表示的对象,那线程本地存储就会生成5个用于x的不同的存储块。主要是,它们使得你可以将状态与线程关联起来。
创建和管理线程本地存储可以由java.lang.ThreadLocal类来实现,如下所示:
package com.zjwave.thinkinjava.concurrency;

import java.util.Random;
import java.util.concurrent.ExecutorService;
import java.util.concurrent.Executors;
import java.util.concurrent.TimeUnit;

public class ThreadLocalVariableHolder {
    private static ThreadLocal<Integer> value = new ThreadLocal<Integer>(){
        private Random rand = new Random(47);

        @Override
        protected synchronized Integer initialValue() {
            return rand.nextInt(10000);
        }
    };

    public static void increment(){
        value.set(value.get() + 1);
    }

    public static int get(){
        return value.get();
    }

    public static void main(String[] args) throws InterruptedException {
        ExecutorService exec = Executors.newCachedThreadPool();
        for (int i = 0; i < 5; i++) {
            exec.execute(new Accessor(i));
        }
        TimeUnit.MILLISECONDS.sleep(3); // Run for a while
        System.exit(0);
    }
}


class Accessor implements Runnable{
    private final int id;

    public Accessor(int id) {
        this.id = id;
    }


    @Override
    public void run() {
        while (!Thread.currentThread().isInterrupted()){
            ThreadLocalVariableHolder.increment();
            System.out.println(this);
            Thread.yield();
        }
    }

    @Override
    public String toString() {
        return "#" + id + ": " + ThreadLocalVariableHolder.get();
    }
}
ThreadLocal对象通常当做静态域存储。在创建ThreadLocal时,你只能通过get()和set()方法来访问该对象的内容,其中,get()方法将返回与其线程相关联的对象的副本,而set()会将参数插入到为其线程存储的对象中,并返回存储中原有的对象。increment()和get()方法在ThreadLocalVariableHolder中演示了这一点。注意,increment()和get()方法都不是synchronized的,因为ThreadLocal保证不会出现竞争条件。
当运行这个程序时,你可以看到每个单独的线程都被分配了自己的存储,因为它们每个都需要跟踪自己的计数值,即便只有一个ThreadLocalVariableHolder对象。
4.终结任务
在前面的某些示例中,cancel()和isCanceled()方法被放到了一个所有任务都可以看到的类中。这些任务通过检查isCanceled()来确定何时终止它们自己,对于这个问题来说,这是一种合理的方式。但是,在某些情况下,任务必须更加突然地终止。
首先,让我们观察一个示例,它不仅演示了终止问题,而且还是一个资源共享的示例。
4.1 装饰性花园
在这个仿真程序中,花园委员会希望了解每天通过多个大门进入公园的总人数。每个大门都有一个十字旋转门或者某种其他形式的计数器,并且任何一个十字旋转门的计数值递增时,就表示公园中的总人数的共享计数值也会递增。
package com.zjwave.thinkinjava.concurrency;

import java.util.ArrayList;
import java.util.List;
import java.util.Random;
import java.util.concurrent.ExecutorService;
import java.util.concurrent.Executors;
import java.util.concurrent.TimeUnit;

public class OrnamentalGarden {
    public static void main(String[] args) throws InterruptedException {
        ExecutorService exec = Executors.newCachedThreadPool();
        for (int i = 0; i < 5; i++) {
            exec.execute(new Entrance(i));
        }
        // Run for a while , then stop and collect the data:
        TimeUnit.SECONDS.sleep(3);
        Entrance.cancel();
        exec.shutdown();
        if (!exec.awaitTermination(250, TimeUnit.MILLISECONDS)) {
            System.out.println("Some tasks were not terminated!");
        }
        System.out.println("Total: " + Entrance.getTotalCount());
        System.out.println("Sum of Entrances: " + Entrance.sumEntrances());
    }
}

class Count {
    private int count = 0;
    private Random rand = new Random(47);

    // Remove the synchronized keyword to see counting fail:
    public synchronized int increment() {
        int temp = count;
        if (rand.nextBoolean()) { // Yield half the time
            Thread.yield();
        }
        return (count = ++temp);
    }

    public synchronized int value() {
        return count;
    }
}

class Entrance implements Runnable {

    private static Count count = new Count();
    private static List<Entrance> entrances = new ArrayList<>();

    private int number = 0;

    //Doesn't need synchronization to read
    private final int id;
    private static volatile boolean canceled = false;

    // Atomic operation on a volatile field:
    public static void cancel() {
        canceled = true;
    }

    public Entrance(int id) {
        this.id = id;
        // Keep this task in a list. Also prevents
        // garbage collection of dead tasks:
        entrances.add(this);
    }

    @Override
    public void run() {
        while (!canceled) {
            synchronized (this) {
                ++number;
            }
            System.out.println(this + " Total: " + count.increment());
            try {
                TimeUnit.MILLISECONDS.sleep(100);
            } catch (InterruptedException e) {
                System.out.println("sleep interrupted");
            }
        }
        System.out.println("Stopping " + this);
    }

    public synchronized int getValue() {
        return number;
    }

    @Override
    public String toString() {
        return "Entrance " + id + ": " + getValue();
    }

    public static int getTotalCount() {
        return count.value();
    }

    public static int sumEntrances() {
        int sum = 0;
        for (Entrance entrance : entrances) {
            sum += entrance.getValue();
        }
        return sum;
    }
}

这里使用单个的Count对象来跟踪花园参观者的主计数值,并且将其当做Entrance类中的一个静态域进行存储。Count.increment()和Count.value()都是synchronized的,用来控制对count域的访问。increment()方法使用了Random对象,目的是在从把count读取到temp中,到递增temp并将其存储回count的这段时间里,有大约一半的时间产生让步。如果你将increment()上的synchronized关键字注释掉,那么这个程序就会崩溃,因为多个任务将同时访问并修改count(yield()会使问题更快地发生)。
每个Entrance任务都维护着一个本地值number,它包含通过某个特定入口进入的参观者的数量。这提供了对count对象的双重检查,以确保其记录的参观者数量是正确的。Entrance.run()只是递增number和count对象,然后休眠100毫秒。
因为Entrance.canceled()是一个volatile的boolean,而它只会被读取和赋值(不会与其他域组合在一起被读取),所以不需要同步对其的访问,就可以安全地操作它。如果你对诸如此类的情况有任何疑虑,那么最好总是使用synchronized。
这个程序在以稳定的方式关闭所有事物方面还有一些小麻烦,其部分原因是为了说明在终止多线程程序时你必须相当小心,而另一部分原因是为了演示interrupt()的值,稍后有关于这个值的介绍。
在3秒钟之后,main()向Entrance发送static cancel()消息,然后调用exec对象的shutdown()方法,之后调用exec上的awaitTermination()方法。ExecutorService.awaitTermination()等待每个任务结束,如果所有的任务在超时时间达到之前全部结束,则返回true,否则返回false,表示不是所有的任务都已经结束了。尽管这会导致每个任务都退出其run()方法,并因此作为任务而终止,但是Entrance对象仍旧是有效的,因为在构造器中,每个Entrance对象都存储在称为entrances的静态List<Entrance>中。因此,sumEntrances()仍旧可以作用于这些有效的Entrance对象。
当这个程序运行时,你将看到,在人们通过十字旋转门时,将显示总人数和通过每个入口的人数。如果移除Count.increment()上面的synchronized声明,你将会注意到总人数与你期望的有差异,每个十字转门统计的人数将与count中的值不同。只要用互斥来同步对Count的访问,问题就可以解决了。请记住,Count.increment()通过使用temp和yield(),增加了失败的可能性。在真正的线程问题中,失败的可能性从统计学角度看可能非常小,因此你可能很容易就掉进了轻信所有事物都将正确工作的陷阱里。就像在上面的示例中,有些还未发生的问题就有可能会隐藏起来,因此在复审并发代码时,要格外地仔细。
4.2 在阻塞时终结
前面示例中的Entrance.run()在其循环中包含对sleep()的调用。我们知道,sleep()最终将唤醒,而任务也将返回循环的开始部分,去检查canceled标志,从而决定是否跳出循环。但是,sleep()这种情况,它使任务从执行状态变为被阻塞状态,而有时你必须终止被阻塞的任务。
线程状态
一个线程可以处于以下四种状态之一:
- 新建(new):当线程被创建时,它只会短暂地处于这种状态。此时它已经分配了必须的系统资源,并执行了初始化。此刻线程已经有资格获得CPU时间了,之后调度器将把这个线程转变为可运行状态或阻塞状态。
- 就绪(Runnable):在这种状态下,只要调度器把时间片分配给线程,线程就可以运行。也就是说,在任意时刻,线程可以运行也可以不运行。只要调度器能分配时间片给线程,它就可以运行,这不同于死亡和阻塞状态。
- 阻塞(Blocked):线程能够运行,但又某个条件阻止它的运行。当线程处于阻塞状态时,调度器将忽略线程,不会分配给线程任何CPU时间。知道线程重新进入了就绪状态,它才有可能执行执行操作。
- 死亡(Dead):处于死亡或终止状态的线程将不再是可调度的,并且再也不会得到CPU时间,它的任务一结束,或不再是可运行的。任务死亡的通常方式是从run()方法返回,但是任务的线程还可以被中断。
进入阻塞状态
一个任务进入阻塞状态,可能有如下原因:
- 通过调用sleep(milliseconds)使任务进入休眠状态,在这种情况下,任务在指定的时间内不会运行。
- 通过调用wait()使线程挂起。知道线程得到了notify()或notifyAll()消息(或者在Java SE5的java.util.concurrent类库中等价的signal()或signalAll()消息),线程才会进入就绪状态。
- 任务在等待某个输入/输出完成。
- 任务试图在某个对象上调用其同步控制方法,但是对象锁不可用,因为另一个任务已经获取了这个锁。
在较早的代码中,也可能会看到用suspend()和resume()来阻塞和唤醒线程,但是在现代Java中这些方法被废止了(因为可能导致死锁),所以本文不讨论这些内容。stop()方法也已经被废止了,因为它不释放线程获得的锁,并且如果线程处于不一致的状态(受损状态),其他任务可以在这种状态下浏览并修改它们。这样锁产生的问题是微妙而难以被发现的。
现在我们需要查看的问题是:有时你希望能够终止处于阻塞状态的任务。如果对于处于阻塞状态的任务,你不能等待其到达代码中可以检查其状态值的某一点,因而决定让它主动地终止,那么你就必须强制这个任务跳出阻塞状态。
4.3 中断
正如你所想象的,在Runnable.run()方法的中间打断它,与等待该方法到达对cancel标志的测试,或者到达程序员准备好离开该方法的其他一些地方相比,要棘手得多。当你打断被阻塞的任务时,可能需要清理资源。正因为这一点,在任务的run()方法中间打断,更像是抛出的异常,因此在Java线程中的这种类型的异常中断中用到了异常(这会滑向异常的不恰当用法,因为这意味着你经常用它们来控制流程)。为了在以这种方式终止任务时,返回众所周知的良好状态,你必须仔细考虑代码的执行路径,并仔细编写catch子句以正确清除所有事物。
Thread类包含interrupt()方法,因此你可以终止被阻塞的任务,这个方法将设置线程的中断状态。如果一个线程已经被阻塞,或者试图执行一个阻塞操作,那么设置这个线程的中断状态将抛出InterruptedException。当抛出该异常或者该任务调用Thread.interrupt()时,中断状态将被复位。正如你将看到的,Thread.interrupted()提供了离开run()循环而不抛出异常的第二种方式。
为了调用interrupted(),你必须持有Thread对象。你可能已经注意到了,新的concurrent类库似乎在避免对Thread对象的直接操作,转而尽量通过Executor来执行所有操作。如果你在Executor上调用shutdownNow(),那么它将发送一个interrupt()调用给它启动的所有线程。这么做是有意义的,因为当你完成工程中的某个部分或者整个程序时,通常会希望同时关闭某个特定Executor的所有任务。然而,你有时也会希望只中断某个单一任务。如果使用Executor,那么通过调用submit()而不是executor()来启动任务,就可以持有该任务的上下文。submit()将返回一个泛型Future<?>,其中有一个未修饰的参数,因为你永远都不会在其上调用get()——持有这种Future的关键在于你可以在其上调用cancel(),并因此可以使用它来中断某个特定任务。如果你将true传递给cancel(),那么它就会拥有在该线程上调用interrupt()以停止这个线程的权限。因此,cancel()是一种中断由Executor启动的单个线程的方式。
下面的示例用Executor展示了基本的interrupt()用法:
package com.zjwave.thinkinjava.concurrency;

import com.zjwave.thinkinjava.enumerated.Input;

import java.io.IOException;
import java.io.InputStream;
import java.util.concurrent.ExecutorService;
import java.util.concurrent.Executors;
import java.util.concurrent.Future;
import java.util.concurrent.TimeUnit;

public class Interrupting {
    private static ExecutorService exec = Executors.newCachedThreadPool();

    static void test(Runnable r) throws InterruptedException {
        Future<?> f = exec.submit(r);
        TimeUnit.MILLISECONDS.sleep(100);
        System.out.println("Interrupting " + r.getClass().getName());
        f.cancel(true);// Interrupts if running
        System.out.println("Interrupt sent to " + r.getClass().getName());
    }

    public static void main(String[] args) throws InterruptedException {
        test(new SleepBlocked());
        test(new IOBlocked(System.in));
        test(new SynchronizedBlocked());
        TimeUnit.SECONDS.sleep(3);
        System.out.println("Aborting with System.exit(0)");
        System.exit(0); // ...since last 2 interrupts failed
    }
}

class SleepBlocked implements Runnable {

    @Override
    public void run() {
        try {
            TimeUnit.SECONDS.sleep(100);
        } catch (InterruptedException e) {
            System.out.println("SleepBlocked InterruptedException");
        }
        System.out.println("Exiting SleepBlocked.run()");
    }
}

class IOBlocked implements Runnable {

    private InputStream in;

    public IOBlocked(InputStream in) {
        this.in = in;
    }

    @Override
    public void run() {
        try {
            System.out.println("Waiting for read()");
            in.read();
        } catch (IOException e) {
            if (Thread.currentThread().isInterrupted()) {
                System.out.println("Interrupted from block I/O");
            } else {
                throw new RuntimeException(e);
            }
        }
        System.out.println("Exiting IOBlocked.run()");
    }
}

class SynchronizedBlocked implements Runnable {

    public SynchronizedBlocked() {
        new Thread() {
            @Override
            public void run() {
                f();
            }
        }.start();
    }

    public synchronized void f() {
        while (true) {// Never releases lock
            Thread.yield();
        }
    }

    @Override
    public void run() {
        System.out.println("Trying to call f()");
        f();
        System.out.println("Exiting SynchronizedBlocked.run()");
    }
}
上面的每个任务都表示了一种不同类型的阻塞。SleepBlock是可中断的阻塞示例,而IOBlocked和Synchronized是不可中断的阻塞示例。这个程序证明I/O和在synchronized块上的等待是不可中断的,但是通过浏览代码,你也可以预见到这一点——无论是I/O还是尝试调用synchronized方法,都不需要任何InterruptedException处理器。
前两个类很简单直观:在第一个类中run()方法调用了sleep(),而在第二个类中调用了read()。但是,为了演示SynchronizedBlock,我们必须首先获取锁。这是通过在构造器中创建匿名的Thread类的实例来实现的,这个匿名Thread类的对象通过调用f()获得某个对象锁(这个线程必须有别于为SynchrBlock驱动run()的线程,因为一个线程可以多次获得某个对象锁)。由于f()永远都不返回,因此这个锁永远不会释放,而SynchronizedBlock.run()在试图调用f(),并阻塞以等待这个锁被释放。
从输出中可以看到,你能够中断对sleep()的调用(或者任何要求抛出InterruptedException的调用)。但是,你不能中断正在试图获取synchronized锁或者试图执行I/O操作的线程。这有点令人烦恼,特别是在创建执行I/O的任务时,因为这意味着I/O具有锁住你的多线程程序的潜在可能性。特别是对于基于Web的程序,这更是关乎利害。
对于这类问题,有一个略显笨拙但是有时确实行之有效的解决方案,即关闭任务在其上发生阻塞的底层资源:
package com.zjwave.thinkinjava.concurrency;


import java.io.*;
import java.net.ServerSocket;
import java.net.Socket;
import java.util.concurrent.ExecutorService;
import java.util.concurrent.Executors;
import java.util.concurrent.TimeUnit;

public class CloseResource {
    public static void main(String[] args) throws IOException, InterruptedException {
        System.setIn(new BufferedInputStream(new ByteArrayInputStream(new byte[0])));
        ExecutorService exec = Executors.newCachedThreadPool();
        ServerSocket server = new ServerSocket(8080);
        InputStream sockedInput = new Socket("localhost", 8080).getInputStream();
        exec.execute(new IOBlocked(sockedInput));
        exec.execute(new IOBlocked(System.in));
        TimeUnit.MILLISECONDS.sleep(100);
        System.out.println("Shutting down all threads");
        exec.shutdownNow();
        TimeUnit.SECONDS.sleep(1);
        System.out.println("Closing " + sockedInput.getClass().getName());
        sockedInput.close();// Releases blocked thread
        TimeUnit.SECONDS.sleep(1);
        System.out.println("Closing " + System.in.getClass().getName());
        System.in.close();// Releases blocked thread
    }
}

对于在某些IDE上运行此段代码的同学来说,System.in已经被重定向到IDE上的控制台,因此,调用System.in.close()方法可能不会关闭,因此main()方法的第一行:
System.setIn(new BufferedInputStream(new ByteArrayInputStream(new byte[0])));将System.in重定向到一个可被关闭的InputStream上。
在shutdownNow()被调用之后以及在两个输入流上调用close()之前的延迟强调的是一旦底层资源被关闭,任务将解除阻塞。请注意,有一点很有趣,interrupt()看起来发生在关闭Socket而不是关闭System.in的时刻。
幸运的是,在Thinking in Java——Java I/O系统:NIO中介绍的各种nio类提供了更人性化的I/O中断。被阻塞的nio通断会自动地响应中断:
package com.zjwave.thinkinjava.concurrency;

import java.io.IOException;
import java.net.InetSocketAddress;
import java.net.ServerSocket;
import java.nio.ByteBuffer;
import java.nio.channels.AsynchronousCloseException;
import java.nio.channels.ClosedByInterruptException;
import java.nio.channels.SocketChannel;
import java.util.concurrent.ExecutorService;
import java.util.concurrent.Executors;
import java.util.concurrent.Future;
import java.util.concurrent.TimeUnit;

public class NIOInterruption {
    public static void main(String[] args) throws IOException, InterruptedException {
        ExecutorService exec = Executors.newCachedThreadPool();
        ServerSocket server = new ServerSocket(8080);
        InetSocketAddress isa = new InetSocketAddress("localhost", 8080);
        SocketChannel sc1 = SocketChannel.open(isa);
        SocketChannel sc2 = SocketChannel.open(isa);
        Future<?> f = exec.submit(new NIOBlocked(sc1,"sc1"));
        exec.execute(new NIOBlocked(sc2,"sc2"));
        exec.shutdown();
        TimeUnit.SECONDS.sleep(1);
        // Produce an interrupt via cancel:
        f.cancel(true);
        TimeUnit.SECONDS.sleep(1);
        // Release the block by closing the channel:
        sc2.close();
    }
}

class NIOBlocked implements Runnable {

    private final SocketChannel sc;

    private final String name;

    public NIOBlocked(SocketChannel sc,String name) {
        this.sc = sc;
        this.name = name;
    }

    @Override
    public String toString() {
        return "NIOBlocked#" + name;
    }

    @Override
    public void run() {
        try {
            System.out.println("Waiting for read() in " + this);
            sc.read(ByteBuffer.allocate(1));
        } catch (ClosedByInterruptException e) {
            System.out.println("ClosedByInterruptException:" + this);
        } catch (AsynchronousCloseException e) {
            System.out.println("AsynchronousCloseException:" + this);
        } catch (IOException e) {
            throw new RuntimeException(e);
        }
        System.out.println("Exiting NIOBlocked.run() " + this);
    }
}
如你所见,你还可以关闭底层资源以释放锁,尽管这种做法一般不是必需的。注意,使用execute()来启动两个任务,并调用e.shutdownNow()可以很容易地终止所有事物,而对于捕获上面示例中的Future,只有在将中断发送给一个线程,同时不发给另一个线程时才是必须的。
被互斥所阻塞
就像在Interrupting.java中看到的,如果你尝试着在一个对象上调用其synchronized方法,而这个对象的锁已经被其他任务获得,那么调用任务将被挂起(阻塞),直至这个锁可获得。下面的示例说明了同一个互斥可以如何能被同一个任务多次获得:
package com.zjwave.thinkinjava.concurrency;

public class MultiLock {

    public synchronized void f1(int count){
        if(count-- > 0){
            System.out.println("f1() calling f2() with count " + count);
            f2(count);
        }
    }

    public synchronized void f2(int count){
        if(count-- > 0){
            System.out.println("f2() calling f1() with count " + count);
            f1(count);
        }
    }


    public static void main(String[] args) {
        final MultiLock multiLock = new MultiLock();
        new Thread(){
            @Override
            public void run() {
                multiLock.f1(10);
            }
        }.start();
    }
}
在main()中创建了一个调用f1()的Thread,然后f1()和f2()互相调用直至count变为0。由于这个任务已经在第一个对f1()的调用中获得了multiLock对象锁,因此同一个任务将在对f2()的调用中再次获取这个锁,以此类推。这么做是有意义的,因为一个任务应该能够调用在同一个对象中的其他的synchronized方法,而这个任务已经持有锁了。
就像前面在不可中断的I/O中所观察到的那样,无论在任何时刻,只要任务以不可中断的方式被阻塞,那么都有潜在的锁住程序的可能。Java SE5并发类库中添加了一个特性,即ReentrantLock上阻塞的任务具备可以被中断的能力,这与在synchronized方法或临界区上阻塞的任务完全不同:
package com.zjwave.thinkinjava.concurrency;

import java.util.concurrent.TimeUnit;
import java.util.concurrent.locks.Lock;
import java.util.concurrent.locks.ReentrantLock;

public class Interrupting2 {
    public static void main(String[] args) throws InterruptedException {
        Thread t = new Thread(new Blocked2());
        t.start();
        TimeUnit.SECONDS.sleep(1);
        System.out.println("Issuing t.interrupt()");
        t.interrupt();
    }
}

class BlockedMutex{
    private Lock lock = new ReentrantLock();

    public BlockedMutex() {
        // Acquire it right away, to demonstrate interruption
        // of a task blocked on a ReentrantLock:
        lock.lock();
    }

    public void f(){
        try {
            // This will never be available to a second task
            lock.lockInterruptibly();// Special call
        } catch (InterruptedException e) {
            System.out.println("Interrupted from lock acquisition in f()");
        }
    }
}

class Blocked2 implements Runnable{

    BlockedMutex blocked = new BlockedMutex();

    @Override
    public void run() {
        System.out.println("Waiting for f() in BlockedMutex");
        blocked.f();
        System.out.println("Broken out of blocked call");
    }
}
BlockedMutex类有一个构造器,它要获取所创建对象上自身的Lock,并且从不释放这个锁。出于这个原因,如果你试图从第二个任务中调用f()(不同于创建这个BlockedMutex的任务),那么将会总是因Mutex不可获得而被阻塞。在Blocked2中,run()方法总是在调用blocked.f()的地方停止。当运行这个程序时,你将会看到,与I/O调用不同,interrupt()可以打断被互斥所阻塞的调用。
4.4 检查中断
注意,当你在线程上调用interrupt()时,中断发生的唯一时刻是在任务要进入到阻塞操作中,或者已经在阻塞操作内部时(如你所见,除了不可中断的I/O或被阻塞的synchronized方法之外,在其余的例外情况下,你无可事事)。但是如果根据程序运行的环境,你已经编写了可能会产生这种阻塞调用的代码,那又该怎么办呢?如果你只能通过在阻塞调用上抛出异常来退出,那么你就无法总是可以离开run()循环。因此,如果你调用interrupt()以停止某个任务,那么在run()循环碰巧没有产生任何阻塞调用的情况下,你的任务将需要第二种方式来退出。
这种机会是由中断状态来表示的,其状态可以通过调用interrupt()来设置。你可以通过调用interrupted()来检查中断状态,这不仅可以告诉你interrupt()是否被调用过,而且还可以清除中断状态。清除中断状态可以确保并发结构不会就某个任务被中断这个问题通知你两次,你可以经由单一的InterruptedException或单一的成功的Thread.interruped()测试来得到这种通知。如果想要再次检查以了解是否被中断,则可以在调用Thread.interruped()时将结果存储起来。
下面是实例展示了典型的惯用法,你应该在run()方法中使用它来处理在中断状态被设置时,被阻塞和不被阻塞的各种可能:
package com.zjwave.thinkinjava.concurrency;

import java.util.concurrent.TimeUnit;

public class InterruptingIdiom {

    /**
     * Args : 1100
     * @param args
     * @throws InterruptedException
     */
    public static void main(String[] args) throws InterruptedException {
        if(args.length != 1){
            System.out.println("usage: java InterruptingIdiom delay-in-mS");
            System.exit(1);
        }
        Thread t = new Thread(new Blocked3());
        t.start();
        TimeUnit.MILLISECONDS.sleep(new Integer(args[0]));
        t.interrupt();
    }
}

class NeedsCleanup{
    private final int id;

    public NeedsCleanup(int id) {
        this.id = id;
        System.out.println("NeedsCleanup " + id);
    }

    public void cleanup() {
        System.out.println("Cleaning up " + id);
    }
}

class Blocked3 implements Runnable{

    private volatile double d = 0.0;

    @Override
    public void run() {
        try{
            while (!Thread.interrupted()){
                // point1
                NeedsCleanup n1 = new NeedsCleanup(1);
                // Start try-finally immediately after definition
                // of n1, to guarantee proper cleanup of n1:
                try {
                    System.out.println("Sleeping");
                    TimeUnit.SECONDS.sleep(1);
                    // point2
                    NeedsCleanup n2 = new NeedsCleanup(2);
                    // Guarantee proper cleanup of n2:
                    try {
                        System.out.println("Calculating");
                        // A time-consuming,non-blocking operation:
                        for (int i = 0; i < 2500000; i++) {
                            d = d + (Math.PI + Math.E) / d;
                        }
                        System.out.println("Finished time-consuming operation");
                    }finally {
                        n2.cleanup();
                    }
                }finally {
                    n1.cleanup();
                }
            }
            System.out.println("Exiting via while() test");
        }catch (InterruptedException e){
            System.out.println("Exiting via InterruptedException");
        }
    }
}

NeedsCleanup类强调在你经由异常离开循环时,正确清理资源的必要性。注意,所以在Blocked3.run()中创建的NeedsCleanup资源都必须在其后面紧跟try-finally子句,以确保cleanup()方法总是会被调用。
你必须给程序提供一个命令行参数,来表示在它调用interrupt()之前以毫秒为单位的延迟时间。通过使用不同的延迟,你可以在不同地点退出Blocked3.run():在阻塞的sleep()调用中,或者在非阻塞的数学计算中。你将看到,如果interrupt()在注释point2之后(即在非阻塞的操作过程中)被调用,那么首先循环将结束,然后所有的本地对象将被销毁,最后循环会经由while语句的顶部退出。但是,如果interrupt()在point1和point2之间(在while语句之后,但是在阻塞操作sleep()之前或其过程中)被调用,那么这个任务就会在第一次试图调用阻塞操作之前,经由InterruptedException退出。在这种情况下,在异常被抛出之时唯一被创建出来的NeedsCleanup对象将被清楚,而你也就有了在catch子句中执行其他任何清除工作的机会。
被设计用来响应interrupt()的类必须建立一种策略,来确保它将保持一致的状态。这通常意味着所有需要清理的对象创建操作的后面,都必须紧跟try-finally子句,从而使得无论run()循环如何退出,清理都会发生。像这样的代码会工作得很好,但是,由于在Java中缺乏自动的析构器调用,因此这将依赖于客户端程序员去编写正确的try-finally子句。
5.线程之间的协作
正如你所见到的,当你使用线程来同时运行多个任务时,可以通过使用锁(互斥)来同步两个任务的行为,从而使得一个任务不会干涉另一个任务的资源。也就是说,如果两个任务在交替着步入某项共享资源(通常是内存),你可以使用互斥来使得任何时刻只有一个任务可以访问这项资源。
这个问题已经解决了,下一步是学习如何使任务彼此之间可以协作,以使得多个任务可以一起工作去解决某个问题。现在的问题不是彼此之间的干涉,而是彼此之间的协调,因为在这类问题中,某些部分必须在其他部分被解决之前解决。这非常像项目规划:必须先挖房子的地基,但是接下来可以并行地铺设钢结构和构件水泥部件,而这两项任务必须的混凝土浇注之前完成。管道必须在水泥板浇注之前到位,而水泥板必须在开始构筑房屋骨架之前到位,等等。在这些任务中,某些可以并行执行,但是某些步骤需要所有的任务都结束之后才能开动。
当任务协作时,关键问题是这些任务之间的握手。为了实现这种握手,我们使用了相同的基础特性:互斥。在这种情况下,互斥能够确保只有一个任务可以响应某个信号,这样就可以根除任何可能的竞争条件。在互斥之上,我们为任务添加了一种途径,可以将其自身挂起,直至某些外部条件发生变化(例如,管道现在已经到位),表示是时候让这个任务向前开动了为止。本节我们将浏览任务间的握手问题,这种握手可以通过Object的方法wait()和notify()来安全地实现。Java SE5的并发类库还提供了具有await()和signal()方法的Condition对象。我们将看到产生的各类问题,以及相应的解决方案。
5.1 wait()与notifyAll()
wait()使你可以等待某个条件发生变化,而改变这个条件超出了当前方法的控制能力。通常,这种条件将由另一个任务来改变。你肯定不想在你的任务测试这个条件的同时,不断地进行空循环,这被称为忙等待,通常是一种不良的CPU周期使用方式。因此wait()会在等待外部世界产生变化的时候将任务挂起,并且只有在notify()或notifyAll()发生时,即表示发生了某些感兴趣的事物,这个任务才会被唤醒并去检查所产生的变化。因此,wait()提供了一种在任务之间对活动同步的方式。
调用sleep()的时候锁并没有被释放,调用yield()也属于这种情况,理解这一点很重要。另一方面,当一个任务在方法里遇到了对wait()的调用的时候,线程的执行被挂起,对象上的锁被释放。因为wait()将释放锁,这就意味着另一个任务可以获得这个锁,因此在该对象(现在是未锁定的)中的其他synchronized方法可以在wait()期间被调用。这一点至关重要,因为这些其他的方法通常会产生改变,而这种改变正是使被挂起的任务重新唤醒所感兴趣的变化。因此,当你调用wait()时,就是在声明:“我已经刚刚做完能做的所有事情,因此我要在这里等待,但是我希望其他的synchronized操作在条件适合的情况下能够执行。”
有两种形式的wait()。第一种版本接受毫秒数作为参数,含义与sleep()方法里参数的意思相同,都是指“在此期间暂停”。但是与sleep()不同的是,对于wait()而言:
- 在wait()期间对象锁是释放的。
- 可以通过notify()、notifyAll(),或者令时间到期,从wait()中恢复执行。
第二种,也是更常用形式的wait()不接受任何参数。这种wait()将无线等待下去,知道线程接收到notify()或者notifyAll()消息。
wait()、notify()以及notifyAll()有一个比较特殊的方面,那就是这些方法是基类Object的一部分,而不是属于Thread的一部分。尽管看起来有点奇怪——仅仅针对线程的功能却作为通用基类的一部分而实现,不过这是有道理的,因为这些方法操作的锁也是所有对象的一部分。所以,你可以把wait()放进任何同步控制方法里,而不用考虑这个类是继承自Thread还是实现了Runnable接口。实际上,只能在同步控制方法或同步控制块里调用wait()、notify()和notifyAll()(因为不用操作锁,所以sleep()可以在非同步控制方法里调用)。如果在非同步控制方法里调用这些方法,程序能通过编译,但运行的时候,将得到IllegalMonitorStateException异常,并伴随着一些含糊的消息,比如“当前线程不是拥有者”。消息的意思是,调用wait()、notify()和notifyAll()的任务在调用这些方法前必须“拥有”(获取)对象的锁。
可以让另一个对象执行某种操作以维护其自己的锁。要这么做的话,必须首先得到对象的锁。比如,如果要向对象x发送notifyAll(),那么就必须在能够取得x的锁的同步控制块中这么做:
synchronized(x){
    x.notifyAll();
}让我们看一个简单的示例,WaxOMatic.java有两个过程:一个是将蜡涂到Car上,一个是抛光它。抛光任务在涂蜡任务完成之前,是不能执行其工作的,而涂蜡任务在涂另一层蜡之前,必须等待抛光任务完成。WaxOn和WaxOff都使用了Car对象,该对象在这些任务等待条件变化的时候,使用wait()和notifyAll()来挂起和重新启动这些任务:
package com.zjwave.thinkinjava.concurrency.waxomatic;

import java.util.concurrent.ExecutorService;
import java.util.concurrent.Executors;
import java.util.concurrent.TimeUnit;

public class WaxOMatic {
    public static void main(String[] args) throws InterruptedException {
        Car car = new Car();
        ExecutorService exec = Executors.newCachedThreadPool();
        exec.execute(new WaxOff(car));
        exec.execute(new WaxOn(car));
        TimeUnit.SECONDS.sleep(5); // Run for a while
        exec.shutdownNow(); // Interrupt all tasks
    }
}


class Car{
    private boolean waxOn = false;

    public synchronized void waxed(){
        waxOn = true; // Ready to buff
        notifyAll();
    }

    public synchronized void buffed(){
        waxOn = false; // Ready for another coat of wax
        notifyAll();
    }

    public synchronized void waitForWaxing() throws InterruptedException{
        while (waxOn == false){
            wait();
        }
    }

    public synchronized void waitForBuffing() throws InterruptedException {
        while (waxOn == true){
            wait();
        }
    }

}

class WaxOn implements Runnable{

    private Car car;

    public WaxOn(Car car) {
        this.car = car;
    }

    @Override
    public void run() {
        try{
            while (!Thread.interrupted()){
                System.out.print("Wax On! ");
                TimeUnit.MILLISECONDS.sleep(200);
                car.waxed();
                car.waitForBuffing();
            }
        }catch (InterruptedException e){
            System.out.println("Exiting via interrupt");
        }
        System.out.println("Ending Wax On task");
    }
}

class WaxOff implements Runnable{

    private Car car;

    public WaxOff(Car car) {
        this.car = car;
    }

    @Override
    public void run() {
        try{
            while (!Thread.interrupted()){
                car.waitForWaxing();
                System.out.print("Wax Off! ");
                TimeUnit.MILLISECONDS.sleep(200);
                car.buffed();
            }
        }catch (InterruptedException e){
            System.out.println("Exiting via interrupt");
        }
    }
}

这里,Car有一个单一的boolean属性waxOn,表示涂蜡-抛光处理的状态。
在waitForWaxing()中将检查waxOn标志,如果它为false,那么这个调用任务将通过调用wait()而被挂起。这个行为发生在synchronized方法中这一点很重要,因为在这样的方法中,任务已经获得了锁。当你调用wait()时,线程被挂起,而锁被释放。锁被释放这一点是本质所在,因为为了安全地改变对象的状态(例如,将waxOn改变为true,如果被挂起的任务要继续执行,就必须执行该动作),其他某个任务就必须能够获得这个锁。在本例中,如果另一个任务调用waxed()来表示“是时候该干点什么了”,那么就必须获得这个锁,从而将waxOn改变为true。之后,waxed()调用notifyAll(),这将唤醒在对wait()的调用中被挂起的任务。为了使该任务从wait()中唤醒,它必须首先重新获得当它进入wait()时释放的锁。在这个锁变得可用之前,这个任务是不会被唤醒的。
WaxOn.run()表示给汽车打蜡过程的第一个步骤,因此它将执行它的操作:调用sleep()以模拟需要涂蜡的时间,然后告知汽车涂蜡结束,并调用waitForBuffing(),这个方法会用一个wait()调用来挂起这个任务,直至WaxOff任务调用这辆车的buffed(),从而改变状态并调用notifyAll()为止。另一方面,WaxOff.run()立即进入waitForWaxing(),并因此而被挂起,直至WaxOn涂完蜡并且waxed()被调用。在运行这个程序时,你可以看到当控制权在两个任务之间来回互相传递时,这两个步骤过程在不断的重复。在5秒钟之后,interrupt()会终止这两个线程,当你调用某个ExecutorService的shutDownNow()时,它会调用所有由它控制的线程的interrupt()。
前面的示例强调你必须用一个检查感兴趣的条件的while循环包围wait()。这很重要,因为:
- 你可能有多个任务出于相同的原因在等待同一个锁,而第一个唤醒任务可能会改变这种状况(即使你没有这么做,有人也会通过继承你的类去这么做)。如果属于这种情况,那么这个任务应该被再次挂起,直至其该兴趣的条件发生变化。
- 在这个任务从其wait()中被唤醒的时刻,有可能会有某个其他的任务已经做出了改变,从而使得这个任务在此时不能执行,或者执行其操作已显得无关紧要。此时,应该通过再次调用wait()来将其重新挂起。
- 也有可能某些任务出于不同的原因在等待你的对象上的锁(在这种情况下必须使用notifyAll())。在这种情况下,你需要检查是否已经由正确的原因唤醒,如果不是,就再次调用wait()。
因此,其本质就是要检查所感兴趣的特定条件,并在条件不满足的情况下返回到wait()中。惯用的方法就是使用while来编写这种代码。
错失的信号
当两个线程使用notify()/wait()或notifyAll()/wait()进行协作时,有可能会错过某个信号。假设T1是通知T2的线程,而这两个线程都是使用下面(有缺陷的)方式实现的:
T1:
synchronized(sharedMonitor){
    <setup condition for T2>
    sharedMonitor.notify();
}

T2:
while(someCondition){
    // Point 1
    synchronized(sharedMonitor){
        sharedMonitor.wait();
    }
}
<setup condition for T2>是防止T2调用wait()的一个动作,当然前提是T2还没有调用wait()。
假设T2对someCondition求值并发现其为true。在Point1,线程调度器可能切换到了T1。而T1将执行其设置,然后调用notify()。当T2得以继续执行时,此时对于T2来说,时机已经晚了,以至于不能意识到这个条件已经发生了变化,因此会盲目进入wait()。此时notify()将错失,而T2也将无限地等待这个已经发送过的信号,从而产生死锁。
该问题的解决方案是放置在someCondition变量上产生竞争条件。下面是T2正确的执行方式:
synchronized(sharedMonitor){
    while(someCondition){
        sharedMonitor.wait();
    }
}现在,如果T1首先执行,当控制返回T2时,它将发现条件发生了变化,从而不会进入wait()。反过来,如果T2首先执行,那它将进入wait(),并且稍后会由T1唤醒。因此,信号不会错失。
5.2 notify()与notifyAll()
因为在技术上,可能会有多个任务在单个Car对象上处于wait()状态,因此调用notifyAll()比只调用notify()要更安全。但是,上面程序的结构只会有一个任务实际处于wait()状态,因此你可以使用notify()来代替notifyAll()。
使用notify()而不是notifyAll()是一种优化。使用notify()时,在众多等待同一个锁的任务只有一个会被唤醒,因此如果你希望使用notify(),所有任务必须等待相同的条件,因为如果你有多个任务在等待不同的条件,那么你就不会知道是否唤醒了恰当的任务。如果使用notify(),当条件发生变化时,必须只有一个任务能够从中受益。最后,这些限制对所有可能存在的子类都必须总是起作用的。如果这些规则中有任何一条不满足,那么你就必须使用notifyAll()而不是notify()。
在有关Java的线程机制的讨论中,有一个令人困惑的描述:notifyAll()将唤醒“所有正在等待的任务”。这是否意味着在程序中任何地方,任何处于wait()状态中的任务都将被任何对notifyAll()的调用唤醒呢?在下面的实例中,与Task2相关的代码说明了情况并非如此——事实上,当notifyAll()因某个特定锁而被调用时,只有等待这个锁的任务才会被唤醒:
package com.zjwave.thinkinjava.concurrency;

import java.util.Timer;
import java.util.TimerTask;
import java.util.concurrent.ExecutorService;
import java.util.concurrent.Executors;
import java.util.concurrent.TimeUnit;

public class NotifyVsNotifyAll {
    public static void main(String[] args) throws InterruptedException {
        ExecutorService exec = Executors.newCachedThreadPool();
        for (int i = 0; i < 5; i++) {
            exec.execute(new Task());
        }
        exec.execute(new Task2());
        Timer timer = new Timer();
        timer.scheduleAtFixedRate(new TimerTask() {
            boolean prod = true;
            @Override
            public void run() {
                if(prod){
                    System.out.println("\nnotify() ");
                    Task.blocker.prod();
                    prod = false;
                }else{
                    System.out.println("\nnotifyAll() ");
                    Task.blocker.prodAll();
                    prod = true;
                }
            }
        },400,400); // Run every 4 second
        TimeUnit.SECONDS.sleep(5); // Run for a while...
        timer.cancel();
        System.out.println("\nTimer canceled");
        TimeUnit.MILLISECONDS.sleep(500);
        System.out.println("Task2.blocker.prodAll() ");
        Task2.blocker.prodAll();
        TimeUnit.MILLISECONDS.sleep(500);
        System.out.println("\nShutting down");
        exec.shutdownNow(); // Interrupt all tasks
    }
}

class Blocker{
    synchronized void waitingCall(){
        try {
            while (!Thread.interrupted()){
                wait();
                System.out.print(Thread.currentThread() + " ");
            }
        }catch (InterruptedException e){
            // Ok to exit this way
        }
    }

    synchronized void prod(){
        notify();
    }

    synchronized void prodAll(){
        notifyAll();
    }
}

class Task implements Runnable{

    static Blocker blocker = new Blocker();

    @Override
    public void run() {
        blocker.waitingCall();
    }
}

class Task2 implements Runnable{

    // A separate Blocker object:
    static Blocker blocker = new Blocker();

    @Override
    public void run() {
        blocker.waitingCall();
    }
}

Task和Task2每个都有其自己的Blocker对象,因此每个Task对象都会在Task.blocker上阻塞,而每个Task2都会在Task2.blocker上阻塞。在main()中,java.util.Timer对象被设置为每400毫秒执行一次run()方法,而这个run()方法将经由“激励”方法交替地在Task.blocker上调用notify()和notifyAll()。
从输出中你可以看到,即使存在Task2.blocker上阻塞的Task2对象,也没有任何在Task.blocker上的notify()或notifyAll()调用会导致Task2对象被唤醒。与此类似,在main()的结尾,调用了timer的cancel(),即使计时器被撤销了,前五个任务也依然在运行,并仍旧在它们对Task.blocker.waitingCall()的调用中被阻塞。对Task2.blocker.prodAll()的调用所产生的输出不包括任何在Task.blocker中的锁上等待的任务。
如果你浏览Blocker中的prod()和prodAll(),就会发现这是有意义的。这些方法是synchronized的,这意味它们将获取自身的锁,因此当它们调用notify()或notifyAll()时,只在这个锁上调用是符合逻辑的——因此,将只唤醒在等待这个特定锁的任务。
Blocker.waitingCall()非常简单,以至于在本例中,你只需声明for(;;)而不是while(!Thread.interrupted())就可以达到相同的效果,因为在本例中,由于异常而离开循环和通过检查interrupted()标志离开循环是没有任何区别的——在两种情况下都要执行相同的到吗。但是,事实上,这个示例选择了检查interrupted(),因为存在着两种离开循环的方式。如果在以后的某个时刻,你决定要在循环中添加更多的代码,那么如果没有覆盖从这个循环中退出的两条路径,就会产生引入错误的风险。
5.3 生产者与消费者
请考虑这样一个饭店,它有一个厨师和一个服务员。这个服务员必须等待厨师准备好膳食。当厨师准备好时,它会通知服务员,之后服务员上菜,然后返回继续等待。这是一个任务协作的示例:厨师代表生产者,而服务员代表消费者。两个任务必须在膳食被生产和消费时进行握手,而系统必须以有序的方式关闭。下面是对这个叙述建模的代码:
package com.zjwave.thinkinjava.concurrency;

import java.util.concurrent.ExecutorService;
import java.util.concurrent.Executors;
import java.util.concurrent.TimeUnit;

public class Restaurant {

    Meal meal;
    ExecutorService exec = Executors.newCachedThreadPool();
    WaitPerson waitPerson = new WaitPerson(this);
    Chef chef = new Chef(this);

    public Restaurant() {
        exec.execute(chef);
        exec.execute(waitPerson);
    }

    public static void main(String[] args) {
        new Restaurant();
    }

}

class Meal{
    private final int orderNum;

    public Meal(int orderNum) {
        this.orderNum = orderNum;
    }

    @Override
    public String toString() {
        return "Meal " + orderNum;
    }
}

class WaitPerson implements Runnable{

    private Restaurant restaurant;

    public WaitPerson(Restaurant restaurant) {
        this.restaurant = restaurant;
    }

    @Override
    public void run() {
        try {
            while (!Thread.interrupted()){
                synchronized (this){
                    while (restaurant.meal == null){
                        wait(); // ... for the chef to produce a meal
                    }
                }
                System.out.println("Waitperson got " + restaurant.meal);
                synchronized (restaurant.chef){
                    restaurant.meal = null;
                    restaurant.chef.notifyAll(); // Ready for another
                }
            }
        }catch (InterruptedException e){
            System.out.println("WaitPerson interrupted");
        }
    }
}

class Chef implements Runnable{

    private Restaurant restaurant;
    private int count = 0;

    public Chef(Restaurant restaurant) {
        this.restaurant = restaurant;
    }

    @Override
    public void run() {
        try {
            while (!Thread.interrupted()){
                synchronized (this){
                    while (restaurant.meal != null){
                        wait(); // ... for the meal to be taken
                    }
                }
                if (++count == 10){
                    System.out.println("Out of food, closing");
                    restaurant.exec.shutdownNow();
                }
                System.out.print("Order up!");
                synchronized (restaurant.waitPerson){
                    restaurant.meal = new Meal(count);
                    restaurant.waitPerson.notifyAll();
                }
                TimeUnit.MILLISECONDS.sleep(100);
            }
        }catch (InterruptedException e){
            System.out.println("Chief interrupted");
        }
    }
}
Restaurant是WaitPerson和Chef的焦点,他们都必须知道在为哪个Restaurant工作,因为他们必须和这家饭店的“餐窗”打交道,以便放置或拿取膳食restaurant.meal。在run()中,WaitPerson进入wait()模式,停止其任务,直至被Chef的notifyAll()唤醒。由于这是一个非常简单的程序,因此我们知道只有一个任务将在WaitPerson的锁上等待:即WaitPerson任务自身。处于这个原因,理论上可以调用notify()而不是notifyAll()。但是,在更复杂的情况下,可能会有多个任务在某个特定对象锁上等待,因此你不知道哪个任务应该被唤醒。因此,调用notifyAll()要更安全一些,这样可以唤醒等待这个锁的所有任务,而每个任务都必须决定这个通知是否与自己相关。
一旦Chef送上Meal并通知WaitPerson,这个Chef就将等待,直至WaitPerson收集到了订单并通知Chef,之后Chef就可以烧下一份Meal了。
注意,wait()被包装在一个while()语句中,这个语句在不断地测试正在等待的事物。咋看上去这有点怪——如果在等待一个订单,一旦你被唤醒,这个订单就必定是可获得的,对吗?正如前面注意到的,问题是在并发应用中,某个其他的任务可能会在WaitPerson被唤醒时,会突然插足并拿走订单,唯一安全的方式是使用下面这种wait()的惯用法(当然要在恰当的同步内部,并采用防止错误信号可能性的程序设计):
while(conditionIsNotMet){
    wait();
}这可以保证在你退出等待循环之前,条件将得到满足,并且如果你收到了关于某事物的通知,而它与这个条件并无关系(就像在使用notifyAll()时可能发生的情况一样),或者在你完全退出等待循环之前,这个条件发生了变化,都可以确保你可以重返等待状态。
请注意观察,对notifyAll()的调用必须首先捕获waitPerson上的锁,而在WaitPerson.run()中的对wait()的调用会自动地释放这个锁,因此这是有可能实现的。因为调用notifyAll()必然拥有这个锁,所以这可以保证两个试图在同一个对象上调用notifyAll()的任务不会互相冲突。
通过把整个run()方法体放到一个try语句块中,可使得这两个run()方法都被设计为可以有序地关闭。catch子句将紧挨着run()方法的结束括号之前结束,因此,如果这个任务收到了InterruptedException异常,它将在捕获异常之后立即结束。
注意,在Chef中,在调用shutdownNow()之后,你应该直接从run()返回,并且通常这就是你应该做的。但是,以这种方式执行还有一些更有趣的东西。记住,shutdownNow()将向所有由ExecutorService启动的任务发送interrupt(),但是在Chef中,任务并没有在获得该interrupt()之后立即关闭,因为当任务试图进入一个(可中断的)阻塞操作时,这个中断只能抛出InterruptedException。因此,你将看到首先显示了“Order up!”,然后当Chef试图调用sleep()时,抛出了InterruptedException。如果移除对sleep()的调用,那么这个任务将回到run()循环的顶部,并由于Thread.interrupted()测试而退出,同时并不抛出异常。
在前面的示例中,对于一个任务而言,只有一个单一的地点用于存放对象,从而使得另一个任务稍后可以使用这个对象。但是,在典型的生产者-消费者实现中,应使用先进先出队列来存储被生产和消费的对象。
使用显式的Lock和Condition对象
在Java SE5的java.util.concurrent类库中还有额外的显式工具可以用来重写WaxOMatic.java。使用互斥并允许任务挂起的基本类是Condition,你可以通过在Condition上调用await()来挂起一个任务。当外部条件发生变化,意味着某个任务应该继续执行时,你可以通过调用signal()来通知这个任务,从而唤醒一个任务,或者调用signalAll()来唤醒所有在这个Conditon上被其自身挂起的任务(与使用notifyAll()相比,signalAll()是更安全的方式)。
下面是WaxOMatic.java的重写版本,它包含一个Condition,用来在waitForWaxing()或waitForBuffering()内部挂起一个任务:
package com.zjwave.thinkinjava.concurrency.waxomatic2;

import java.util.concurrent.ExecutorService;
import java.util.concurrent.Executors;
import java.util.concurrent.TimeUnit;
import java.util.concurrent.locks.Condition;
import java.util.concurrent.locks.Lock;
import java.util.concurrent.locks.ReentrantLock;

public class WaxOMatic2 {
    public static void main(String[] args) throws InterruptedException {
        Car car = new Car();
        ExecutorService exec = Executors.newCachedThreadPool();
        exec.execute(new WaxOff(car));
        exec.execute(new WaxOn(car));
        TimeUnit.SECONDS.sleep(5);
        exec.shutdownNow();
    }
}

class Car{
    private Lock lock = new ReentrantLock();
    private Condition condition = lock.newCondition();
    private boolean waxOn = false;

    public void waxed(){
        lock.lock();
        try {
            waxOn = true;//Ready to buff
            condition.signalAll();
        }finally {
            lock.unlock();
        }
    }

    public void buffed(){
        lock.lock();
        try {
            waxOn = false; // Ready for another coat of wax
            condition.signalAll();
        }finally {
            lock.unlock();
        }
    }

    public void waitForWaxing() throws InterruptedException {
        lock.lock();
        try {
            while (waxOn == false){
                condition.await();
            }
        }finally {
            lock.unlock();
        }
    }

    public void waitForBuffing() throws InterruptedException {
        lock.lock();
        try {
            while (waxOn == true){
                condition.await();
            }
        }finally {
            lock.unlock();
        }
    }
}

class WaxOn implements Runnable{

    private Car car;

    public WaxOn(Car car) {
        this.car = car;
    }

    @Override
    public void run() {
        try {
            while (!Thread.interrupted()){
                System.out.print("Wax On! ");
                TimeUnit.MILLISECONDS.sleep(200);
                car.waxed();
                car.waitForBuffing();
            }
        }catch (InterruptedException e){
            System.out.println("Exiting via interrupt");
        }
        System.out.println("Ending Wax On Task");
    }
}

class WaxOff implements Runnable{

    private Car car;

    public WaxOff(Car car) {
        this.car = car;
    }

    @Override
    public void run() {
        try {
            while (!Thread.interrupted()){
                car.waitForWaxing();
                System.out.print("Wax Off! ");
                TimeUnit.MILLISECONDS.sleep(200);
                car.buffed();
            }
        }catch (InterruptedException e){
            System.out.println("Exiting via interrupt");
        }
        System.out.println("Ending Wax Off task");
    }
}
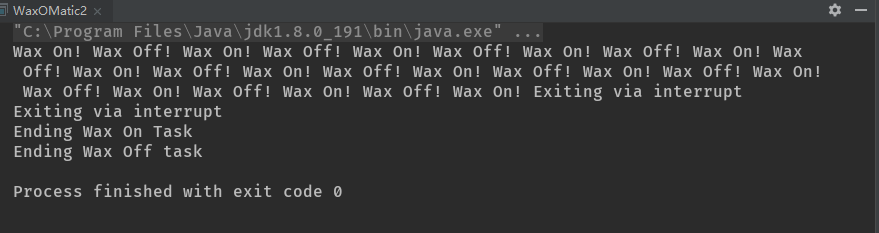
在Car构造器中,单个的Lock将产生一个Condition对象,这个对象被用来管理任务间的通信。但是,这个Condition对象不包含任何有关处理状态的信息,因此,你需要管理额外的表示处理状态的信息,即boolean waxOn。
每个对lock()的调用都必须紧跟一个try-finally子句,用来保证在所有情况下都可以释放锁。在使用内建版本时,任务在可以调用await()、signal()或signalAll()之前,必须拥有这个锁。
注意,这个解决方案比之前一个更加复杂,在本例中这种复杂性并未使你收获更多。Lock和Condition对象只有在更加困难的多线程问题中才是必须的。
5.4 生产者-消费者与队列
wait()和notifyAll()方法以一种非常低级的方式解决了任务互操作的问题,即每次交互时都握手。在许多情况下,你可以描向更高的抽象级别,使用同步队列来解决任务协作问题,同步队列在任何时刻都只允许一个任务插入或移除元素。在java.util.concurrent.BlockingQueue接口中提供了这个队列,这个接口有大量的标准实现。你通常可以使用LinkedBlockingQueue,它是一个无界队列,还可以使用ArrayBlockingQueue,它具有固定的尺寸,因此你可以在它被阻塞之前,向其中放置有限数量的元素。
如果消费者任务试图从队列中获取对象,而该队列此时为空,那么这些队列还可以挂起消费者任务,并且当有更多的元素可用时恢复消费者任务。阻塞队列可以解决非常大量的问题,而其方式与wait()和notifyAll()相比,则简单并可靠得多。
下面是一个简单的测试,它将多个LiftOff对象的执行串行化了。消费者是LiftOffRunner,它将每个LiftOff对象从BlockingQueue中退出并运行。(即,它是通过显式地调用run()使用自己的线程来运行,而不是为每个任务启动一个新线程。)
package com.zjwave.thinkinjava.concurrency;

import java.io.BufferedReader;
import java.io.IOException;
import java.io.InputStreamReader;
import java.util.concurrent.ArrayBlockingQueue;
import java.util.concurrent.BlockingQueue;
import java.util.concurrent.LinkedBlockingDeque;
import java.util.concurrent.SynchronousQueue;

public class TestBlockingQueues {
    static void getKey(){
        try {
            // Compensate for Windows/Linux difference in the
            // length of the result produced by the Enter key:
            new BufferedReader(new InputStreamReader(System.in)).readLine();
        } catch (IOException e) {
            throw new RuntimeException(e);
        }
    }

    static void getKey(String message){
        System.out.println(message);
        getKey();
    }

    static void test(String msg,BlockingQueue<LiftOff> queue){
        System.out.println(msg);
        LiftOffRunner runner = new LiftOffRunner(queue);
        Thread t = new Thread(runner);
        t.start();
        for (int i = 0; i < 5; i++) {
            runner.add(new LiftOff(5));
        }
        getKey("Press 'Enter' (" + msg + ")");
        t.interrupt();
        System.out.println("Finished " + msg + " test");
    }

    public static void main(String[] args) {
        test("LinkedBlockingQueue",new LinkedBlockingDeque<>()); // Unlimited size
        test("ArrayBlockingQueue",new ArrayBlockingQueue<>(3));// Fixed size
        test("SynchronousQueue",new SynchronousQueue<>());//Size of 1
    }
}

class LiftOffRunner implements Runnable{

    private BlockingQueue<LiftOff> rockets;

    public LiftOffRunner(BlockingQueue<LiftOff> rockets) {
        this.rockets = rockets;
    }

    public void add(LiftOff lo){
        try {
            rockets.put(lo);
        } catch (InterruptedException e) {
            System.out.println("Interrupted during put()");
        }
    }

    @Override
    public void run() {
        try {
            while (!Thread.interrupted()){
                LiftOff rocket = rockets.take();
                rocket.run();// Use this thread
            }
        }catch (InterruptedException e){
            System.out.println("Waking from take()");
        }
        System.out.println("Exiting LiftOffRunner");
    }
}
各个任务由main()放置到了BlockingQueue中,并且由LiftOffRunner从BlockingQueue中取出。注意,LiftOffRunner可以忽略同步问题,因为它们已经由BlockingQueue解决了。
吐司BlockingQueue
考虑下面这个使用BlockingQueue的示例,有一台机器具有三个任务:一个制作吐司、一个给吐司抹黄油,另一个在抹过黄油的吐司上涂果酱。我们可以通过各个处理过程之间的BlockingQueue来运行这个吐司制作程序:
package com.zjwave.thinkinjava.concurrency;

import java.util.Random;
import java.util.concurrent.ExecutorService;
import java.util.concurrent.Executors;
import java.util.concurrent.LinkedBlockingDeque;
import java.util.concurrent.TimeUnit;

public class ToastOMatic {
    public static void main(String[] args) throws InterruptedException {
        ToastQueue dryQueue = new ToastQueue(),
                butteredQueue = new ToastQueue(),
                finishedQueue = new ToastQueue();
        ExecutorService exec = Executors.newCachedThreadPool();
        exec.execute(new Toaster(dryQueue));
        exec.execute(new Butterer(dryQueue,butteredQueue));
        exec.execute(new Jammer(butteredQueue,finishedQueue));
        exec.execute(new Eater(finishedQueue));
        TimeUnit.SECONDS.sleep(5);
        exec.shutdownNow();
    }
}

class Toast {
    public enum Status {
        DRY, BUTTERED, JAMMED
    }

    private Status status = Status.DRY;
    private final int id;

    public Toast(int id) {
        this.id = id;
    }

    public void butter() {
        status = Status.BUTTERED;
    }

    public void jam() {
        status = Status.JAMMED;
    }

    public Status getStatus() {
        return status;
    }

    public int getId() {
        return id;
    }

    @Override
    public String toString() {
        return "Toast " + id + ": " + status;
    }
}

class ToastQueue extends LinkedBlockingDeque<Toast> {
}

class Toaster implements Runnable {

    private ToastQueue toastQueue;
    private int count = 0;
    private Random rand = new Random(47);

    public Toaster(ToastQueue toastQueue) {
        this.toastQueue = toastQueue;
    }

    @Override
    public void run() {
        try {
            while (!Thread.interrupted()) {
                TimeUnit.MILLISECONDS.sleep(100 + rand.nextInt(500));
                // Make toast
                Toast t = new Toast(count++);
                System.out.println(t);
                // Insert into queue
                toastQueue.put(t);
            }
        } catch (InterruptedException e) {
            System.out.println("Toaster interrupted");
        }
        System.out.println("Toaster off");
    }
}

// Apply butter to toast:
class Butterer implements Runnable {

    private ToastQueue dryQueue, butteredQueue;

    public Butterer(ToastQueue dryQueue, ToastQueue butteredQueue) {
        this.dryQueue = dryQueue;
        this.butteredQueue = butteredQueue;
    }

    @Override
    public void run() {
        try {
            while (!Thread.interrupted()) {
                // Blocks until next piece of toast is available:
                Toast t = dryQueue.take();
                t.butter();
                System.out.println(t);
                butteredQueue.put(t);
            }
        } catch (InterruptedException e) {
            System.out.println("Butterer interrupted");
        }
        System.out.println("Butterer off");
    }
}

// Apply jam to buttered toast:
class Jammer implements Runnable{

    private ToastQueue butteredQueue,finishedQueue;

    public Jammer(ToastQueue butteredQueue, ToastQueue finishedQueue) {
        this.butteredQueue = butteredQueue;
        this.finishedQueue = finishedQueue;
    }

    @Override
    public void run() {
        try {
            while (!Thread.interrupted()) {
                // Blocks until next piece of toast is available
                Toast t = butteredQueue.take();
                t.jam();
                System.out.println(t);
                finishedQueue.put(t);
            }
        } catch (InterruptedException e) {
            System.out.println("Jammer interrupted");
        }
        System.out.println("Jammer off");
    }
}

// Consume the toast:
class Eater implements Runnable{

    private ToastQueue finishedQueue;
    private int counter = 0;

    public Eater(ToastQueue finishedQueue) {
        this.finishedQueue = finishedQueue;
    }

    @Override
    public void run() {
        try {
            while (!Thread.interrupted()) {
                // Blocks until next piece of toast is available
                Toast t = finishedQueue.take();
                // Verify that the toast is coming in order,
                // and that all pieces are getting jammed:
                if(t.getId() != counter++ || t.getStatus() != Toast.Status.JAMMED){
                    System.out.println(">>>> Error: " + t);
                    System.exit(1);
                }else{
                    System.out.println("Chomp! " + t);
                }
            }
        } catch (InterruptedException e) {
            System.out.println("Eater interrupted");
        }
        System.out.println("Eater off");
    }
}

Toast是一个使用enum值的优秀示例。注意,这个示例中没有任何显式的同步(即使用Lock对象或synchronized关键字的同步),因为同步由队列(其内部是同步的)和系统的设计隐式地管理了——每片Toast在任何时刻都只由一个任务在操作。因为队列的阻塞,使得处理过程将被自动地挂起和恢复。你可以看到由BlockingQueue产生的简化十分明显。在使用显式的wait()和notifyAll()时存在的类和类之间的耦合被消除了,因为每个类都只和它的BlockingQueue通信。
5.5 任务间使用管道进行输入/输出
通过输入/输出在线程间进行通信通常很有用。提供线程功能的类库以“管道”的形式对线程间的输入/输出提供了支持。它们在Java输入/输出类库中的对应物就是PipedWriter类(允许任务向管道写)和PipedReader类(允许不同任务从同一个管道中读取)。这个模型可以看成是“生产者-消费者”问题的变体,这里的管道就是一个封装好的解决方案。管道基本上是一个阻塞队列,存在于多个引入BlockingQueue之前的Java版本中。
下面是一个简单例子,两个任务使用一个管道进行通信:
package com.zjwave.thinkinjava.concurrency;

import java.io.IOException;
import java.io.PipedReader;
import java.io.PipedWriter;
import java.util.Random;
import java.util.concurrent.ExecutorService;
import java.util.concurrent.Executors;
import java.util.concurrent.TimeUnit;

public class PipedIO {
    public static void main(String[] args) throws IOException, InterruptedException {
        Sender sender = new Sender();
        Reciever reciever = new Reciever(sender);
        ExecutorService exec = Executors.newCachedThreadPool();
        exec.execute(sender);
        exec.execute(reciever);
        TimeUnit.SECONDS.sleep(4);
        exec.shutdownNow();
    }
}

class Sender implements Runnable {

    private Random rand = new Random(47);
    private PipedWriter out = new PipedWriter();


    @Override
    public void run() {
        try {
            while (true) {
                for (char c = 'A'; c <= 'z'; c++) {
                    out.write(c);
                    TimeUnit.MILLISECONDS.sleep(rand.nextInt(500));
                }
            }
        } catch (IOException e) {
            System.out.println(e + " Sender write exception");
        } catch (InterruptedException e) {
            System.out.println(e + " Sender sleep interrupted");
        }
    }

    public PipedWriter getPipedWriter() {
        return out;
    }
}

class Reciever implements Runnable{

    private PipedReader in;

    public Reciever(Sender sender) throws IOException {
        in = new PipedReader(sender.getPipedWriter());
    }

    @Override
    public void run() {
        try{
            while (true){
                // Blockes until characters are there:
                System.out.print("Read: " + (char)in.read() + ",");
            }
        }catch (IOException e){
            System.out.println(e + " Receiver read exception");
        }
    }
}
Sender和Receiver代表了需要互相通信的两个任务。Sender创建了一个PipedWriter,它是一个单独的对象,但是对于Receiver,PipedReader的建立必须在构造其中与一个PipedWriter相关联。Sender把数据放进Writer,然后休眠一段时间(随机数)。然而,Receiver没有sleep()和wait()。但当它调用read()时,如果没有更多的数据,管道将自动阻塞。
注意sender和receiver是在main()中启动的,即对象构造彻底完毕以后。如果你启动了一个没有构造完毕的对象,在不同的平台上管道可能会产生不一致的行为(注意,BlockingQueue使用起来更加健壮而容易)。
在shutdownNow()被调用时,可以看到PipedReader与普通I/O之间最重要的差异——PipedReader是可中断的。如果你将in.read()调用修改为System.in.read(),那么interrupt()将不能打断read()调用。
6.死锁
现在你理解了,一个对象可以有synchronized方法或其他形式的加锁机制来防止别的任务在互斥还没有释放的时候就访问这个对象。你已经学习过,任务可以变成阻塞状态,所以就可能出现这种情况:某个任务在等待另一个,而后者又等待别的任务,这样一直下去,直到这个链条上的任务又在等待第一个任务释放锁。这得到了一个任务之间互相等待的连续循环,没有哪个线程能继续。这杯称之为死锁。
如果你运行一个程序,而它马上就死锁了,你可以立即跟踪下去。真正的问题在于,程序可能看起来工作良好,但是具有潜在的死锁危险。这时,死锁可能发生,而实现却没有任何征兆,所以缺陷会潜伏在你的程序里,知道客户发现它出乎意料地发生(以一种几乎肯定是很难重现的方式发生)。因此,在编写并发程序的时候,进行仔细的程序设计以防止死锁是关键部分。
哲学家就餐问题是一个经典的死锁例证。该问题的基本描述中是指定五个哲学家(不过这里的例子中将允许任意数目)。这些哲学家将花部分时间思考,花部分时间就餐。当他们思考的时候,不需要任何共享资源,但当他们就餐时,将使用有限数量的餐具。在问题的原始描述中,餐具是叉子。要吃到桌子中央盘子里的面条需要用两把叉子,不过把餐具看成是筷子更合理,很明显,哲学家就餐就需要两根筷子。
问题中引入的难点是:作为哲学家,他们很穷,所以他们只能买五根筷子(更一般地讲,筷子和哲学家的数量相同)。他们围坐在桌子周围,每人之间放一根筷子。当一个哲学家要就餐的时候,这个哲学家必须同时得到左边和右边的筷子。如果一个哲学家左边或右边已经有人在使用筷子了,那么这个哲学家就必须等待,直至可得到必须的筷子。
package com.zjwave.thinkinjava.concurrency;

public class Chopstick {
    private boolean taken = false;
    public synchronized void take() throws InterruptedException {
        while (taken){
            wait();
        }
        taken = true;
    }

    public synchronized void drop(){
        taken = false;
        notifyAll();
    }
}
任何两个Philosopher都不能成功take()同一根筷子。另外,如果一根Chopstick已经被某个Philosopher获得,那么另一个Philosopher可以wait(),直至这根Chopstick的当前持有者调用drop()使其可用为止。
当一个Philosopher任务调用take()时,这个Philosopher将等待,直至taken标志变为false(直至当前持有Chopstick的Philosopher释放它)。然后这个任务将会taken标志设置为true,以表示现在由新的Philosopher持有这根Chopstick。当这个Philosopher使用完这根Chopstick时,它们调用drop()来修改标志的状态,并notifyAll()所有其他的Philosopher,这些Philosopher中有些可能就在wait()这根Chopstick。
package com.zjwave.thinkinjava.concurrency;

import java.util.Random;
import java.util.concurrent.TimeUnit;

public class Philosopher implements Runnable {

    private Chopstick left;
    private Chopstick right;
    private final int id;
    private final int ponderFactor;
    private Random rand = new Random(47);

    private void pause() throws InterruptedException{
        if(ponderFactor == 0){
            return;
        }
        TimeUnit.MILLISECONDS.sleep(rand.nextInt(ponderFactor * 250));
    }

    public Philosopher(Chopstick left, Chopstick right, int id, int ponderFactor) {
        this.left = left;
        this.right = right;
        this.id = id;
        this.ponderFactor = ponderFactor;
    }


    @Override
    public void run() {
        try{
            while (!Thread.interrupted()){
                System.out.println(this + " thinking");
                pause();
                // Philosopher becomes hungry
                System.out.println(this + " grabbing right");
                right.take();
                System.out.println(this + " grabbing left");
                left.take();
                System.out.println(this + " eating");
                pause();
                right.drop();
                left.drop();
            }
        }catch (InterruptedException e){
            System.out.println(this + " exiting via interrupt");
        }
    }

    @Override
    public String toString() {
        return "Philosopher " + id;
    }
}
在Philosopher.run()中,每个Philosopher只是不断地思考和吃饭。如果ponderFactor不为0,则pause()方法会休眠(sleep())一段随机的时间。通过使用这种方式,你将看到Philosopher会在思考上花掉一段随机化的时间,然后尝试着获取(take())右边和左边的Chopstick,随后在吃饭上再花掉一段随机化的时间,之后重复此过程。
现在我们可以建立这个程序的将会产生死锁的版本了:
package com.zjwave.thinkinjava.concurrency;

import java.io.IOException;
import java.util.concurrent.ExecutorService;
import java.util.concurrent.Executors;
import java.util.concurrent.TimeUnit;

public class DeadlockingDiningPhilosophers {

    /**
     * Args: 0 5 timeout
     * @param args
     * @throws InterruptedException
     * @throws IOException
     */
    public static void main(String[] args) throws InterruptedException, IOException {
        int ponder = 5;
        if (args.length > 0) {
            ponder = Integer.parseInt(args[0]);
        }
        int size = 5;
        if (args.length > 1) {
            size = Integer.parseInt(args[1]);
        }
        ExecutorService exec = Executors.newCachedThreadPool();
        Chopstick[] sticks = new Chopstick[size];
        for (int i = 0; i < size; i++) {
            sticks[i] = new Chopstick();
        }
        for (int i = 0; i < size; i++) {
            exec.execute(new Philosopher(sticks[i], sticks[(i + 1) % size], i, ponder));
        }
        if(args.length == 3 && args[2].equals("timeout")){
            TimeUnit.SECONDS.sleep(5);
        }else {
            System.out.println("Press 'Enter' to quit");
            System.in.read();
        }
        exec.shutdownNow();
    }
}

你会发现,如果Philosopher花在思考上的时间非常少,那么当他们想要进餐时,全都会在Chopstick上产生竞争,而死锁也就会更快地发生。
第一个命令行参数可以调整ponder因子,从而影响每个Philosopher花费在思考上的时间长度。如果有许多Philosopher,或者他们花费很多时间去思考,那么尽管存在死锁的可能,但你可能永远也看不到死锁。值为0的命令行参数倾向于使死锁尽快发生。
注意,Chopstick对象不需要内部标识符,它们是由在数组sticks中的位置来标识的。每个Philosopher构造器都会得到一个对左边和右边的Chopstick对象的引用。除了最后一个Philosopher,其他所有的Philosopher都是通过将这个Philosopher定位于下一对Chopstick对象之间而被初始化的,而最后一个Philosopher右边的Philosopher是第0个Chopstick,这样这个循环表也就结束了。因为最后一个Philosopher坐在第一个Philosopher的右边,所以它们会共享第0个Chopstick。现在,所有的Philosopher都有可能希望进餐,从而等待其临近的Philosopher放下它们的Chopstick。这将使程序死锁。
如果Philosopher花费更多的时间去思考而不是进餐(使用非0的ponder值,或者大量的Philosopher),那么它们请求共享资源(Chopstick)的可能性就会小许多,这样你就会确信该程序不会死锁,尽管它们并非如此。这个示例相当有趣,因为它演示了看起来可以正确运行,但实际上会死锁的程序。
要修正死锁问题,你必须明白,当一下四个条件同时满足时,就会发生死锁:
- 互斥条件。任务使用的资源中至少有一个是不能共享的。这里,一根Chopstick一次就只能被一个Philosopher使用。
- 至少有一个任务它必须持有一个资源且正在等待获取一个当前被别的任务持有的资源。也就是说,要发生死锁,Philosopher必须拿着一根Chopstick并且等待另一根。
- 资源不能被任务抢占,任务必须把资源释放当做普通时间。Philosopher很有礼貌,它们不会从其他Philosopher那里抢Chopstick。
- 必须有循环等待,这时,一个任务等待其他任务所持有的资源,后者又在等待另一个任务所持有的资源,这样一直下去,直到有一个任务在等待第一个任务所持有的资源,使得大家都被锁住。在DeadlockingDiningPhilosophers.java中,因为每个Philosopher都试图先得到右边的Chopstick,然后得到左边的Chopstick,所以发生了循环等待。
因为要发生死锁的话,所有这些条件必须全部满足,所以要防止死锁的话,只需破坏其中一个即可。在程序中,防止死锁最容易的方法就是破坏第4个条件。有这个条件的原因是每个Philosopher都试图用特定的顺序拿Chopstick:先右后左。正因为如此,就可能发生“每个人都拿着右边的Chopstick,并等待左边的Chopstick”的情况,这就是循环等待条件。然而,如果最后一个Philosopher被初始化成先拿左边的Chopstick,后拿右边的Chopstick,那么这个Philosopher将永远不会阻止其右边的Philosopher拿起他们的Chopstick。在本例中,这就可以防止循环等待。这只是问题的解决方法之一,也可以通过破坏其他条件来放置死锁:
package com.zjwave.thinkinjava.concurrency;

import java.io.IOException;
import java.util.concurrent.ExecutorService;
import java.util.concurrent.Executors;
import java.util.concurrent.TimeUnit;

public class FixedDiningPhilosophers {

    /**
     * Args: 0 5 timeout
     * @param args
     * @throws InterruptedException
     * @throws IOException
     */
    public static void main(String[] args) throws InterruptedException, IOException {
        int ponder = 5;
        if (args.length > 0) {
            ponder = Integer.parseInt(args[0]);
        }
        int size = 5;
        if (args.length > 1) {
            size = Integer.parseInt(args[1]);
        }
        ExecutorService exec = Executors.newCachedThreadPool();
        Chopstick[] sticks = new Chopstick[size];
        for (int i = 0; i < size; i++) {
            sticks[i] = new Chopstick();
        }
        for (int i = 0; i < size; i++) {
            if(i < (size -1)){
                exec.execute(new Philosopher(sticks[i], sticks[i + 1], i, ponder));
            }else {
                exec.execute(new Philosopher(sticks[0],sticks[i],i,ponder));
            }
        }
        if(args.length == 3 && args[2].equals("timeout")){
            TimeUnit.SECONDS.sleep(5);
        }else {
            System.out.println("Press 'Enter' to quit");
            System.in.read();
        }
        exec.shutdownNow();
    }
}

通过确保最后一个Philosopher先拿起和放下左边的Chopstick,我们可以移除死锁,从而使这个程序平滑地运行。
Java对死锁并没有提供语言层面上的支持,能否通过仔细地设计程序来避免死锁,这取决于你自己。对于正在试图调试一个有死锁程序的程序员来说,这不是什么安慰人的话。
7.新类库中的构件
Java SE5的java.util.concurrent引入了大量设计用来解决并发问题的新类。学习使用它们将有助于你编写出更加简单而健壮的并发程序。
本节包含了各种组件具有代表性的示例,但是少数组件,即那些你不太可能会用到或碰到的组件,没有包括在内。
因为这些组件设计各种问题,所以没有一种清晰的方式可以用来组织它们,因此我尝试着从最简单的示例入手,逐渐增加复杂度,从而介绍所有的示例。
7.1 CountDownLatch
它被用来同步一个或多个任务,强制它们等待由其他任务执行的一组操作完成。
你可以向CountDownLatch对象设置一个初始计数值,任何在这个对象上调用wait()的方法都将阻塞,直至这个计数值到达0。其他任务在结束其工作时,可以在该对象上调用countDown()来减小这个计数值。CountDownLatch被设计为只触发一次,计数值不能被重置。如果你需要能够重置计数值的版本,则可以使用CyclicBarrier。
调用countDown()的任务在产生这个调用时并没有被阻塞,只有对await()的调用会被阻塞,直至计数值到达0。
CountDownLatch的典型用法是将一个程序分为n个互相独立的可解决任务,并创建值为0的CountDownLatch。当每个任务完成时,都会在这个锁存器上调用countDown()。等待问题被解决的任务在这个锁存器上调用await(),将它们自己拦住,直至锁存器计数结束。下面是演示这种技术的一个框架示例:
package com.zjwave.thinkinjava.concurrency;

import java.util.Random;
import java.util.concurrent.CountDownLatch;
import java.util.concurrent.ExecutorService;
import java.util.concurrent.Executors;
import java.util.concurrent.TimeUnit;

public class CountDownLatchDemo {

    static final int SIZE = 100;

    public static void main(String[] args) {
        ExecutorService exec = Executors.newCachedThreadPool();
        // All must share a single CountDownLatch object:
        CountDownLatch latch = new CountDownLatch(SIZE);
        for (int i = 0; i < 10; i++) {
            exec.execute(new WaitingTask(latch));
        }
        for (int i = 0; i < SIZE; i++) {
            exec.execute(new TaskPortion(latch));
        }
        System.out.println("Launched all tasks");
        exec.shutdown(); // Quit when all task complete
    }

}

class TaskPortion implements Runnable{

    private static int counter = 0;
    private final int id = counter++;
    private static Random rand = new Random(47);
    private final CountDownLatch latch;

    public TaskPortion(CountDownLatch latch) {
        this.latch = latch;
    }

    @Override
    public void run() {
        try {
            doWork();
            latch.countDown();
        } catch (InterruptedException e) {
            // Acceptable way to exit
        }
    }

    public void doWork() throws InterruptedException {
        TimeUnit.MILLISECONDS.sleep(rand.nextInt(2000));
        System.out.println(this + "completed");
    }

    @Override
    public String toString() {
        return String.format("%1$-3d",id);
    }
}

// Waits on the CountDownLatch:
class WaitingTask implements Runnable{

    private static int counter = 0;
    private final int id = counter++;
    private final CountDownLatch latch;

    public WaitingTask(CountDownLatch latch) {
        this.latch = latch;
    }

    @Override
    public void run() {
        try {
            latch.await();
            System.out.println("Latch barrier passed for " + this);
        } catch (InterruptedException e) {
            System.out.println(this + " interrupted");
        }
    }

    @Override
    public String toString() {
        return String.format("WaitingTask %1$-3d",id);
    }
}

TaskPortion将随机地休眠一段时间,以模拟这部分工作的完成,而WaitingTask表示系统中必须等待的部分,它要等待到问题的初始部分完成为止。所有任务都使用了在main()中定义的同一个单一的CountDownLatch。
类库的线程安全
注意,TaskPortion包含一个静态的Random对象,这意味着多个任何可能会同时调用Random.nextInt()。这是否安全呢?
如果存在问题,在这种情况下,可以通过向TaskPosition提供其自己的Random对象来解决。也就是说,通过移除static限定符的方式解决。但是这个问题对于Java标准类库中的方法来说,也大都存在:哪些是线程安全的?哪些不是?
遗憾的是,JDK文档并没有指出这一点。Random.nextInt()碰巧是安全的,但是你必须通过使用Web引擎,或者审视Java类库代码,去逐个地揭示这一点。这对于被设计为支持,至少是理论上支持并发的程序设计语言来说,并非是一件好事。
7.2 CyclicBarrier
CyclicBarrier适用于这样的情况:你希望创建一组任务,它们并行地执行工作,然后在进行下一个步骤之前等待,直至所有任务都完成(看起来有些像join())。它使得所有的并行任务都将在栅栏处列队,因此可以一致地向前移动。这非常像CountDownLatch,只是CountDownLatch是只触发一次的事件,而CyclicBarrier可以多次重用。
下面是一个赛马游戏的仿真程序,其中使用了CyclicBarrier:
package com.zjwave.thinkinjava.concurrency;

import java.util.ArrayList;
import java.util.List;
import java.util.Random;
import java.util.concurrent.*;

public class HorseRace {
    static final int FINISH_LINE = 75;
    private List<Horse> horses = new ArrayList<>();
    private ExecutorService exec = Executors.newCachedThreadPool();

    private CyclicBarrier barrier;

    public HorseRace(int nHorses,final int pause) {
        barrier = new CyclicBarrier(nHorses, new Runnable() {

            @Override
            public void run() {
                StringBuilder s = new StringBuilder();
                for (int i = 0; i < FINISH_LINE; i++) {
                    s.append("="); // The fence on the racetrack
                }
                System.out.println(s);
                for (Horse horse : horses) {
                    System.out.println(horse.tracks());
                }
                for (Horse horse : horses) {
                    if(horse.getStrides() >= FINISH_LINE){
                        System.out.println(horse + "won!");
                        exec.shutdownNow();
                        return;
                    }
                }
                try {
                    TimeUnit.MILLISECONDS.sleep(pause);
                } catch (InterruptedException e) {
                    System.out.println("barrier-action sleep interrupted");
                }
            }
        });
        for (int i = 0; i < nHorses; i++) {
            Horse horse = new Horse(barrier);
            horses.add(horse);
            exec.execute(horse);
        }
    }

    public static void main(String[] args) {
        int nHorses = 7;
        int pause = 200;
        if(args.length > 0){// Optional argument
            int n = new Integer(args[0]);
            nHorses = n > 0 ? n : nHorses;
        }
        if(args.length > 1){// Optional argument
            int p = new Integer(args[1]);
            pause = p > -1 ? p : pause;
        }
        new HorseRace(nHorses,pause);
    }

}

class Horse implements Runnable {

    private static int counter = 0;
    private final int id = counter++;
    private int strides = 0;
    private static Random rand = new Random(47);
    private CyclicBarrier barrier;

    public Horse(CyclicBarrier b) {
        barrier = b;
    }

    public synchronized int getStrides() {
        return strides;
    }

    @Override
    public void run() {
        try {
            while (!Thread.interrupted()) {
                synchronized (this) {
                    strides += rand.nextInt(3); // Produce 0 , 1 or 2
                }
                barrier.await();
            }
        } catch (InterruptedException e) {
            // A legitimate way to exit
        } catch (BrokenBarrierException e) {
            // This one we want to know about
            throw new RuntimeException(e);
        }
    }

    @Override
    public String toString() {
        return "Horse " + id + " ";
    }

    public String tracks(){
        StringBuilder s = new StringBuilder();
        for (int i = 0; i < getStrides(); i++) {
            s.append("*");
        }
        s.append(id);
        return s.toString();
    }
}

可以向CyclicBarrier提供一个“栅栏动作”,它是一个Runnable,当计数值到达0时自动执行——这是CyclicBarrier和CountDownLatch之间的另一个区别。这里,栅栏动作是作为匿名内部类创建的,它被提交给了CyclicBarrier的构造器。
我试图让每匹马都打印自己,但是之后的显示顺序取决于任务管理器。CyclicBarrier使得每匹马都要执行为了向前移动所必须执行的所有工作,然后必须在栅栏处等待其他所有的马都准备完毕。当所有的马都向前移动时,CyclicBarrier将自动调用Runnable栅栏动作任务,按顺序显示马和终点线的位置。
一旦所有的任务都越过了栅栏,它就会自动地为下一回合比赛做好准备。
为了展示这个非常简单的动画效果,你需要将控制台视窗的尺寸调整为小到只有马时,才会展示出来。
7.3 DelayQueue
这是一个无界的BlockingQueue,用于放置实现了Delayed接口的对象,其中的对象只能在其到期时才能从队列中取走。这种队列是有序的,即队头对象的延迟到期的时间最长。如果没有任何延迟到期,那么就不会有任何头元素,并且poll()将返回null(正因为这样,你不能将null放置到这种队列中)。
下面是一个实例,其中的Delayed对象自身就是任务,而DelayedTaskConsumer将最“紧急”的任务(到期时间最长的任务)从队列中取出,然后运行它。注意,这样DelayQueue就称为了优先级队列的一种变体:
package com.zjwave.thinkinjava.concurrency;

import java.util.ArrayList;
import java.util.List;
import java.util.Random;
import java.util.concurrent.*;

import static java.util.concurrent.TimeUnit.*;

public class DelayQueueDemo {
    public static void main(String[] args) {
        Random rand = new Random(47);
        ExecutorService exec = Executors.newCachedThreadPool();
        DelayQueue<DelayedTask> queue = new DelayQueue<>();
        // Fill with tasks that have random delays:
        for (int i = 0; i < 20; i++) {
            queue.put(new DelayedTask(rand.nextInt(5000)));
        }
        // Set the stopping point
        queue.add(new DelayedTask.EndSentinel(5000,exec));
        exec.execute(new DelayedTaskConsumer(queue));
    }
}

class DelayedTask implements Runnable, Delayed{

    private static int counter = 0;
    private final int id = counter++;
    private final int delta;
    private final long trigger;
    protected  static List<DelayedTask> sequence = new ArrayList<>();

    public DelayedTask(int delayInMilliseconds){
        delta = delayInMilliseconds;
        trigger = System.nanoTime() + NANOSECONDS.convert(delta,MILLISECONDS);
        sequence.add(this);
    }

    @Override
    public int compareTo(Delayed o) {
        DelayedTask that = (DelayedTask) o;
        if(trigger < that.trigger){
            return -1;
        }
        if(trigger > that.trigger){
            return 1;
        }
        return 0;
    }

    @Override
    public void run() {
        System.out.print(this + " ");
    }

    @Override
    public String toString() {
        return String.format("[%1$-4d]",delta) + " Task " + id;
    }

    @Override
    public long getDelay(TimeUnit unit) {
        return unit.convert(trigger - System.nanoTime(),NANOSECONDS);
    }

    public String summary(){
        return "(" + id + ":" + delta + ")";
    }

    public static class EndSentinel extends DelayedTask{

        private ExecutorService exec;

        public EndSentinel(int delayInMilliseconds, ExecutorService exec) {
            super(delayInMilliseconds);
            this.exec = exec;
        }

        @Override
        public void run() {
            for (DelayedTask pt : sequence) {
                System.out.print(pt.summary() + " ");
            }
            System.out.println();
            System.out.println(this + " Calling shutdownNow()");
            exec.shutdownNow();
        }
    }
}

class DelayedTaskConsumer implements Runnable{

    private DelayQueue<DelayedTask> q;

    public DelayedTaskConsumer(DelayQueue<DelayedTask> q) {
        this.q = q;
    }

    @Override
    public void run() {
        try{
            while (!Thread.interrupted()){
                q.take().run();
            }
        }catch (InterruptedException e){
            // Acceptable way to exit
        }
        System.out.println("Finished DelayedTaskConsumer");
    }
}
DelayedTask包含一个称为sequence的List<DelayedTask>,它保存了任务被创建的顺序,因此我们看到排序是按照实际发生的顺序执行的。
Delayed接口有一个方法名为getDelay(),它可以用来告知延迟到期有多长时间,或者延迟在多长时间之前已经到期。这个方法将强制我们去使用TimeUnit类,因为这就是参数类型。这会产生一个非常方便的类,因为你可以很容易地转换单位而无须作任何声明。例如,delta的值是以毫秒为单位存储的,但是Java SE5的方法System.nanoTime()产生的时间则是以纳秒为单位的。你可以转换delta的值,方法是声明它的单位以及你希望以什么单位来表示,就像下面这样:
NANOSECONDS.convert(delta,MILLISECONDS);在getDelay()中,希望使用的单位是作为unit参数传递进来的,你使用它将当前时间与触发时间之间的差转换为调用者要求的单位,而无需知道这些单位是什么(这是策略设计模式的一个简单示例,在这种模式中,算法的一部分是作为参数传递进来的)。
为了排序,Delayed接口还继承了Comparable接口,因此必须实现compareTo(),使其可以产生合理的比较。toString()和summary()提供了输出格式化,而嵌套的EndSentinel类提供了一种关闭所有事物的途径,具体做法是将其放置为队列的最后一个元素。
注意,因为DelayedTaskConsumer自身是一个任务,所以它有自己的Thread,它可以使用这个线程来运行从队列中获取的所有任务。由于任务是按照队列优先级的顺序执行的,因此在本例中不需要启动任何单独的线程来运行DelayedTask。
从输出中可以看到,任务创建的顺序对执行顺序没有任何影响,任务是按照所期望的延迟顺序执行的。
7.4 PriorityBlockingQueue
这是一个很基础的优先级队列,它具有可阻塞的读取操作。下面是一个示例,其中在优先级队列中的对象是按照优先级顺序从队列中出现的任务。PrioritizedTask被赋予了一个优先级数字,以此来提供这种顺序:
package com.zjwave.thinkinjava.concurrency;

import java.util.ArrayList;
import java.util.List;
import java.util.Queue;
import java.util.Random;
import java.util.concurrent.ExecutorService;
import java.util.concurrent.Executors;
import java.util.concurrent.PriorityBlockingQueue;
import java.util.concurrent.TimeUnit;

public class PriorityBlockingQueueDemo {

    public static void main(String[] args) {
        ExecutorService exec = Executors.newCachedThreadPool();
        PriorityBlockingQueue<Runnable> queue = new PriorityBlockingQueue<>();
        exec.execute(new PrioritizedTaskProducer(queue,exec));
        exec.execute(new PrioritizedTaskConsumer(queue));
    }

}

class PrioritizedTask implements Runnable, Comparable<PrioritizedTask> {

    private Random rand = new Random(47);
    private static int counter = 0;
    private final int id = counter++;
    private final int priority;
    protected static List<PrioritizedTask> sequence = new ArrayList<>();

    public PrioritizedTask(int priority) {
        this.priority = priority;
        sequence.add(this);
    }

    @Override
    public int compareTo(PrioritizedTask o) {
        return priority < o.priority ? 1 : (priority > o.priority ? -1 : 0);
    }

    @Override
    public void run() {
        try {
            TimeUnit.MILLISECONDS.sleep(rand.nextInt(250));
        } catch (InterruptedException e) {
            // Acceptable way to exit
        }
        System.out.println(this);
    }

    @Override
    public String toString() {
        return String.format("[%1$-2d]",priority) + " Task " + id;
    }

    public String summary(){
        return "(" + id + ":" + priority + ")";
    }

    public static class EndSentinel extends PrioritizedTask{
        private ExecutorService exec;

        public EndSentinel(ExecutorService exec) {
            super(-1);// Lowest priority in this program
            this.exec = exec;
        }

        @Override
        public void run() {
            int count = 0;
            for (PrioritizedTask pt : sequence) {
                System.out.print(pt.summary());
                if (++count % 5 == 0){
                    System.out.println();
                }
            }
            System.out.println();
            System.out.println(this + " Calling shutdownNow()");
            exec.shutdownNow();
        }
    }
}

class PrioritizedTaskProducer implements Runnable{

    private Random rand = new Random(47);
    private Queue<Runnable> queue;
    private ExecutorService exec;

    public PrioritizedTaskProducer(Queue<Runnable> queue, ExecutorService exec) {
        this.queue = queue;
        this.exec = exec;
    }

    @Override
    public void run() {
        // Unbounded queue; never blocks
        // Fill it up fast with random priorities:
        for (int i = 0; i < 20; i++) {
            queue.add(new PrioritizedTask(rand.nextInt(10)));
            Thread.yield();
        }
        // Trickle in highest-priority jobs
        try {
            for (int i = 0; i < 10; i++) {
                TimeUnit.MILLISECONDS.sleep(250);
                queue.add(new PrioritizedTask(10));
            }
            // Add jobs , lowest priority first:
            for (int i = 0; i < 10; i++) {
                queue.add(new PrioritizedTask(i));
            }
            // A sentinel to stop all the tasks:
            queue.add(new PrioritizedTask.EndSentinel(exec));
        }catch (InterruptedException e){
            // Acceptable way to exit
        }
        System.out.println("Finished PrioritizedTaskProducer");
    }
}

class PrioritizedTaskConsumer implements Runnable{

    private PriorityBlockingQueue<Runnable> q;

    public PrioritizedTaskConsumer(PriorityBlockingQueue<Runnable> q) {
        this.q = q;
    }

    @Override
    public void run() {
        try {
            while (!Thread.interrupted()){
                // Use current thread to run the task:
                q.take().run();
            }
        }catch (InterruptedException e){
            // Acceptable way to exit
        }
        System.out.println("Finished PrioritizedTaskConsumer");
    }
}
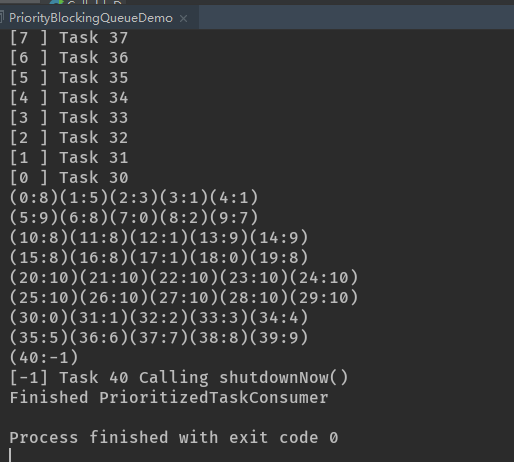
与前一个示例相同,PrioritizedTask对象的创建序列被记录在sequence List中,用于和实际的执行顺序比较。run()方法将休眠一小段随机的时间,然后打印对象信息,而EndSentinel提供了和前面相同的功能,要确保它是队列中最后一个对象。
PrioritizedTaskProducer和PrioritizedTaskConsumer通过PriorityBlockingQueue彼此连接。因为这种队列的阻塞特性提供了所有必须的同步,所以你应该注意到了,这里不需要任何显式的同步——不必考虑当你从这种队列中读取时,其中是否有元素,因为这个队列在没有元素时,将直接阻塞读取者。
7.5 使用ScheduledExecutor的温室控制器
下面是一个假想的温室控制系统的示例,它可以控制各种设施的开关,过着是对它们进行调节。这可以被看作是一种并发问题,每个期望的温室时间都是一个在预定时间运行的任务。ScheduledThreadPoolExecutor提供了解决该问题的服务。通过使用schedule()(运行一次任务)或者scheduleAtFixedRate()(每隔规则的时间重复执行任务),你可以将Runnable对象设置为在将来的某个时刻执行。
package com.zjwave.thinkinjava.concurrency;

import java.util.*;
import java.util.concurrent.ScheduledThreadPoolExecutor;
import java.util.concurrent.TimeUnit;

public class GreenhouseScheduler {
    private volatile boolean light = false;
    private volatile boolean water = false;
    private String thermostat = "Day";

    public synchronized String getThermostat() {
        return thermostat;
    }

    public synchronized void setThermostat(String thermostat) {
        this.thermostat = thermostat;
    }

    ScheduledThreadPoolExecutor scheduler = new ScheduledThreadPoolExecutor(10);

    public void schedule(Runnable event,long delay){
        scheduler.schedule(event,delay, TimeUnit.MILLISECONDS);
    }

    public void repeat(Runnable event,long initialDelay,long period){
        scheduler.scheduleAtFixedRate(event,initialDelay,period,TimeUnit.MILLISECONDS);
    }

    class LightOn implements Runnable{

        @Override
        public void run() {
            // Put hardware control code here to
            // physically trn on the light:
            System.out.println("Turning on lights");
            light = true;
        }
    }


    class LightOff implements Runnable{

        @Override
        public void run() {
            // Put hardware control code here to
            // physically turn off the light
            System.out.println("Turning off lights");
            light = false;
        }
    }

    class WaterOn implements Runnable{

        @Override
        public void run() {
            // Put hardware control code here.
            System.out.println("Turning greenhouse water on");
            water = true;
        }
    }

    class WaterOff implements Runnable{

        @Override
        public void run() {
            // Put hardware control code here.
            System.out.println("Turning greenhouse water off");
            water = false;
        }
    }

    class ThermostatNight implements Runnable{

        @Override
        public void run() {
            // Put hardware control code here.
            System.out.println("Thermostat to night setting");
            setThermostat("Night");
        }
    }

    class ThermostatDay implements Runnable{

        @Override
        public void run() {
            // Put hardware control code here.
            System.out.println("Thermostat to day setting");
            setThermostat("Day");
        }
    }

    class Bell implements Runnable{

        @Override
        public void run() {
            System.out.println("Bing!");
        }
    }

    class Terminate implements Runnable{

        @Override
        public void run() {
            System.out.println("Terminating");
            scheduler.shutdownNow();
            // Must start a separate task to do this job,
            // since the scheduler has been shut down:
            new Thread(){
                @Override
                public void run() {
                    for (DataPoint d : data) {
                        System.out.println(d);
                    }
                }
            }.start();
        }
    }

    // New feature: data collection
    static class DataPoint{
        final Calendar time;
        final float temperature;
        final float humidity;

        public DataPoint(Calendar time, float temperature, float humidity) {
            this.time = time;
            this.temperature = temperature;
            this.humidity = humidity;
        }

        @Override
        public String toString() {
            return time.getTime() + String.format(" temperature: %1$.1f humidity: %2$.2f",temperature,humidity);
        }
    }

    private Calendar lastTime = Calendar.getInstance();
    {
        // Adjust date to the half hour
        lastTime.set(Calendar.MINUTE,30);
        lastTime.set(Calendar.SECOND,00);
    }

    private float lastTemp = 65.0f;
    private int tempDirection = +1;
    private float lastHumidity = 50.0f;
    private int humidityDirection = +1;
    private Random rand = new Random(47);
    List<DataPoint> data = Collections.synchronizedList(new ArrayList<>());
    class CollectData implements Runnable{

        @Override
        public void run() {
            System.out.println("Collecting data");
            synchronized (GreenhouseScheduler.this){
                // Pretend the interval is longer that it is:
                lastTime.set(Calendar.MINUTE,lastTime.get(Calendar.MINUTE) + 30);
                // One in 5 chances of reversing the direction:
                if(rand.nextInt(5) == 4){
                    tempDirection = -tempDirection;
                }
                // Store previous value:
                lastTemp = lastTemp + tempDirection * (1.0F + rand.nextFloat());
                if(rand.nextInt(5) == 4){
                    humidityDirection = -humidityDirection;
                }
                lastHumidity = lastHumidity + humidityDirection * rand.nextFloat();
                // Calendar must be cloned, otherwise all
                // DataPoints hold references to the same lastTime.
                // For a basic object like Calendar, clone() is OK.
                data.add(new DataPoint((Calendar) lastTime.clone(),lastTemp,lastHumidity));
            }
        }
    }

    public static void main(String[] args) {
        GreenhouseScheduler gh = new GreenhouseScheduler();
        gh.schedule(gh.new Terminate(),5000);
        // Former "Restart" class not necessary:
        gh.repeat(gh.new Bell(),0,1000);
        gh.repeat(gh.new ThermostatNight(),0,2000);
        gh.repeat(gh.new LightOn(),0,200);
        gh.repeat(gh.new LightOff(),0,400);
        gh.repeat(gh.new WaterOn(),0,600);
        gh.repeat(gh.new WaterOff(),0,800);
        gh.repeat(gh.new ThermostatDay(),0,1400);
        gh.repeat(gh.new CollectData(),500,500);
    }

}

DataPoint可以持有并显示单个的数据段,而CollectData是被调度的任务,它在每次运行时,都可以产生仿真数据,并将其添加到Greenhouse的List<DataPoint>中。
注意,volatile和synchronized在适当的场合都得到了应用,以防止任务之间的互相干涉。在持有DataPoint的List中的所有方法都是synchronized的,这是因为在List被创建时,使用了java.util.Collections实用工具synchronizedList()。
7.5 Semaphore
正常的锁(来自concurrent.locks或内建的synchronized锁)在任何时刻都只允许一个任务访问一项资源,而计数信号量允许n个任务同时访问这个资源。你还可以将信号量看作是在向外分发使用的资源的“许可证”,尽管实际上没有使用任何许可证对象。
作为一个示例,请考虑对象池的概念,它管理着数量有限的对象,当要使用对象时可以签出它们,而在用户使用完毕时,可以将它们签回。这种功能可以被封装到一个泛型类中:
package com.zjwave.thinkinjava.concurrency;

import java.util.ArrayList;
import java.util.List;
import java.util.concurrent.Semaphore;

public class Pool<T> {
    private int size;
    private List<T> items = new ArrayList<>();
    private volatile boolean[] checkedOut;
    private Semaphore available;
    public Pool(Class<T> classObject,int size){
        this.size = size;
        checkedOut = new boolean[size];
        available = new Semaphore(size,true);
        // Load pool with objects that can be checked out:
        for (int i = 0; i < size; i++) {
            try {
                // Assumes a default constructor
                items.add(classObject.newInstance());
            }catch (Exception e){
                throw new RuntimeException(e);
            }
        }
    }

    public T checkOut() throws InterruptedException {
        available.acquire();
        return getItem();
    }

    public void checkIn(T x){
        if(releaseItem(x)){
            available.release();
        }
    }

    private synchronized T getItem(){
        for (int i = 0; i < size; i++) {
            if(!checkedOut[i]){
                checkedOut[i] = true;
                return items.get(i);
            }
        }
        return null; // Semaphore prevents reaching here
    }

    private synchronized boolean releaseItem(T item){
        int index = items.indexOf(item);
        if(index == -1){
            return false;// Not in the list
        }
        if(checkedOut[index]){
            checkedOut[index] = false;
            return true;
        }
        return false; // Wasn't checked out
    }
}
在这个简化的形式中,构造器使用newInstance()来把对象加载到池中。如果你需要一个新对象,那么可以调用checkOut(),并且在使用完之后,将其递交给checkIn()。
boolean类型的数组checkedOut可以跟踪被签出的对象,并且可以通过getItem()和releasItem()方法来管理。而这些都将由Semaphore类型的available来加以确保,因此,在checkOut()中,如果没有任何信号量许可证可用(这意味着在池中没有更多的对象了),available将阻塞调用过程。在checkIn()中,如果被签入的对象有效,则会像信号量返回一个许可证。
为了创建一个示例,我们可以使用Fat,这是一种创建代价高昂的对象类型,因为它的构造器运行起来很耗时:
package com.zjwave.thinkinjava.concurrency;

public class Fat {
    private volatile double d;// Prevent optizization
    private static int counter = 0;
    private final int id = counter++;

    public Fat() {
        // Expensive,interruptable operation:
        for (int i = 0; i < 10000; i++) {
            d += (Math.PI + Math.E) / (double)i;
        }
    }

    public void operation(){
        System.out.println(this);
    }

    @Override
    public String toString() {
        return "Fat id: " + id;
    }
}
我们在池中管理这些对象,以限制这个构造器所造成的影响。我们可以创建一个任务,它将签出Fat对象,持有一段时间之后再将它们签入,以此来测试Pool这个类:
package com.zjwave.thinkinjava.concurrency;

import java.util.ArrayList;
import java.util.List;
import java.util.concurrent.ExecutorService;
import java.util.concurrent.Executors;
import java.util.concurrent.Future;
import java.util.concurrent.TimeUnit;

public class SemaphoreDemo {

    final static int SIZE = 25;

    public static void main(String[] args) throws InterruptedException {
        Pool<Fat> pool = new Pool<>(Fat.class, SIZE);
        ExecutorService exec = Executors.newCachedThreadPool();
        for (int i = 0; i < SIZE; i++) {
            exec.execute(new CheckoutTask<>(pool));
        }
        System.out.println("All CheckoutTasks created");
        List<Fat> list = new ArrayList<>();
        for (int i = 0; i < SIZE; i++) {
            Fat f = pool.checkOut();
            System.out.print(i + ": main() thread checked out ");
            f.operation();
            list.add(f);
        }
        Future<?> blocked = exec.submit(new Runnable() {
            @Override
            public void run() {
                try {
                    // Semaphore prevents additional checkout.
                    // so call is blocked:
                    pool.checkOut();
                } catch (InterruptedException e) {
                    System.out.println("checkedOut() Interrupted");
                }
            }
        });
        TimeUnit.SECONDS.sleep(2);
        blocked.cancel(true);// Break out of blocked call
        System.out.println("Checking in objects in " + list);
        for (Fat f : list) {
            pool.checkIn(f);
        }
        for (Fat f : list) {
            pool.checkIn(f); //
        }
        exec.shutdown();
    }

}

class CheckoutTask<T> implements Runnable{

    private static int counter = 0;
    private final int id = counter++;
    private Pool<T> pool;

    public CheckoutTask(Pool<T> pool) {
        this.pool = pool;
    }

    @Override
    public void run() {
        try {
            T item = pool.checkOut();
            System.out.println(this + "checked out " + item);
            TimeUnit.SECONDS.sleep(1);
            System.out.println(this + "checked in " + item);
            pool.checkIn(item);
        }catch (InterruptedException e){
            // Acceptable way to terminate
        }
    }

    @Override
    public String toString() {
        return "CheckoutTask " + id + " ";
    }
}
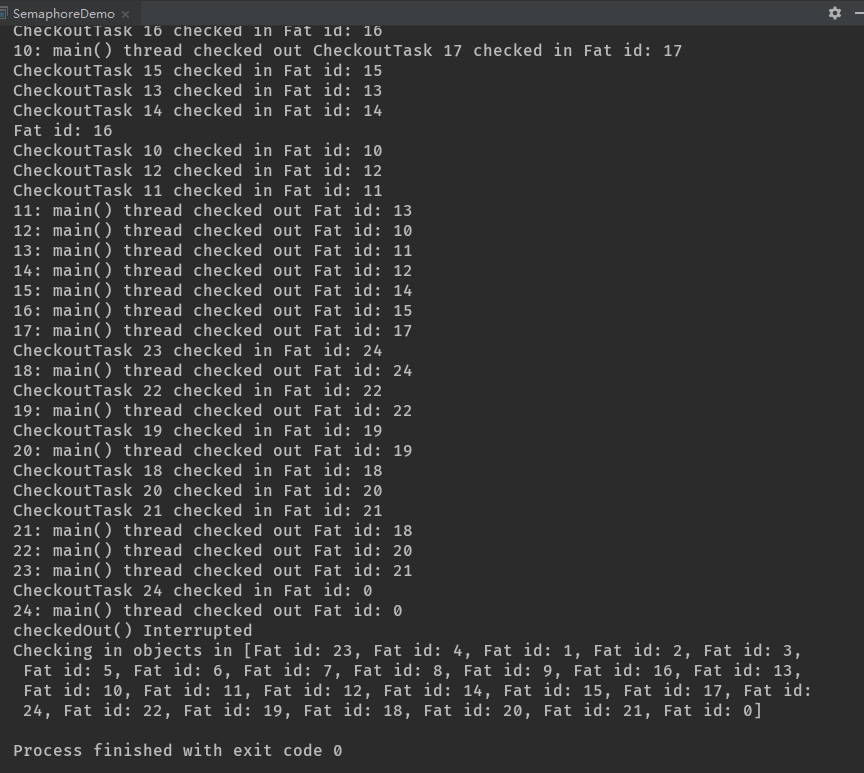
在main()中,创建了一个持有Fat对象的Pool,而一组CheckoutTask则开始操练这个Pool。然后,main()线程签出池中的Fat对象,但是并不签入它们。一旦池中所有的对象都被签出,Semaphore将不再允许执行任何签出操作。blocked的run()方法因此会被阻塞,2秒钟之后,cancel()方法被调用,以此来挣脱Futrue的束缚。注意,冗余的签入将被Pool忽略。
这个示例依赖于Pool的客户端严格地并愿意签入所持有的对象,当其工作时,这是最简单的解决方案。
7.7 Exchanger
Exchanger是在两个任务之间交换对象的栅栏。当这些任务进入栅栏时,它们各自拥有一个对象,当它们离开时,它们都拥有之前由对象持有的对象。Exchanger的典型应用场景是:一个任务在创建对象,这些对象的生产代价很高昂,而另一个任务在消费这些对象。通过这种方式,可以有更多在对象在被创建的同事被消费。
为了演练Exchanger类,我们将创建生产者和消费者任务,它们经由泛型的Generator,可以工作于任何类型的对象,然后我们将它们应用于Fat类。ExchangerProducer和ExchangerConsumer使用一个List<T>作为要交换的对象,它们都包含一个用于这个List<T>的Exchanger。当你调用Exchanger.exchanger()方法时,它将阻塞直至对方任务调用它自己的exchange()方法,那时,这两个exchange()方法将全部完成,而List<T>则被互换:
package com.zjwave.thinkinjava.concurrency;

import com.zjwave.thinkinjava.generics.BasicGenerator;
import com.zjwave.thinkinjava.generics.Generator;

import java.util.List;
import java.util.concurrent.*;

public class ExchangerDemo {
    static int size = 10;
    static int delay = 5; // Seconds

    public static void main(String[] args) throws InterruptedException {
        if (args.length > 0) {
            size = new Integer(args[0]);
        }
        if (args.length > 1) {
            delay = new Integer(args[1]);
        }
        ExecutorService exec = Executors.newCachedThreadPool();
        Exchanger<List<Fat>> xc = new Exchanger<>();
        List<Fat> producerList = new CopyOnWriteArrayList<>(),
                consumerList = new CopyOnWriteArrayList<>();
        exec.execute(new ExchangerProducer<>(BasicGenerator.create(Fat.class), xc, producerList));
        exec.execute(new ExchangerConsumer<>(xc,consumerList));
        TimeUnit.SECONDS.sleep(delay);
        exec.shutdownNow();
    }
}

class ExchangerProducer<T> implements Runnable {

    private Generator<T> generator;
    private Exchanger<List<T>> exchanger;
    private List<T> holder;

    public ExchangerProducer(Generator<T> generator, Exchanger<List<T>> exchanger, List<T> holder) {
        this.generator = generator;
        this.exchanger = exchanger;
        this.holder = holder;
    }

    @Override
    public void run() {
        try {
            while (!Thread.interrupted()) {
                for (int i = 0; i < ExchangerDemo.size; i++) {
                    holder.add(generator.next());
                    // Exchange full for empty:
                    holder = exchanger.exchange(holder);
                }
            }
        } catch (InterruptedException e) {
            // OK to terminate this way
        }
    }
}

class ExchangerConsumer<T> implements Runnable {

    private Exchanger<List<T>> exchanger;
    private List<T> holder;
    private volatile T value;

    public ExchangerConsumer(Exchanger<List<T>> exchanger, List<T> holder) {
        this.exchanger = exchanger;
        this.holder = holder;
    }

    @Override
    public void run() {
        try {
            while (!Thread.interrupted()) {
                holder = exchanger.exchange(holder);
                for (T x : holder) {
                    value = x; // Fetch out value
                    holder.remove(x);// OK for CopyOnWriteArrayList
                }
            }
        } catch (InterruptedException e) {
            // OK to terminate this way
        }
        System.out.println("Final value: " + value);
    }
}
在main()中,创建了用于两个任务的单一的Exchanger,以及两个用于互换的CopyOnWriteArrayList。这个特定的List变体允许在列表被遍历时调用remove()方法,而不会抛出ConcurrentModificationException异常。ExchangeProducer将填充这个List,然后将这个满列表交换为ExchangerConsumer传递给它的空列表。因为有了Exchanger,填充一个列表和消费另一个列表便可以同时发生了。
8.仿真
并发最有趣也最令人兴奋的用法就是创建仿真。通过使用并发,仿真的每个构件都可以成为其自身的任务,这使得仿真更容易编程。许多视频游戏和电影中的CG动画都是仿真,前面所示的HorseRace.java和GreenhouseScheduler.java也可以被认为是仿真。
8.1 银行出纳员仿真
这个经典的仿真可以表示任何属于下面这种类型的情况:对象随机地出现,并且要求数量有限的服务器提供随机数量的服务时间。通过构建仿真可以确定理想的服务器数量。
在本例中,每个银行顾客要求一定数量的服务时间,这是出纳员必须花费在顾客身上,以服务顾客需求的时间单位的数量。服务时间的数量对每个顾客来说都是不同的,并且是随机确定的。另外,你不知道每个时间间隔内有多少顾客会到达,因此这也是随机确定的:
package com.zjwave.thinkinjava.concurrency;

import java.io.IOException;
import java.util.LinkedList;
import java.util.PriorityQueue;
import java.util.Queue;
import java.util.Random;
import java.util.concurrent.ArrayBlockingQueue;
import java.util.concurrent.ExecutorService;
import java.util.concurrent.Executors;
import java.util.concurrent.TimeUnit;

public class BankTellerSimulation {
    static final int MAX_LINE_SIZE = 50;
    static final int ADJUSTMENT_PERIOD = 1000;

    public static void main(String[] args) throws InterruptedException, IOException {
        ExecutorService exec = Executors.newCachedThreadPool();
        // If line is too long, customers will leave:
        CustomerLine customers = new CustomerLine(MAX_LINE_SIZE);
        exec.execute(new CustomerGenerator(customers));
        // Manager will add and remove tellers as necessary:
        exec.execute(new TellerManager(exec,customers,ADJUSTMENT_PERIOD));
        if (args.length > 0){// Optional argument
            TimeUnit.SECONDS.sleep(new Integer(args[0]));
        }else{
            System.out.println("Press 'Enter' to quit");
            System.in.read();
        }
        exec.shutdownNow();
    }
}

// Read-only objects don't require synchronization:
class Customer{
    private final int serviceTime;

    public Customer(int serviceTime) {
        this.serviceTime = serviceTime;
    }

    public int getServiceTime() {
        return serviceTime;
    }

    @Override
    public String toString() {
        return "[" + serviceTime + "]";
    }
}

// Teach the customer line to display itself:
class CustomerLine extends ArrayBlockingQueue<Customer>{


    public CustomerLine(int maxLineSize) {
        super(maxLineSize);
    }

    @Override
    public String toString() {
        if(this.size() == 0){
            return "[Empty]";
        }
        StringBuilder result = new StringBuilder();
        for (Customer customer : this) {
            result.append(customer);
        }
        return result.toString();
    }
}

// Randomly add customers to a queue:
class CustomerGenerator implements Runnable{

    private CustomerLine customers;
    private static Random rand = new Random(47);

    public CustomerGenerator(CustomerLine customers) {
        this.customers = customers;
    }

    @Override
    public void run() {
        try {
            while (!Thread.interrupted()){
                TimeUnit.MILLISECONDS.sleep(rand.nextInt(300));
                customers.put(new Customer(rand.nextInt(1000)));
            }
        }catch (InterruptedException e){
            System.out.println("CustomerGenerator interrupted");
        }
        System.out.println("CustomerGenerator terminating");
    }
}

class Teller implements Runnable,Comparable<Teller>{

    private static int counter = 0;
    private final int id = counter++;
    // Customers served during this shift:
    private int customersServed = 0;
    private CustomerLine customers;
    private boolean servingCustomerLine = true;

    public Teller(CustomerLine customers) {
        this.customers = customers;
    }

    // Used by priority queue:
    @Override
    public int compareTo(Teller o) {
        return customersServed < o.customersServed ? -1 : (customersServed == o.customersServed ? 0 : 1);
    }

    @Override
    public void run() {
        try {
            while (!Thread.interrupted()){
                Customer customer = customers.take();
                TimeUnit.MILLISECONDS.sleep(customer.getServiceTime());
                synchronized (this){
                    customersServed++;
                    while (!servingCustomerLine){
                        wait();
                    }
                }
            }
        }catch (InterruptedException e){
            System.out.println(this + "interrupted");
        }
        System.out.println(this + "terminating");
    }

    public synchronized void doSomethingElse(){
        customersServed = 0;
        servingCustomerLine = false;
    }

    public synchronized void serveCustomerLine(){
        assert !servingCustomerLine:"already serving: " + this;
        servingCustomerLine = true;
        notifyAll();
    }

    @Override
    public String toString() {
        return "Teller " + id + " ";
    }

    public String shortString(){
        return "T" + id;
    }
}


class TellerManager implements Runnable{

    private ExecutorService exec;
    private CustomerLine customers;
    private PriorityQueue<Teller> workingTellers = new PriorityQueue<>();
    private Queue<Teller> tellersDoingOtherThings = new LinkedList<>();
    private int adjustmentPeriod;

    public TellerManager(ExecutorService exec, CustomerLine customers, int adjustmentPeriod) {
        this.exec = exec;
        this.customers = customers;
        this.adjustmentPeriod = adjustmentPeriod;
        // Start with a single teller:
        Teller teller = new Teller(customers);
        exec.execute(teller);
        workingTellers.add(teller);
    }

    public void adjustTellerNumber(){
        // This is actually a control system. By adjusting
        // the numbers, you can reveal stability issues in
        // the control mechanism
        // If line is too long,add another teller:
        if(customers.size() / workingTellers.size() > 2){
            // If tellers are on break or doing
            // another job, bring one back:
            if(tellersDoingOtherThings.size() > 0){
                Teller teller = tellersDoingOtherThings.remove();
                teller.serveCustomerLine();
                workingTellers.offer(teller);
                return;
            }
            // Else create (hire) a new teller
            Teller teller = new Teller(customers);
            exec.execute(teller);
            workingTellers.add(teller);
            return;
        }
        // If line is short enough, remove a teller:
        if (workingTellers.size() > 1 && customers.size() / workingTellers.size() < 2){
            reassignOneTeller();
        }
        // If there is no line,we only need one teller:
        if (customers.size() == 0){
            while (workingTellers.size() > 1){
                reassignOneTeller();
            }
        }
    }

    // Give a teller a different job or a break:
    private void reassignOneTeller(){
        Teller teller = workingTellers.poll();
        teller.doSomethingElse();
        tellersDoingOtherThings.offer(teller);
    }

    @Override
    public void run() {
        try {
            while (!Thread.interrupted()){
                TimeUnit.MILLISECONDS.sleep(adjustmentPeriod);
                adjustTellerNumber();
                System.out.print(customers + " {");
                for (Teller teller : workingTellers) {
                    System.out.print(teller.shortString() + " ");
                }
                System.out.println("}");
            }
        }catch (InterruptedException e){
            System.out.println(this + "interrupted");
        }
        System.out.println(this + "terminating");
    }

    @Override
    public String toString() {
        return "TellerManger";
    }
}

Customer对象非常简单,只包含一个final int域。因为这些对象从来都不发生变化,因此它们是只读对象,并且不需要同步或使用volatile。在这之上,每个Teller任务在任何时刻都只从输入队列中移除一个Customer,并且在这个Customer上工作直至完成,因此Customer在任何时刻都只由一个任务访问。
CustomerLine表示顾客在等待被某个Teller服务时所排成的单一的行。这只是一个ArrayBlockingQueue,它具有一个toString()方法,可以按照我们希望的形式打印结果。
CustomerGenerator附着在CustomerLine上,按照随机的时间间隔向这个队列中添加Customer。
Teller从CustomerLine中取走Customer,在任何时刻他都只能处理一个顾客,并且跟踪在这个特定的班次中有他服务的Customer的数量。当没有足够多的顾客时,他会被告知去执行doSomethingElse(),而当出现了许多顾客时,他会被告知去执行serveCustomerLine()。为了选择下一个出纳员,让其回到服务顾客的业务上,compareTo()方法将查看出纳员服务过的顾客数量,是的PriorityQueue可以自动地将工作量最小的出纳员推向前台。
TellerManager是各种活动的中心,它跟踪所有的出纳员以及等待服务的顾客。这个仿真中有一件有趣的事情,即它试图发现对于给定的顾客流,最优的出纳员数量是多少。你可以在adjustTellerNumber()中看到这一点,这是一个控制系统,它能够以稳定的方式添加或移除出纳员。所有的控制系统都具有稳定性问题,如果它们对变化反应过快,那么它们就是不稳定的,而如果它们反映过慢,则系统会迁移到它的某种极端情况。
8.2 饭店仿真
这个仿真添加了更多的仿真组件,例如Order和Plate,从而充实了本文前面描述的Restaurant.java示例,并且它重用了Thinking in Java——枚举:menu中的类。它还引入了Java SE5的SynchronousQueue,这是一种没有内部容量的阻塞队列,因此每个put()都必须等待一个take(),反之亦然。这就好比你在把一个对象交给某人——没有任何桌子可以放置这个对象,因此只有在这个人伸出手,准备好接收这个对象时,你才能工作。在本例中,SynchronousQueue表示设置在用餐者面前的某个位置,以加强在任何时刻只能上一道菜这个概念。
本例中剩下的类和功能都遵循Restaurant.java结构,或者是对实际的饭店操作的相当直接的映射:
package com.zjwave.thinkinjava.concurrency.restaurant2;


import com.zjwave.thinkinjava.enumerated.Course;
import com.zjwave.thinkinjava.enumerated.Food;

import java.io.IOException;
import java.util.ArrayList;
import java.util.List;
import java.util.Random;
import java.util.concurrent.*;


public class RestaurantWithQueues {

    /**
     * Args : 5
     * @param args
     * @throws IOException
     * @throws InterruptedException
     */
    public static void main(String[] args) throws IOException, InterruptedException {
        ExecutorService exec = Executors.newCachedThreadPool();
        Restaurant restaurant = new Restaurant(exec, 5, 2);
        exec.execute(restaurant);
        if(args.length > 0){// Optional argument
           TimeUnit.SECONDS.sleep(new Integer(args[0]));
        }else {
            System.out.println("Press 'Enter' to quit");
            System.in.read();
        }
        exec.shutdownNow();
    }
}

// This is given to the waiter, who gives it to the chef:
class Order{
    private static int counter = 0;
    private final int id = counter++;
    private final Customer customer;
    private final WaitPerson waitPerson;
    private final Food food;

    public Order(Customer customer, WaitPerson waitPerson, Food food) {
        this.customer = customer;
        this.waitPerson = waitPerson;
        this.food = food;
    }

    public Food item(){
        return food;
    }

    public Customer getCustomer() {
        return customer;
    }

    public WaitPerson getWaitPerson() {
        return waitPerson;
    }

    @Override
    public String toString() {
        return "Order: " + id + " item: " + food +
                " for: " + customer +
                " served by: " + waitPerson;
    }
}

// This is what comes back from the chef:
class Plate{
    private final Order order;
    private final Food food;

    public Plate(Order order, Food food) {
        this.order = order;
        this.food = food;
    }

    public Order getOrder() {
        return order;
    }

    public Food getFood() {
        return food;
    }

    @Override
    public String toString() {
        return food.toString();
    }
}

class Customer implements Runnable{

    private static int counter = 0;
    private final int id = counter++;
    private final WaitPerson waitPerson;
    // Only one course at a time can be received:
    private SynchronousQueue<Plate> placeSetting = new SynchronousQueue<>();

    public Customer(WaitPerson waitPerson) {
        this.waitPerson = waitPerson;
    }

    public void deliver(Plate p) throws InterruptedException {
        // Only blocks if customer is still
        // eating the previous course:
        placeSetting.put(p);
    }

    @Override
    public void run() {
        for (Course course : Course.values()) {
            Food food = course.randomSelection();
            try {
                waitPerson.placeOrder(this,food);
                // Blocks until course has been delivered:
                System.out.println(this + "eating " + placeSetting.take());
            }catch (InterruptedException e){
                System.out.println(this + "waiting for " + course + " interrupted");
                break;
            }
        }
    }

    @Override
    public String toString() {
        return "Customer " + id + " ";
    }
}

class WaitPerson implements Runnable{
    private static int counter = 0;
    private final int id = counter++;
    private final Restaurant restaurant;
    BlockingQueue<Plate> filledOrders = new LinkedBlockingQueue<>();

    public WaitPerson(Restaurant restaurant) {
        this.restaurant = restaurant;
    }

    public void placeOrder(Customer customer,Food food){
        try {
            // Shouldn't actually block because this is
            // a LinkedBlockingQueue with no size limit:
            restaurant.orders.put(new Order(customer,this,food));
        } catch (InterruptedException e) {
            System.out.println(this + " interrupted");
        }
    }


    @Override
    public void run() {
        try {
            while (!Thread.interrupted()){
                // Blocks until a course is ready
                Plate plate = filledOrders.take();
                System.out.println(this + "received " + plate + " delivering to " + plate.getOrder().getCustomer());
                plate.getOrder().getCustomer().deliver(plate);
            }
        }catch (InterruptedException e){
            System.out.println(this + " interrupted");
        }
        System.out.println(this + " off duty");
    }

    @Override
    public String toString() {
        return "WaitPerson " + id + " ";
    }
}

class Chef implements Runnable{
    private static int counter = 0;
    private final int id = counter++;
    private final Restaurant restaurant;
    private static Random rand = new Random(47);

    public Chef(Restaurant restaurant) {
        this.restaurant = restaurant;
    }

    @Override
    public void run() {
        try {
            while (!Thread.interrupted()){
                // Blocks until an order appears:
                Order order = restaurant.orders.take();
                Food requestedItem = order.item();
                // Time to prepare order:
                TimeUnit.MILLISECONDS.sleep(rand.nextInt(500));
                Plate plate = new Plate(order, requestedItem);
                order.getWaitPerson().filledOrders.put(plate);
            }
        }catch (InterruptedException e){
            System.out.println(this + " interrupted");
        }
        System.out.println(this + " off duty");
    }

    @Override
    public String toString() {
        return "Chef " + id + " ";
    }
}

class Restaurant implements Runnable{

    private List<WaitPerson> waitPersons = new ArrayList<>();
    private List<Chef> chefs = new ArrayList<>();
    private ExecutorService exec;
    private static Random rand = new Random(47);
    BlockingQueue<Order> orders = new LinkedBlockingQueue<>();

    public Restaurant(ExecutorService exec,int nWaitPersons,int nChefs) {
        this.exec = exec;
        for (int i = 0; i < nWaitPersons; i++) {
            WaitPerson waitPerson = new WaitPerson(this);
            waitPersons.add(waitPerson);
            exec.execute(waitPerson);
        }
        for (int i = 0; i < nChefs; i++) {
            Chef chef = new Chef(this);
            chefs.add(chef);
            exec.execute(chef);
        }
    }


    @Override
    public void run() {
        try {
            while (!Thread.interrupted()){
                // A new customer arrives;assign a WaitPerson:
                WaitPerson wp = waitPersons.get(rand.nextInt(waitPersons.size()));
                Customer c = new Customer(wp);
                exec.execute(c);
                TimeUnit.MILLISECONDS.sleep(100);
            }
        }catch (InterruptedException e){
            System.out.println("Restaurant closing");
        }
    }
}
关于这个示例,需要观察的一项非常重要的事项,就是使用队列在任务间通信所带来的管理复杂度。这个单项技术通过反转控制极大地简化了并发编程的过程:任务没有直接地互相干涉,而是经由队列互相发送对象。接收任务将处理对象,将其当做一个消息来对待,而不是向它发送消息。如果只要可能就遵循这项技术,那么你构建出健壮的并发系统的可能性就会大大增加。
8.3 分发工作
下面的仿真示例将本文的许多概念都结合在了一起。考虑一个假想的用于汽车的机器人组装线,每辆Car都将分多个阶段构建,从创建底盘开始,紧跟着是安装发动机、车厢和轮子。
package com.zjwave.thinkinjava.concurrency;

import java.util.HashSet;
import java.util.Set;
import java.util.concurrent.*;

public class CarBuilder {
    public static void main(String[] args) throws InterruptedException {
        CarQueue chassisQueue = new CarQueue(),
                finishingQueue = new CarQueue();
        ExecutorService exec = Executors.newCachedThreadPool();
        RobotPool robotPool = new RobotPool();
        exec.execute(new EngineRobot(robotPool));
        exec.execute(new DriveTrainRobot(robotPool));
        exec.execute(new WheelRobot(robotPool));
        exec.execute(new Assembler(chassisQueue,finishingQueue,robotPool));
        exec.execute(new Reporter(finishingQueue));
        // Start everything running by producing chassis:
        exec.execute(new ChassisBuilder(chassisQueue));
        TimeUnit.SECONDS.sleep(7);
        exec.shutdownNow();
    }
}

class Car {
    private final int id;
    private boolean engine = false, driveTrain = false,
            wheels = false;

    public Car(int id) {
        this.id = id;
    }

    // Empty Car object:
    public Car() {
        id = -1;
    }

    public synchronized int getId(){
        return id;
    }

    public synchronized void addEngine(){
        engine = true;
    }

    public synchronized void addDriveTrain(){
        driveTrain = true;
    }

    public synchronized void addWheels(){
        wheels = true;
    }

    @Override
    public synchronized String toString() {
        return "Car " + id + " [ engine: " + engine
                + " driveTrain: " + driveTrain
                + " wheels: " + wheels +" ]";
    }
}

class CarQueue extends LinkedBlockingQueue<Car>{}

class ChassisBuilder implements Runnable{

    private CarQueue carQueue;
    private int counter = 0;

    public ChassisBuilder(CarQueue carQueue) {
        this.carQueue = carQueue;
    }

    @Override
    public void run() {
        try {
            while (!Thread.interrupted()){
                TimeUnit.MILLISECONDS.sleep(500);
                // Make chassis
                Car c = new Car(counter++);
                System.out.println("ChassisBuilder created " + c);
                // Insert into queue
                carQueue.put(c);
            }
        }catch (InterruptedException e){
            System.out.println("Interrupted: ChassisBuilder");
        }
        System.out.println("ChassisBuilder off");
    }
}

class Assembler implements Runnable{

    private CarQueue chassisQueue,finishingQueue;
    private Car car;
    private CyclicBarrier barrier = new CyclicBarrier(4);
    private RobotPool robotPool;

    public Assembler(CarQueue chassisQueue, CarQueue finishingQueue, RobotPool robotPool) {
        this.chassisQueue = chassisQueue;
        this.finishingQueue = finishingQueue;
        this.robotPool = robotPool;
    }

    public Car car() {
        return car;
    }

    public CyclicBarrier barrier(){
        return barrier;
    }

    @Override
    public void run() {
        try {
            while (!Thread.interrupted()){
                // Blocks until chassis is available:
                car = chassisQueue.take();
                // Hire robots to perform work:
                robotPool.hire(EngineRobot.class,this);
                robotPool.hire(DriveTrainRobot.class,this);
                robotPool.hire(WheelRobot.class,this);
                barrier.await(); // Until the robots finish
                // Put car into finishingQueue for further work
                finishingQueue.put(car);
            }
        }catch (InterruptedException e){
            System.out.println("Exiting Assembler via interrupt");
        } catch (BrokenBarrierException e) {
            // This one we want to know about
            throw new RuntimeException(e);
        }
        System.out.println("Assembler off");
    }
}

class Reporter implements Runnable{

    private CarQueue carQueue;

    public Reporter(CarQueue carQueue) {
        this.carQueue = carQueue;
    }

    @Override
    public void run() {
        try {
            while (!Thread.interrupted()){
                System.out.println(carQueue.take());
            }
        }catch (InterruptedException e){
            System.out.println("Exiting Reporter via interrupt");
        }
        System.out.println("Reporter off");
    }
}

abstract class Robot implements Runnable{
    private RobotPool pool;

    public Robot(RobotPool pool) {
        this.pool = pool;
    }

    protected Assembler assembler;

    public Robot assignAssembler(Assembler assembler){
        this.assembler = assembler;
        return this;
    }

    private boolean engage = false;
    public synchronized void engage(){
        engage = true;
        notifyAll();
    }

    // The part of run() that's different for each robot:
    abstract protected void performService();

    @Override
    public void run() {
        try {
            powerDown(); // Wait until needed
            while (!Thread.interrupted()){
                performService();
                assembler.barrier().await(); // Synchronize
                // We're done with that job...
                powerDown();
            }
        }catch (InterruptedException e){
            System.out.println("Exiting " + this + " via interrupt");
        } catch (BrokenBarrierException e) {
            // This one we want to know about
            throw new RuntimeException(e);
        }
    }

    private synchronized void powerDown() throws InterruptedException {
        engage = false;
        assembler = null;// Disconnect from the Assembler
        // Put ourselves back in the available pool:
        pool.release(this);
        while (engage == false){// Power down
            wait();
        }
    }

    @Override
    public String toString() {
        return getClass().getSimpleName();
    }
}

class EngineRobot extends Robot{

    public EngineRobot(RobotPool pool) {
        super(pool);
    }

    @Override
    protected void performService() {
        System.out.println(this + " installing engine");
        assembler.car().addEngine();
    }
}

class DriveTrainRobot extends Robot{

    public DriveTrainRobot(RobotPool pool) {
        super(pool);
    }

    @Override
    protected void performService() {
        System.out.println(this + " installing DriveTrain");
        assembler.car().addDriveTrain();
    }
}

class WheelRobot extends Robot{

    public WheelRobot(RobotPool pool) {
        super(pool);
    }

    @Override
    protected void performService() {
        System.out.println(this + " installing Wheels");
        assembler.car().addWheels();
    }
}

class RobotPool{
    // Quietly prevents identical entries:
    private Set<Robot> pool = new HashSet<>();

    public synchronized void add(Robot r){
        pool.add(r);
        notifyAll();
    }

    public synchronized void hire(Class<? extends Robot> robotType,Assembler d) throws InterruptedException {
        for (Robot r : pool) {
            if(r.getClass().equals(robotType)){
                pool.remove(r);
                r.assignAssembler(d);
                r.engage(); // Power it up to do the task
                return;
            }
        }
        wait(); // None available
        hire(robotType,d);// Try again , recursively
    }


    public synchronized void release(Robot r){
        add(r);
    }
}
Car是经由CarQueue从一个地方传送到另一个地方的,CarQueue是一种LinkedBlockingQueue类型。ChassisBuilder创建了一个未加修饰的Car,并将它放到了一个CarQueue中。Assembler从一个CarQueue中取走Car,并雇请Robot对其加工。CyclicBarrier使Assembler等待,直至所有的Robot都完成,并且在那一时刻它会将Car放置到即将离开它的CarQueue中,然后被传送到下一个操作。最终的CarQueue的消费者是一个Reporter对象,它只是打印Car,以显示所有的任务都已经正确的完成了。
Robot是在池中管理的,当需要完成工作时,就会从池中雇请适当的Robot。在工作完成时,这个Robot会返回到池中。
在main()中创建了所有必须的对象,并初始化了各个任务,最后启动ChassisBuilder,从而启动整个过程(但是,由于LinkedBlockingQueue的行为,使得最先启动它也没问题)。注意,这个程序遵循了本文描述的所有有关对象和任务生命周期的设计原则,因此关闭这个过程将是安全的的。
你会注意到,Car将其所有方法都设置成了synchronized的。正如它所表现出来的那样,在本例中,这是多余的,因为在工厂的内部,Car是通过队列移动的,并且在任何时刻,只有一个任务能够在某辆车上工作。基本上,队列可以强制串行化地访问Car。但是这正是你可能会落入的陷阱——你可能会说“让我们尝试着通过不对Car类同步来进行优化,因为看起来Car在这里并不需要同步。”但是,当这个系统连接到另一个需要Car被同步的系统时,它就会崩溃。
进行这样的声明会简单得多:“Car可能会被多个线程使用,因此我们需要以明显的方式使其成为线程安全的。”我把这种方式描绘为:在公园中,你会在陡峭的坡路上发现一些保护围栏,并且可能会发现标记声明:“不要依靠围栏。”当然,这条规则的真实目的不是要阻止你借助围栏,而是防止你跌落悬崖。但是“不要依靠围栏”与“不要跌落悬崖”相比,是一条遵循起来要容易得多的规则。
9.性能调优
在Java SE5的java.util.concurrent类库中存在着数量庞大的用于性能提高的类。当你细读concurrent类库时就会发现很难辨认哪些类适用于常规应用(例如BlockingQueue),而哪些类只适用于提高性能。在本节中,我们将围绕着性能调优探讨某些话题和类。
9.1 比较各类互斥技术
既然Java包括老式的synchronized关键字和Java SE5中新的Lock和Atomic类,那么比较这些不同的方式,更多地理解它们各自的价值和适用范围,就会显得很有意义。
比较天真的方式是在针对每种方式都执行一个简单的测试,就像下面这样:
package com.zjwave.thinkinjava.concurrency;

import java.util.concurrent.locks.Lock;
import java.util.concurrent.locks.ReentrantLock;

public class SimpleMicroBenchmark {
   static long test(Incrementable incr){
       long start = System.nanoTime();
       for (long i = 0; i < 99999L; i++) {
           incr.increment();
       }
       return System.nanoTime() - start;
   }

    public static void main(String[] args) {
        long synchTime = test(new SynchronizingTest());
        long lockTime = test(new LockingTest());
        System.out.printf("synchronized: %1$10d\n",synchTime);
        System.out.printf("Lock        : %1$10d\n",lockTime);
        System.out.printf("Lock/synchronized = %1$.3f",(double)lockTime /(double)synchTime);
    }

}

abstract class Incrementable{
    protected long counter = 0;
    public abstract void increment();
}

class SynchronizingTest extends Incrementable{

    @Override
    public synchronized void increment() {
        ++counter;
    }
}

class LockingTest extends Incrementable{

    private Lock lock = new ReentrantLock();

    @Override
    public void increment() {
        lock.lock();
        try {
            ++counter;
        }finally {
            lock.unlock();
        }
    }
}

从输出中可以看到,对synchronized方法的调用看起来要比使用ReentrantLock快,这是为什么呢?
本例演示了所谓的“基准测试”危险,这个术语通常指在隔离的,脱离上下文环境的情况下对某个特性进行性能测试。当然,你仍旧必须编写测试来验证诸如“Lock比synchronized更快”这样的断言,但是你需要在编写这些测试的时候意识到,在编译过程中和在运行时实际会发生什么。
上面的示例存在着大量的问题。首先也是最重要的是,我们只有在这些互斥存在竞争的情况下,才能看到真正的性能差异,因此必须有多个任务尝试着访问互斥代码区。而在上面的示例中,每个互斥都是由单个main()线程在隔离的情况下测试。
其次,当编译器看到synchronized关键字时,有可能会执行特殊的优化,甚至有时会注意到这个程序是单线程的。编译器甚至可能会识别出connter被递增的次数是固定数量的,因此会预先计算出其结果。不同的编译器和运行时系统在这方面会有所差异,因此很难确切了解将会发生什么,但是我们需要防止编译器去预测结果的可能性。
为了创建有效的测试,我们必须使程序更加复杂。首先我们需要多个任务,但并不只是会修改内部值的任务,还包括读取这些值的任务(否则优化器可以识别出这些值从来都不会被使用)。另外,计算必须足够复杂和不可预测,以使得编译器没有机会执行积极优化。这可以通过预加载一个大型的随机int数组(预加载可以减小在主循环上调用Random.nextInt()所造成的影响),并在计算总和时使用它们来实现:
package com.zjwave.thinkinjava.concurrency;

import java.util.Random;
import java.util.concurrent.CyclicBarrier;
import java.util.concurrent.ExecutorService;
import java.util.concurrent.Executors;
import java.util.concurrent.atomic.AtomicInteger;
import java.util.concurrent.atomic.AtomicLong;
import java.util.concurrent.locks.Lock;
import java.util.concurrent.locks.ReentrantLock;

public class SynchronizationComparisons {

    static BaseLine baseLine = new BaseLine();
    static SynchronizeTest synch = new SynchronizeTest();
    static LockTest lock = new LockTest();
    static AtomicTest atomic = new AtomicTest();
    static void test(){
        System.out.println("========================");
        System.out.printf("%-12s : %13d\n","Cycles",Accumulator.cycles);
        baseLine.timedTest();
        synch.timedTest();
        lock.timedTest();
        atomic.timedTest();
        Accumulator.report(synch,baseLine);
        Accumulator.report(lock,baseLine);
        Accumulator.report(atomic,baseLine);
        Accumulator.report(synch,lock);
        Accumulator.report(synch,atomic);
        Accumulator.report(lock,atomic);
    }

    public static void main(String[] args) {
        int iterations = 5;//D Default
        if (args.length > 0){// Optionally change iterations
            iterations = new Integer(args[0]);
        }
        // The first time fills the thread pool:
        System.out.println("Warmup");
        baseLine.timedTest();
        // Now the initial test doesn't include the cost
        // of starting the threads for the first timne.
        // Produce multiple data points:
        for (int i = 0; i < iterations; i++) {
            test();
            Accumulator.cycles *= 2;
        }
        Accumulator.exec.shutdown();
    }
}

abstract class Accumulator {
    public static long cycles = 50000L;
    // Number of Modifiers and Readers during each test:
    private static final int N = 4;
    public static ExecutorService exec = Executors.newFixedThreadPool(N * 2);
    private static CyclicBarrier barrier = new CyclicBarrier(N * 2 + 1);
    protected volatile int index = 0;
    protected volatile long value = 0;
    protected long duration = 0;
    protected String id = "error";
    protected final static int SIZE = 100000;
    protected final static int MAX_INDEX = SIZE - Runtime.getRuntime().availableProcessors();
    protected static int[] preLoaded = new int[SIZE];
    static {
        // Load the array of random numbers:
        Random rand = new Random(47);
        for (int i = 0; i < SIZE; i++) {
            preLoaded[i] = rand.nextInt();
        }
    }
    public abstract void accumulate();

    public abstract long read();
    private class Modifier implements Runnable{

        @Override
        public void run() {
            for (long i = 0; i < cycles; i++) {
                accumulate();
            }
            try {
                barrier.await();
            } catch (Exception e) {
                throw new RuntimeException(e);
            }
        }
    }

    private class Reader implements Runnable{
        private volatile long value;

        @Override
        public void run() {
            for (long i = 0; i < cycles; i++) {
                value = read();
            }
            try {
                barrier.await();
            } catch (Exception e) {
                throw new RuntimeException(e);
            }
        }
    }

    public void timedTest(){
        long start = System.nanoTime();
        for (int i = 0; i < N; i++) {
            exec.execute(new Modifier());
            exec.execute(new Reader());
        }
        try {
            barrier.await();
        } catch (Exception e) {
            throw new RuntimeException(e);
        }
        duration = System.nanoTime() - start;
        System.out.printf("%-13s: %13d\n",id,duration);
    }

    public static void report(Accumulator acc1,Accumulator acc2){
        System.out.printf("%-22s: %.2f\n",acc1.id + "/" + acc2.id,(double)acc1.duration / (double)acc2.duration);
    }
}

class BaseLine extends Accumulator{
    {
        id = "BaseLine";
    }

    @Override
    public void accumulate() {
        value += preLoaded[index++];
        if(index >= MAX_INDEX){
            index = 0;
        }
    }

    @Override
    public long read() {
        return value;
    }
}

class SynchronizeTest extends Accumulator{
    {
        id = "synchronized";
    }

    @Override
    public synchronized void accumulate() {
        value += preLoaded[index++];
        if(index >= MAX_INDEX){
            index = 0;
        }
    }

    @Override
    public synchronized long read() {
        return value;
    }
}

class LockTest extends Accumulator{
    {
        id = "Lock";
    }

    private Lock lock = new ReentrantLock();

    @Override
    public void accumulate() {
        lock.lock();
        try {
            value += preLoaded[index++];
            if(index >= MAX_INDEX){
                index = 0;
            }
        }finally {
            lock.unlock();
        }
    }

    @Override
    public long read() {
        lock.lock();
        try {
            return value;
        }finally {
            lock.unlock();
        }

    }
}

class AtomicTest extends Accumulator{

    {
        id = "Atomic";
    }

    private AtomicInteger index = new AtomicInteger(0);
    private AtomicLong value = new AtomicLong(0);

    @Override
    public void accumulate() {
        // Oops! Relying on more than one Atomic at
        // a time doesn't work. But it still gives us
        // a performance indicator:
        int i = index.getAndIncrement();
        value.getAndAdd(preLoaded[i]);
        if(++i >= MAX_INDEX){
            index.set(0);
        }
    }

    @Override
    public long read() {
        return value.get();
    }
}

这个程序使用了模板方法设计模式,将所有公用代码都放置到基类中,并将所有不同的代码隔离在导出类的accumulate()和read()的实现中。在每个导出类SynchronizeTest、LockTest和AtomicTest中,你可以看到accumulate()和read()如何表达了实现互斥现象的不同方式。
在这个程序中,各个任务都是经由FixedThreadPool执行的,在执行过程中尝试着在开始时跟踪所有线程的创建,并且在测试过程中防止产生任何额外的开销。为了保险起见,初始测试执行了两次,而第一次的结果被丢弃,因为它包含了初始线程的创建。
程序中必须有一个CyclicBarrier,因为我们希望确保所有的任务在生命每个测试完成之前都已经完成。
每次调用accumulate()时,它都会移动到preLoaded数组的下一个位置(到达数组尾部时再回到开始位置),并将这个位置的随机生成的数组加到value上。多个Modifier和Reader任务提供了在Accumulatro对象上的竞争。
注意,在AtomicTest中,我发现情况过于复杂,使用Atomic对象已经不适合了——基本上,如果涉及多个Atomic对象,你就有可能被强制要求放弃这种用法,转而使用更加常规的互斥(JDK文档特别声明:当对一个对象的临界更新被限制为只涉及单个变量时,只有使用Atomic对象这种方式才能工作)。但是,这个测试仍旧保留了下来,使你能够感受到Atomic对象的性能优势。
在main()中,测试是重复运行的,并且你可以要求其重复次数超过5次(默认次数)。对于每次重复,测试循环的数量都会加倍,因此你可以看到当运行次数越来越多时,这些不同的互斥在行为方面存在着怎样的差异。正如你从输出中可以看到的那样,测试结果相当惊人。synchronized关键字比Lock和Atomic要低效,并且随着循环次数的增加,synchronized和BaseLine测试之间的比例是逐渐增大的,而Lock和Atomic则显得大体维持着与BaseLine测试之间的比例关系,因此也就变得比synchronized关键字要高效得多。
记住,这个程序只给出了各种互斥之间的差异的趋势,而上面的输出也仅仅表示这些差异在我的特定环境下的特定机器上的表现。如你所见,如果自己动手试验,当所使用的线程数量不同,或者程序运行的时间更长时,在行为方面肯定会存在着明显的变化。例如,某些hotspot运行时优化会在程序运行数分钟之后被调用,但是对于服务器端程序,这段时间可能会长达数小时。
也就是说,很明显,使用Lock通常会比使用synchronized要高效许多,而且synchronized的开销看起来变化范围太大,而Lock相对比较一致。
这是否意味着你永远都不应该使用synchronized关键字呢?这里有两个因素需要考虑:首先,在SynchronizationComparisons.java中,互斥方法的方法体是非常之小的。通常,这是一个很好的习惯——只互斥那些你绝对必须互斥的部分。但是,在实际中,被互斥部分可能会比上面示例中的那些大许多,因此在这些方法体中花费的时间的百分比可能会明显大于进入和退出互斥的开销,这样也就湮没了提高互斥速度带来的所有好处。当然,唯一了解这一点的方式是——当你在对性能调优时,应该立即——尝试各种不同的方法并观察它们造成的影响。
其次,阅读本文中的代码就会发现,很明显,synchronized关键字所产生的代码,与Lock所需的“加锁-try/finally-解锁”惯用法所产生的代码相比,可读性提高了很多,这就是为什么本文主要使用synchronized关键字的原因。代码被阅读的次数远多于被编写的次数。在编程时,与其他人交流相对于与计算机交流而言,要重要得多,因此代码的可读性至关重要。因此,以synchronized关键字入手,只有在性能调优时才替换为Lock对象这种做法,是具有实际意义的。
最后,当你在自己的并发程序中可以使用Atomic类时,这肯定非常好,但是要意识到,正如我们在SynchronizationComparisons.java中所看到的,Atomic对象只有在非常简单的情况下才有用,这些情况通常包括你只有一个要被修改的Atomic对象,并且这个对象独立于其他所有的对象。更安全的做法是:以更加传统的互斥方式入手,只有在性能方面的需求能够明确指示时,再替换为Atomic。
9.2 免锁容器
容器是所有编程中的基础工具,这其中自然也包括并发编程。出于这个原因,像Vector和Hashtable这类早期容器具有许多synchronized方法,当它们用于非多线程的应用程序中时,遍会导致不可接受的开销。在Java 1.2中,新的容器类库是不同步的,并且Collections类提供了各种static的同步的装饰方法,从而来同步不同类型的容器。尽管这是一种改进,因为它使你可以选择在你的容器中是否要使用同步,但是这种开销仍旧是基于synchronized加锁机制的。Java SE5特别添加了新的容器,通过使用更灵巧的技术来消除加锁,从而提高线程安全的性能。
这些免锁容器背后的通用策略是:对容器的修改可以与读取操作同时发生,只要读取者只能看到完成修改的结果即可。修改是在容器数据结构的某个部分的一个单独的副本(有时是整个数据结构的副本)上执行的,并且这个副本在修改过程中是不可视的。只有当修改完成时,被修改的结构才会自动地与主数据结构进行交换,之后读取者就可以看到这个修改了。
在CopyOnWriteArrayList中,写入将导致创建整个底层数组的副本,而源数组将保留在原地,使得复制的数组在被修改时,读取操作可以安全地执行。当修改完成时,一个原子性的操作将把新的数组换入,使得新的读取操作可以看到这个新的修改。CopyOnWriteArrayList的好处之一是当多个迭代器同时遍历和修改这个列表时,不会抛出ConcurrentModificationException,因此你不必编写特殊的代码去防范这种异常。
CopyOnWriteArraySet将使用CopyOnWriteArrayList来实现其免锁行为。
ConcurrentHashMap和ConcurrentLinkedQueue使用了类似的技术,允许并发的读取和写入,但是容器中只有部分内容而不是整个容器可以被复制和修改。然而,任何修改在完成之前,读取者仍旧不能看到它们。ConcurrentHashMap不会抛出ConcurrentModificationException异常。
乐观锁
只要你主要是从免锁容器中读取,那么它就会比其synchronized对应物快许多,因为获取和释放锁的开销被省掉了。如果需要向免锁容器中执行少量写入,那么情况仍旧如此,但是什么算是“少量”?这是一个很有意思的问题。本节将介绍有关在各种不同条件下,这些容器在性能方面差异的大致概念。
我将从一个泛型框架着手,它专门用于在任何类型的容器上执行测试,包括各种Map在内,其中泛型参数C表示容器的类型:
package com.zjwave.thinkinjava.concurrency;

import com.zjwave.thinkinjava.arrays.Generated;
import com.zjwave.thinkinjava.arrays.RandomGenerator;

import java.util.concurrent.CountDownLatch;
import java.util.concurrent.ExecutorService;
import java.util.concurrent.Executors;

public abstract class Tester<C> {
    static int testReps = 10;
    static int testCycles = 1000;
    static int containerSize = 1000;

    abstract C containerInitializer();

    abstract void startReadersAndWriters();

    C testContainer;
    String testId;
    int nReaders;
    int nWriters;
    volatile long readResult = 0;
    volatile long readTime = 0;
    volatile long writeTime = 0;
    CountDownLatch endLatch;
    static ExecutorService exec = Executors.newCachedThreadPool();
    Integer[] writeData;

    public Tester(String testId, int nReaders, int nWriters) {
        this.testId = testId;
        this.nReaders = nReaders;
        this.nWriters = nWriters;
        writeData = Generated.array(Integer.class, new RandomGenerator.Integer(), containerSize);
        for (int i = 0; i < testReps; i++) {
            runTest();
            readTime = 0;
            writeTime = 0;
        }
    }


    void runTest() {
        endLatch = new CountDownLatch(nReaders + nWriters);
        testContainer = containerInitializer();
        startReadersAndWriters();
        try {
            endLatch.await();
        } catch (InterruptedException e) {
            System.out.println("endLatch interrupted");
        }
        System.out.printf("%-27s %14d %14d\n", testId, readTime, writeTime);
        if (readTime != 0 && writeTime != 0) {
            System.out.printf("%-27s %14d\n","readTime + writeTime =",readTime + writeTime);
        }
    }

    abstract class TestTask implements Runnable{
        abstract void test();
        abstract void putResults();
        long duration;

        @Override
        public void run() {
            long startTime = System.nanoTime();
            test();
            duration = System.nanoTime() - startTime;
            synchronized (Tester.this){
                putResults();
            }
            endLatch.countDown();
        }
    }

    public static void initMain(String args[]){
        if (args.length > 0){
            testReps = new Integer(args[0]);
        }
        if(args.length > 1){
            testCycles = new Integer(args[1]);
        }
        if(args.length > 2){
            containerSize = new Integer(args[2]);
        }
        System.out.printf("%-27s %14s %14s\n","Type","Read time","Write time");
    }

}
abstract方法containerInitializer()返回将被测试的初始化后的肉经期,它被存储在testContainer域中。另一个abstract方法startReadersAndWriters()启动读取者和写入者任务,它们将读取和修改待测容器。不同的测试在运行时将具有数量变化的读取者和写入者,这样就可以观察到锁竞争(针对synchronized容器而言)和写入(针对免锁容器而言)的效果。
我们向构造器提供了有关测试的信息(参数标识符应该是自解释的)然后它会调用runTest()方法testReps次。runTest()将创建一个CountDownLatch(因此测试可以知道所有任务何时完成)、初始化容器,然后调用startReadersAndWriters(),并等待它们全部完成。
每个Reader和Writer类都基于TestTask,它可以度量其抽象方法test()的执行时间,然后在一个synchronized块中调用putResults()去存储度量结果。
为了使用这个框架(其中你可以识别出模板方法设计模式),我们必须让想要测试的特定类型的容器继承Tester,并提供适合的Reader和Writer类:
package com.zjwave.thinkinjava.concurrency;

import com.zjwave.thinkinjava.collection.CountingIntegerList;
import java.util.ArrayList;
import java.util.Collections;
import java.util.List;
import java.util.concurrent.CopyOnWriteArrayList;

public class ListComparisons {
    /**
     * Args : 1 500 500
     * @param args
     */
    public static void main(String[] args) {
        Tester.initMain(args);
        new SynchronizedArrayListTest(10,0);
        new SynchronizedArrayListTest(9,1);
        new SynchronizedArrayListTest(5,5);
        new CopyOnWriteArrayListTest(10,0);
        new CopyOnWriteArrayListTest(9,1);
        new CopyOnWriteArrayListTest(5,5);
        Tester.exec.shutdown();
    }
}

abstract class ListTest extends Tester<List<Integer>>{

    public ListTest(String testId, int nReaders, int nWriters) {
        super(testId, nReaders, nWriters);
    }

    class Reader extends TestTask{
        long result = 0;

        @Override
        void test() {
            for (int i = 0; i < testCycles; i++) {
                for (int index = 0; index < containerSize; index++) {
                    result += testContainer.get(index);
                }
            }
        }

        @Override
        void putResults() {
            readResult += result;
            readTime += duration;
        }
    }

    class Writer extends TestTask{

        @Override
        void test() {
            for (int i = 0; i < testCycles; i++) {
                for (int index = 0; index < containerSize; index++) {
                    testContainer.set(index,writeData[index]);
                }
            }
        }

        @Override
        void putResults() {
            writeTime += duration;
        }
    }

    @Override
    void startReadersAndWriters() {
        for (int i = 0; i < nReaders; i++) {
            exec.execute(new Reader());
        }
        for (int i = 0; i < nWriters; i++) {
            exec.execute(new Writer());
        }
    }
}

class SynchronizedArrayListTest extends ListTest{

    public SynchronizedArrayListTest(int nReaders, int nWriters) {
        super("Synched ArrayList", nReaders, nWriters);
    }

    @Override
    List<Integer> containerInitializer() {
        return Collections.synchronizedList(new ArrayList<>(new CountingIntegerList(containerSize)));
    }
}

class CopyOnWriteArrayListTest extends ListTest{

    public CopyOnWriteArrayListTest(int nReaders, int nWriters) {
        super("CopyOnWriteArrayList", nReaders, nWriters);
    }

    @Override
    List<Integer> containerInitializer() {
        return new CopyOnWriteArrayList<>(new CountingIntegerList(containerSize));
    }
}

在ListTest中,Reader和Writer类执行针对List<Integer>的具体动作。在Reader.putResults()中,duration被存储起来,result也是一样,这样可以防止这些计算被优化掉。startReadersAndWriters()被定义为创建和执行具体的Readers和Writers。
一旦创建了ListTest,它就必须被进一步继承,以覆盖containerInitializer(),从而可以创建和初始化具体的测试容器。
在main()中,你可以看到各种测试变体,它们具有不同数量的读取者和写入者。由于存在对Tester.initMain(args)的调用,所以你可以使用命令行参数来改变测试变量。
默认行是为每个测试运行10次,这有助于稳定输出,而输出是可以变化的,因为存在着诸如hotspot优化和垃圾回收这样的JVM活动。你看到的样本输出已经被编辑为只显示每个测试的最后一个迭代。从输出中可以看到,synchronized ArrayList无论读取者和写入者的数量是多少,都具有大致相同的性能——读取者与其他读取者竞争锁的方式与写入者相同。但是,CopyOnWriteArrayList在没有写入者时,速度会快许多,并且在有5个写入者时,速度仍旧明显地快。看起来你应该尽量使用CopyOnWriteArrayList,对列表写入的影响并没有超过短期同步整个列表的影响。当然,你必须在你的具体应用中尝试着良好总不同的方式,以了解到底哪个更好一些。
再次注意,这还不是测试结果绝对不变的良好基准测试,你的结果几乎肯定是不同的。这里的目标只是让你对两种不同类型的容器的相对行为有个概念上的认识。
因为CopyOnWriteArraySet使用了CopyOnWriteArrayList,所以它的行为与此类似,在这里就不需要另外设计一个单独的测试了。
比较各种Map的实现
我们可以使用相同的框架来得到synchronizedhashMap和ConcurrentHashMap在性能方面的比较结果:
package com.zjwave.thinkinjava.concurrency;

import com.zjwave.thinkinjava.arrays.CountingGenerator;
import com.zjwave.thinkinjava.collection.MapData;

import java.util.Collections;
import java.util.HashMap;
import java.util.Map;
import java.util.concurrent.ConcurrentHashMap;

public class MapComparisons {

    /**
     * Args : 1 500 500
     * @param args
     */
    public static void main(String[] args) {
        Tester.initMain(args);
        new SynchronizedHashMapTest(10,0);
        new SynchronizedHashMapTest(9,1);
        new SynchronizedHashMapTest(5,5);

        new ConcurrentHashMapTest(10,0);
        new ConcurrentHashMapTest(9,1);
        new ConcurrentHashMapTest(5,5);
        Tester.exec.shutdown();
    }
}

abstract class MapTest extends Tester<Map<Integer,Integer>>{

    public MapTest(String testId, int nReaders, int nWriters) {
        super(testId, nReaders, nWriters);
    }

    class Reader extends TestTask{

        long result = 0;

        @Override
        void test() {
            for (int i = 0; i < testCycles; i++) {
                for (int index = 0; index < containerSize; index++) {
                    result += testContainer.get(index);
                }
            }
        }

        @Override
        void putResults() {
            readResult += result;
            readTime += duration;
        }
    }

    class Writer extends TestTask{

        @Override
        void test() {
            for (int i = 0; i < testCycles; i++) {
                for (int index = 0; index < containerSize; index++) {
                    testContainer.put(index,writeData[index]);
                }
            }
        }

        @Override
        void putResults() {
            writeTime += duration;
        }
    }

    @Override
    void startReadersAndWriters() {
        for (int i = 0; i < nReaders; i++) {
            exec.execute(new Reader());
        }
        for (int i = 0; i < nWriters; i++) {
            exec.execute(new Writer());
        }
    }
}

class SynchronizedHashMapTest extends MapTest{

    public SynchronizedHashMapTest(int nReaders, int nWriters) {
        super("Synched HashMap", nReaders, nWriters);
    }

    @Override
    Map<Integer, Integer> containerInitializer() {
        return Collections.synchronizedMap(new HashMap<>(MapData.map(new CountingGenerator.Integer(),new CountingGenerator.Integer(),containerSize)));
    }
}

class ConcurrentHashMapTest extends MapTest{

    public ConcurrentHashMapTest(int nReaders, int nWriters) {
        super("ConcurrentHashMap", nReaders, nWriters);
    }

    @Override
    Map<Integer, Integer> containerInitializer() {
        return new ConcurrentHashMap<>(MapData.map(new CountingGenerator.Integer(),new CountingGenerator.Integer(),containerSize));
    }
}
想ConcurrentHashMap添加写入者的影响甚至还不如CopyOnWriteArrayList明显,这是因为ConcurrentHashMap使用了一种不同的技术,它可以明显地最小化写入所造成的影响。
9.3 乐观加锁
尽管Atomic对象将执行像decrementAndGet()这样的原子性操作,但是某些Atomic类还允许你执行所谓的“乐观加锁”。这意味着当你执行某项计算时,实际上没有使用互斥,但是在这项计算完成,并且你准备更新这个Atomic对象时,你需要使用一个称为compareAndSet()的方法。你将旧值和新值一起提交给这个方法,如果旧值与它在Atomic对象中发现的值不一致,那么这个操作就失败——这意味某个其他的任务已经与此操作执行期间修改了这个对象。记住,我们在正常情况下将使用互斥(synchronized或Lock)来放置多个任务同时修改一个对象,但是这里我们是“乐观的”,因为我们保持数据为未锁定状态,并希望没有任何其他任务插入修改它。所有这些又都是以性能的名义执行的——通过使用Atomic来替代synchronized或Lock,可以获得性能上的好处。
如果compareAndSet()操作失败会发生什么?这正是棘手的地方,也是你在应用这项技术时的受限之处,即只能针对能够温和这些需求的问题。如果compareAndSet()失败,那么就必须决定做些什么,这是一个非常重要的稳定提,因为如果不能执行某些恢复操作,那么你就不能使用这项技术,从而必须使用传统的互斥。你可能会重试这个操作,如果在第二次成功,那么万事大吉,或者可能会忽略这次失败,直接结束——在某些仿真中,如果数据点丢失,在重要的框架中,这就是最终需要做的事情(当然,你必须很好地理解你的模型,以了解情况是否确实如此)。
考虑一个假想的仿真,它由长度为30的100000个基因构成,这可能是某种类型的遗传算法的起源。假设伴随着遗传算法的每次“进化”,都会发生某些代价高昂的计算,因此你决定使用一台多处理器机器来分布这些任务以提高性能。另外,你将使用Atomic对象而不是Lock对象来防止互斥开销(当然,一开始,你使用synchronized关键字以最简单的方式编写了代码。一旦你运行该程序,发现它太慢了,并开始应用性能调优技术,而此时你也只能写出这样的解决方案)。因为你的模型的特性,使得如果在计算过程中产生冲突,那么发现冲突的任务将直接忽略它,并不会更新它的值。下面是这个示例的代码:
package com.zjwave.thinkinjava.concurrency;

import java.util.Random;
import java.util.concurrent.ExecutorService;
import java.util.concurrent.Executors;
import java.util.concurrent.TimeUnit;
import java.util.concurrent.atomic.AtomicInteger;

public class FastSimulation{
    static final int N_ELEMENTS = 100000;
    static final int N_GENES = 30;
    static final int N_EVOLVERS = 50;
    static final AtomicInteger[][] GRID = new AtomicInteger[N_ELEMENTS][N_GENES];
    static Random rand = new Random(47);
    static class Evolver implements Runnable{

        @Override
        public void run() {
            while (!Thread.interrupted()){
                // Randomly select an element to work on:
                int element = rand.nextInt(N_ELEMENTS);
                for (int i = 0; i < N_GENES; i++) {
                    int previous = element -1;
                    if(previous < 0){
                        previous = N_ELEMENTS - 1;
                    }
                    int next = element + 1;
                    if(next >= N_ELEMENTS){
                        next = 0;
                    }
                    int oldValue = GRID[element][i].get();
                    // Perform some kind of modeling calculation:
                    int newValue = oldValue + GRID[previous][i].get() + GRID[next][i].get();
                    newValue /= 3; //Average the three values
                    if(!GRID[element][i].compareAndSet(oldValue,newValue)){
                        // Policy here to deal with failure. Here,we
                        // just report it and ignore it; our model
                        // will eventually deal with it.
                        System.out.println("Old value changed from " + oldValue);
                    }
                }
            }
        }
    }

    public static void main(String[] args) throws InterruptedException {
        ExecutorService exec = Executors.newCachedThreadPool();
        for (int i = 0; i < N_ELEMENTS; i++) {
            for (int j = 0; j < N_GENES; j++) {
                GRID[i][j] = new AtomicInteger(rand.nextInt(1000));
            }
        }
        for (int i = 0; i < N_EVOLVERS; i++) {
            exec.execute(new Evolver());
        }
        TimeUnit.SECONDS.sleep(5);
        exec.shutdownNow();
    }
}

所有元素都被置于数组内,这被认为有助于提高性能。每个Evolver对象会用它前一个元素和后一个元素来平均它的值,如果在更新时失败,那么将直接打印这个值并继续执行。注意,这个程序中没有出现任何互斥。
9.4 ReadWriteLock
ReadWriteLock对向数据结构相对不频繁地写入,但是有多个任务要经常读取这个数据结构的这类情况进行了优化。ReadWriteLock是的你可以同时有多个读取者,只要他们都不试图写入即可。如果写锁已经被其他任务持有,那么任何读取者都不能访问,直至这个写锁被释放为止。
ReadWriteLock是否能够提高程序的性能是完全不可确定的,它取决于诸如数据呗读取的频率与被修改的频率相比较的结果,读取和写入操作的时间(锁将更复杂,因此短操作并不能带来好处),有多少线程竞争以及是否在多处理机器上运行等因素。最终,唯一可以了解是否能够给ReadWriteLock你的程序带来好处的方式就是用试验来证明。
下面是只展示了ReadWriteLock的最基本用法的示例:
package com.zjwave.thinkinjava.concurrency;

import java.util.ArrayList;
import java.util.Collections;
import java.util.Random;
import java.util.concurrent.ExecutorService;
import java.util.concurrent.Executors;
import java.util.concurrent.TimeUnit;
import java.util.concurrent.locks.Lock;
import java.util.concurrent.locks.ReentrantReadWriteLock;

public class ReaderWriterList<T> {

    private ArrayList<T> lockedList;

    // Make the ordering fair:
    private ReentrantReadWriteLock lock = new ReentrantReadWriteLock(true);

    public ReaderWriterList(int size, T initialValue) {
        lockedList = new ArrayList<>(Collections.nCopies(size, initialValue));
    }

    public T set(int index, T element) {
        Lock wlock = lock.writeLock();
        wlock.lock();
        try {
            return lockedList.set(index, element);
        } finally {
            wlock.unlock();
        }
    }

    public T get(int index){
        Lock rlock = lock.readLock();
        rlock.lock();
        try {
            // Show that multiple readers
            // may acquire the read lock:
            if(lock.getReadLockCount() > 1){
                System.out.println(lock.getReadLockCount());
            }
            return lockedList.get(index);
        }finally {
            rlock.unlock();
        }
    }

    public static void main(String[] args) {
        new ReaderWriterListTest(30,1);
    }
}


class ReaderWriterListTest{
    ExecutorService exec = Executors.newCachedThreadPool();
    private final static int SIZE = 100;
    private static Random rand = new Random(47);
    private ReaderWriterList<Integer> list = new ReaderWriterList<>(SIZE,0);
    private class Writer implements Runnable{

        @Override
        public void run() {
            try {
                for (int i = 0; i < 20; i++) {// 2 second test
                    list.set(i,rand.nextInt());
                    TimeUnit.MILLISECONDS.sleep(100);
                }
            }catch (InterruptedException e){
                // Acceptable way to exit
            }
            System.out.println("Writer finished, shutting down");
            exec.shutdownNow();
        }
    }

    private class Reader implements Runnable{
        @Override
        public void run() {
            try {
                while (!Thread.interrupted()){
                    for (int i = 0; i < SIZE; i++) {
                        list.get(i);
                        TimeUnit.MILLISECONDS.sleep(1);
                    }
                }
            }catch (InterruptedException e){
                // Acceptable way to exit
            }
        }
    }

    public ReaderWriterListTest(int readers,int writers) {
        for (int i = 0; i < readers; i++) {
            exec.execute(new Reader());
        }
        for (int i = 0; i < writers; i++) {
            exec.execute(new Writer());
        }
    }
}
ReadWriterList可以持有固定数量的任何类型的对象。你必须向构造器提供所希望的列表尺寸和组装这个列表时所用的处事对象。set()方法要获取一个写锁,以调用底层的ArrayList.set(),而get()方法要获取一个读锁,以调用底层的ArrayList.get()。另外,get()将检查是否已经有多个读取者获取了该锁,如果是,则将显示这种读取者的数量,以证明可以有多个读取者获得读锁。
为了测试ReadWriterList,ReadWriterListTest为ReadWriterList<Integer>创建了读取者和写入者。注意,写入者的数量远少于读取者。
如果你在JDK文档中查看ReentrantReadWriteLock,就会发现还有大量的其他方法可用,涉及“公平性”和“政策性决策”等问题。这是一个相当复杂的工具,只有当你在搜索可用提高性能的方法时,猜应该想到用它。你的程序的第一个草案应该使用更直观的同步,并且只有在必须时再引入ReadWriteLock
10.活动对象
当你通读本文之后,可能会发现,Java中的线程机制看起来非常复杂并难以正确使用。另外,它好像还有点达不到预期效果的味道——尽管多个任务可以并行工作,但是你必须花很大的气力去实现防止这些任务彼此互相干涉的技术。
如果你曾经编写过汇编语言,那么编写多线程程序就似曾相识:每个细节都很重要,你有责任处理所有事物,并且没有任何编译器检查形式的安全方式措施。
是多线程模型自身有问题吗?毕竟,它来自于过程型编程世界,并且几乎没做什么改变。可能还存在着另一种不同你个的并发模型,它更加适合面向对象编程。
一种可替换的方式被称为活动对象或行动者。之所以称这些对象是“活动的”,是因为每个对象都维护者它自己的工作器线程和消息队列,并且所有对这种对象的请求都将进入队列排队,任何时刻都只能运行其中的一个。因此,有了活动对象,我们就可以串行化消息而不是方法,这意味不在需要防备一个任务在其循环的中间被中断这种问题。
当你向一个活动对象发送消息时,这条消息会转变为一个任务,该任务会被插入到这个对象的队列中,等待在以后的某个时刻运行。Java SE5的Future在实现这种模式时将派上用场。下面是一个简单的示例,它有两个方法,可以将方法调用排进队列:
package com.zjwave.thinkinjava.concurrency;

import java.util.List;
import java.util.Random;
import java.util.concurrent.*;

/**
 * Can only pass constants,immutables,"disconnected
 * object," or other active objects as arguments
 * to asynch methods.
 */
public class ActiveObjectDemo {
    private ExecutorService ex = Executors.newSingleThreadExecutor();
    private Random rand = new Random(47);

    // Insert a random delay to produce the effect
    // of a calculation time:
    private void pause(int factor) {
        try {
            TimeUnit.MILLISECONDS.sleep(100 + rand.nextInt(factor));
        } catch (InterruptedException e) {
            System.out.println("sleep() interrupted");
        }
    }

    public Future<Integer> calculateInt(int x, int y) {
        return ex.submit(new Callable<Integer>() {
            @Override
            public Integer call() throws Exception {
                System.out.println("starting " + x + " + " + y);
                pause(500);
                return x + y;
            }
        });
    }

    public Future<Float> calculateFloat(float x, float y) {
        return ex.submit(new Callable<Float>() {
            @Override
            public Float call() throws Exception {
                System.out.println("starting " + x + " + " + y);
                pause(2000);
                return x + y;
            }
        });
    }

    public void shutdown() {
        ex.shutdown();
    }

    public static void main(String[] args) {
        ActiveObjectDemo d1 = new ActiveObjectDemo();
        // Prevents ConcurrentModificationException:
        List<Future<?>> results = new CopyOnWriteArrayList<>();
        for (float f = 0.0F; f < 1.0F; f += 0.2F) {
            results.add(d1.calculateFloat(f,f));
        }
        for (int i = 0; i < 5; i++) {
            results.add(d1.calculateInt(i,i));
        }
        System.out.println("All asynch calls made");
        while (results.size() > 0){
            for (Future<?> future : results) {
                if(future.isDone()){
                    try {
                        System.out.println(future.get());
                    }catch (Exception e){
                        throw new RuntimeException(e);
                    }
                    results.remove(future);
                }
            }
        }
        d1.shutdown();
    }
}

由对Executors.newSingleThreadExecutor()的调用产生的单线程执行器维护着它自己的无界阻塞队列,并且只有一个线程从该队列中取走任务并执行它们直至外城。我们需要在calculateInt()和calculateFloat()中做的就是用submit()提交一个新的Callable对象,以响应对这些方法的调用,这样就可以把方法调用转变为消息,而submit()的方法体包含在匿名内部类的call()方法中。注意,每个活动对象方法的返回值都是一个具有泛型参数的Future,而这个泛型参数就是该方法中实际的返回类型。通过这种方式,方法调用几乎可以立即返回,调用者可以使用Future来发现何时任务完成,并收集实际的返回值比。这样可以处理最复杂的情况,但是如果调用没有任何返回值,那么这个过程将被简化。
在main()中,创建了一个List<Future<?>>来捕获由发送给活动对象的calculateFloat()和calculateInt()消息返回的Future对象。对于每个Future,都是使用isDone()来从这个列表中抽取的,这种方式使得当Future完成并且其结果被处理过之后,就会从List中移除。注意,使用CopyOnWriteArrayList可以移除为了防止ConcurrentModificationException而复制List的这种需求。
为了能够在不经意间就可以防止线程之间的耦合,任何传递给活动对象方法调用的参数都必须是只读的其他活动对象,或者是不连接对象,即没有连接任何其他任务的对象(这一点很难强制保障,因为没有任何语言支持它)。有了活动对象:
- 每个对象都可以拥有自己的工作器线程。
- 每个对象都将维护对它自己的域的全部控制权(这比普通的类要更严苛一些,普通的类只是拥有防护它们的域的选择权)。
- 所有在活动对象之间的通信都将以在这些对象之间的消息形式发生。
- 活动对象之间的所有消息都要排队。
这些结果很吸引人。由于从一个活动对象到另一个活动对象的消息只能被排队时的延迟所阻塞,并且因为这个延迟总是非常短且独立于任何其他对象的,所以发送消息实际上是不可阻塞的(最坏情况也只是很短的延迟)。由于一个活动对象系统只是经由消息来通信,所以两个对象在竞争调用另一个对象上的方法时,是不会被阻塞的,而这意味着不会发生死锁。这是一种巨大的进步。因为在活动对象中的工作器线程在任何时刻只执行一个消息,所以不存在任何资源竞争,而你也不必操心应该如何同步方法。同步仍旧会发生,但是它通过将方法调用排队,使得任何时刻都只能发生一个调用,从而将同步控制器在消息级别上发生。
遗憾的是,如果欧直接的编译器支持,上面这种编码方式实在是太过于麻烦了。但是,这在活动对象和行动者领域,或者更有趣的被称为基于代理的编程领域,确实产生了进步。代理实际上就是活动对象,但是代理系统还支持跨网络和机器的透明性。如果代理编程最终称为面向对象编程的继任者,我一点也不会觉得惊讶,因为它把对象和相对容易的并发解决方案结合了起来。
11.总结
本文的目标是想你提供使用Java线程进行并发程序设计的基础知识,以使你理解:
- 可以运行多个独立的任务。
- 必须考虑当这些任务关闭时,可能出现的所有问题。
- 任务可能会在共享资源上彼此干涉。互斥(锁)是用来防止这种冲突的基本工具。
- 如果任务设计得不够仔细,就有可能会死锁。
明白什么时候应该使用并发、什么时候应该避免使用并发是非常关键的。使用它的主要原因是:
- 要处理很多任务,它们交织在一起,应用并发能够更有效地使用计算机(包括在多个CPI上透明地分配任务的能力)。
- 要能够更好地阻止代码。
- 要更便于用户使用。
均衡资源的经典案例是在等待输入/输出时使用CPU,更好的代码阻止可以在仿真中看到,使用户方便的经典案例是在长时间的下载过程中监视“停止”按钮是否被按下。
线程的一个额外好处是它们提供了轻量级的执行上下文切换(大约100条指令),而不是重量级的进程上下文切换(要上千条指令)。因为一个给定进程内的所有线程共享相同的内存空间,轻量级的上下文切换只是改变了程序的执行序列和局部变量。进程切换(重量级的上下文切换)必须改变所有内存空间。
多线程的主要缺陷有:
- 等待共享资源的时候性能降低。
- 需要处理线程的额外CPU花费。
- 糟糕的程序设计导致不必要的复杂度。
- 有可能产生一些病态行为,如饿死、竞争、死锁和活锁(多个运行各自任务的线程使得整体无法完成)。
- 不同平台导致的不一致性。比如,我在编写文中的一些例子时发现,竞争条件在某些机器上很快出现,但在别的机器上根本不出现。如果你在后一种机器上做开发,那么当你发布程序的时候就要大吃一惊了。
因为多个线程可能共享一个资源,比如一个对象的内存,而且你必须确定多个线程不会同时读取和改变这个资源,这就是线程产生的最大难题。这需要明智地使用可用的加锁机制(例如synchronized关键字),它们仅仅是个工具,同时它们会引入潜在的死锁条件,所以要对它们有透彻的理解。
此外,线程应用上也有一些技巧。Java允许你建立足够多的对象来解决你的问题,至少理论上是如此。(实际上并非如此,比如,为工程商的有限元素分析而创建几百万个对象在Java中如果不适用享元设计模式,是并不可行。)然而,你要创建的线程数目看起来还有有个上界,因为达到了一定数量之后,线程性能会很差。这个临界点很难检测,通过依赖于操作系统和JVM,它可以是不足一百个线程,也可能是几千个线程。不过通常我们只是创建少数县城来解决问题,所以这个限制并不严重。尽管对于更一般的设计来说,这可能会是一个约束,它可能会强制要求你添加一种协作并发模式。
不管在使用某种特定的语言或类库时,线程机制看起来是多么地简单,你都应该视其为魔法。总有一些你最不想碰见的事物会反噬你一口。哲学家用餐问题之所有有趣,就是因为它可以进行调整,使得死锁极少发生,这给了你一个印象:每件事物都很美好。
通常,使用线程机制需要非常仔细和保守。如果你的线程问题变得大而复杂,那么就应该考虑使用像Erlang这样的语言,这是专门用于线程机制的几种函数型语言之一。你可以将这种语言用于程序中要求使用线程机制的部分,前提是你精要要使用线程机制,或者线程问题的复杂度足以促使你这么做。
所有源码均可在https://gitee.com/zjwave/thinkinjava中下载
关联文章:
Thinking in Java——Java异常体系(通过异常处理错误)
Thinking in Java——String及相关类库的使用
Thinking in Java——运行时类型信息(RTTI)以及反射
转载请注明原文链接:ZJ-Wave
ZJWave
引用来自于 的内容:
应该是重新刷新了页面回复 @ :回复 @ :是的,文章太长滚动到上次浏览位置可能稍微慢了点= =
匿名用户
引用来自于 的内容:
您好 写完评论后,整个页面的滚动条会 先从头滚到末尾处。。应该是重新刷新了页面回复 @ :
匿名用户
支持up
匿名用户
您好 写完评论后,整个页面的滚动条会 先从头滚到末尾处。。
匿名用户
很多好的文章
匿名用户
收藏